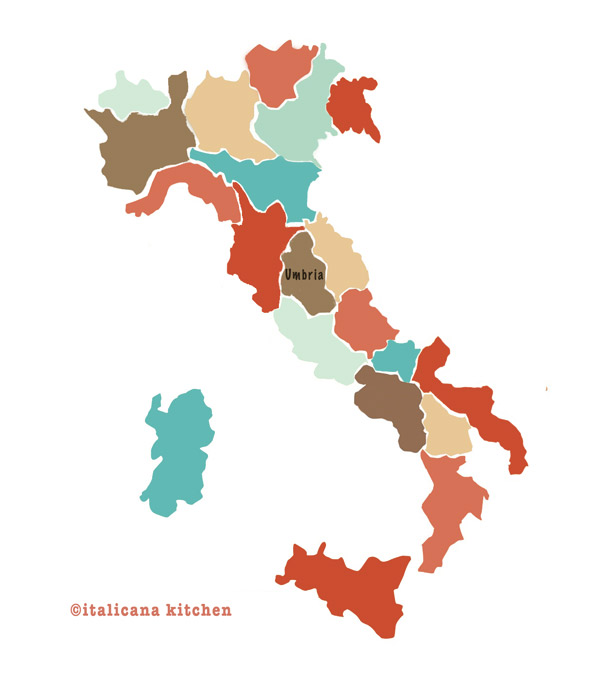
Don’t get me wrong, Rome, Florence and Venice are three cities not to be missed on a first time trip :: viaggio to Italy. Yet, for returning tourists or nature lovers, I recommend a peaceful getaway to the region of Umbria, nicknamed the “green heart of Italy” for it’s rich vegetation.
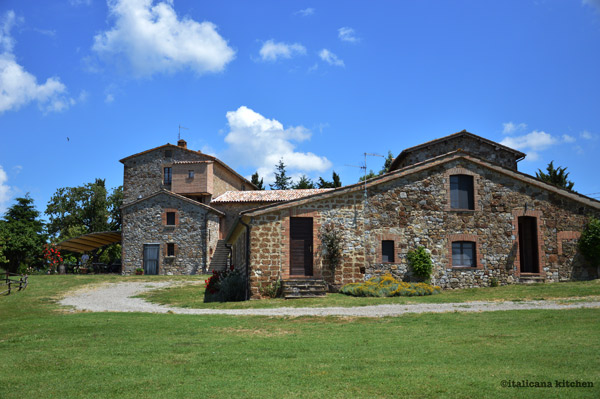
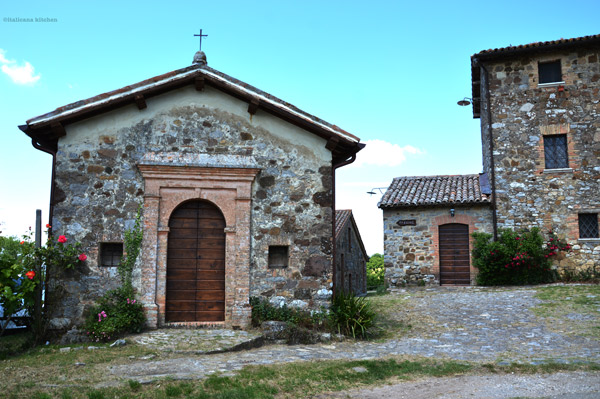
Umbria’s landscape consists of endless rolling hills, forests, meadows, valleys and vineyards stretching as far as the eye can see with castles, borghi and medieval farm houses scattered along the way. Many of these farm houses and stables have been been restored and converted into “agriturismi” or farm vacations. Mr. Italicano and I had the opportunity to spend a relaxing weekend at the lovely Agriturismo L’Elmo which is found in the peaceful countryside only 15 miles from the medieval town of Orvieto.
Like everything in Italy, it all starts with a story. In 1788 the farm, stables and servant houses for the prince of the area was built using local materials like stones, sand, and oak trees. The property belonged to the Ruspoli family until the late 1970’s when the Agneni family acquired it, introducing the cultivation of organic hazelnuts ::noccioli bio. Mr. Italicano and I had never seen hazelnut trees up close before. Come to find out, prestige truffles spontaneously grow near the trunks of the trees which are often used in the agriturismo’s dinner menus. Yes, please!
Throughout the years the farmhouse and stable :: stalla were restored and created into an agriturismo which opened its doors in 2000. The rustic quaint room that we stayed was absolutely delightful. Country sleeping is so peaceful. There was no noise of cars passing by, just the nighttime sounds through the open window: the chirping of the crickets and rustle of the wind through the nearby trees that rocked us to sleep.
I had strolled around the agriturismo, but hadn’t appreciated the well maintained gardens until Marina gave me a private tour of her family property pointing out the various plants, flowers, trees and shrubs ::cespugli. When we stayed, there still wasn’t any fruit so I hadn’t realized that many of the trees were fruit trees like kiwis, cherries and walnuts or that the shrub I had passed was really a laurel where she got her bay leafs for cooking. And, how did I not see the large lavender plants that lined the walkway? There was so much for me to discover thanks to Marina.
Shortly after, Marina showed me her large organic vegetable garden :: orto bio where in the summer she grows over seven varieties of tomatoes, various types of salads, celery, peppers, artichokes and cucumbers, just to name a few. In the winter, you’ll find broccoli Romanesco, brussel sprouts, cime di rapa and other winter vegetables. Breakfast and dinners are prepared by Marina ultilizing these organic fruit and vegetables, as well as sheep and chickens raised on the farm. You’ll also find organic products produced by Argriturismo L’Elmo, like extra virgin olive oil, hazelnut spreads and jams. If you are looking for a true farm to table experience, this is the place to go.
As for activities, you can head to nearby wineries for local wine tastings :: degustazioni di vini, make the short drive to see the beautiful town of Orvieto where there is a remarkable cathedral or simply relax poolside at the agriturismo with a good book and a glass of white wine. The views are breathtaking.
Or, if you want to do something more active, how about a guided horseback ride through the beautiful countryside? There is a stable with a variety of trained horses for beginners and experts. Mr. Italicano and I are taking horseback riding lessons in a closed ring near where we live, but it was a whole other experience to trot through the open field and dirt trails :: sentieri di terra.
We couldn’t have asked for a more relaxing weekend. If you are looking for a place to unwind and to enjoy the nature, homemade food and incredible views, I would highly suggest booking a stay at the Argiturismo L’Elmo.
Simplicity lies in gathering with gratitude the scents and flavors that the ingredient gives us in its natural form. I think about this phrase when I develop my recipes. I try to create simple dishes that allows you to savor the single ingredients in their purity, letting their flavors guide your memory to the past and to their place of origin.
Sometimes I forget that I live in Italy, a country with such incredible origins. How much history is in every grain of dirt as I walk across the lawn towards the vegetable garden? How many words were spoken throughout the centuries under the archways where I walk to get a café macchiato with my girlfriends?
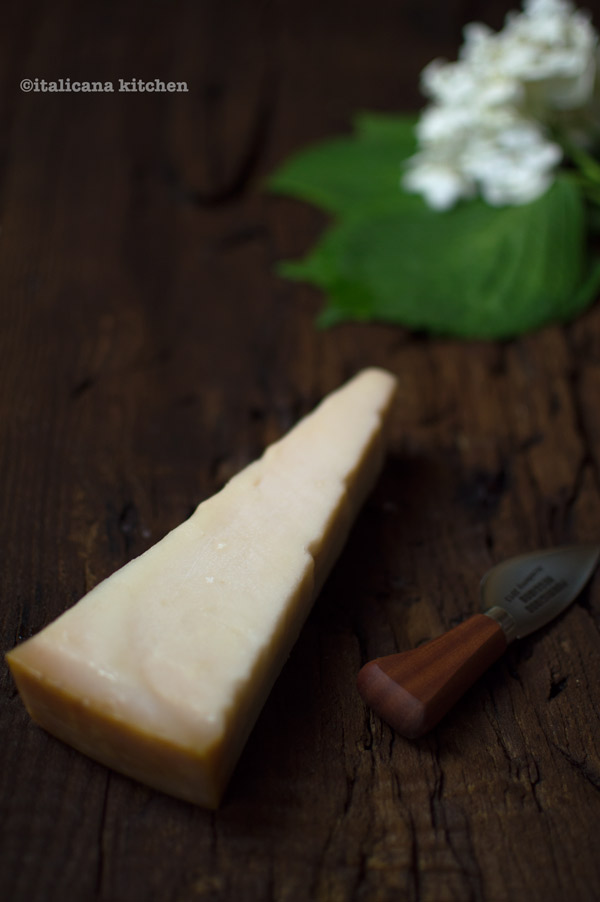
In Italy, everything has a history…especially food. Throughout these seven years that I have lived here, I have learned just how much good food is rooted in the minds of Italians, as daily nourishment and as a cure for illness. For instance, often times the first baby food for Italian children has grated Parmigiano Reggiano mixed into it. And, here in the region of Emilia where I live, when someone is sick they eat “risotto in bianco”, or “white rice” with Parmigiano Reggiano and extra virgin olive oil.
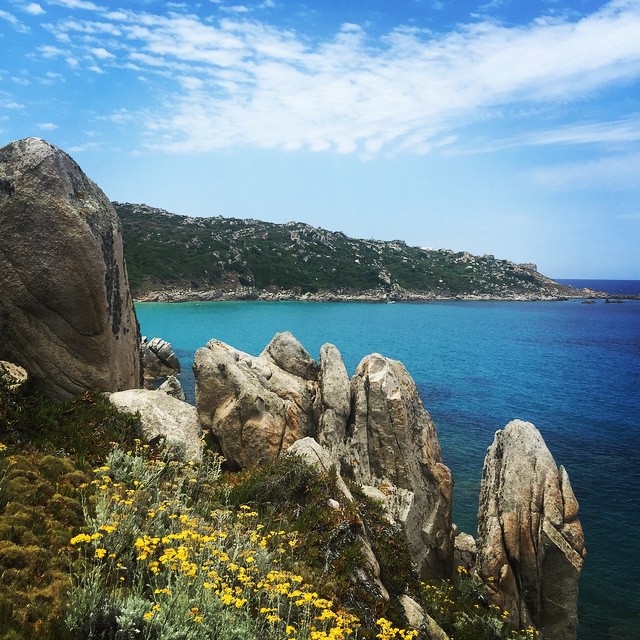
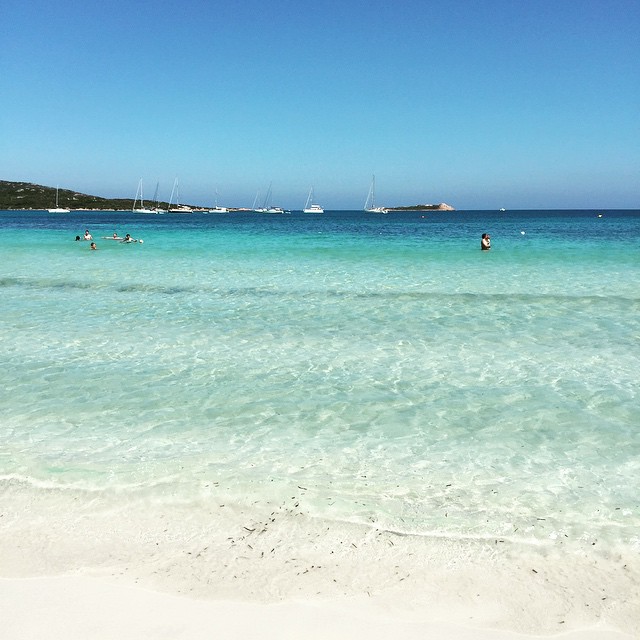
Mr. Italicano and I were recently in Sardegna, an island off the west coast of Italy. Sun. Beaches. Wine. Seafood. Relax. It was the first time in months where we actually unplugged from our busy schedules. It felt so good to take things slow :: piano, unwind and detach from the online world. Well…almost. I couldn’t help resist posting some photos of Sardegna, it’s just too beautiful not to share!
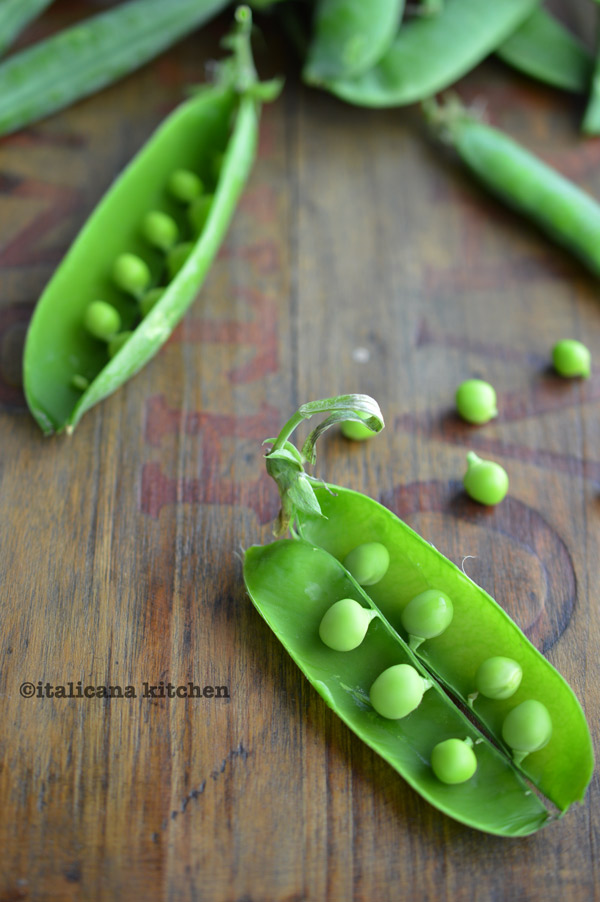
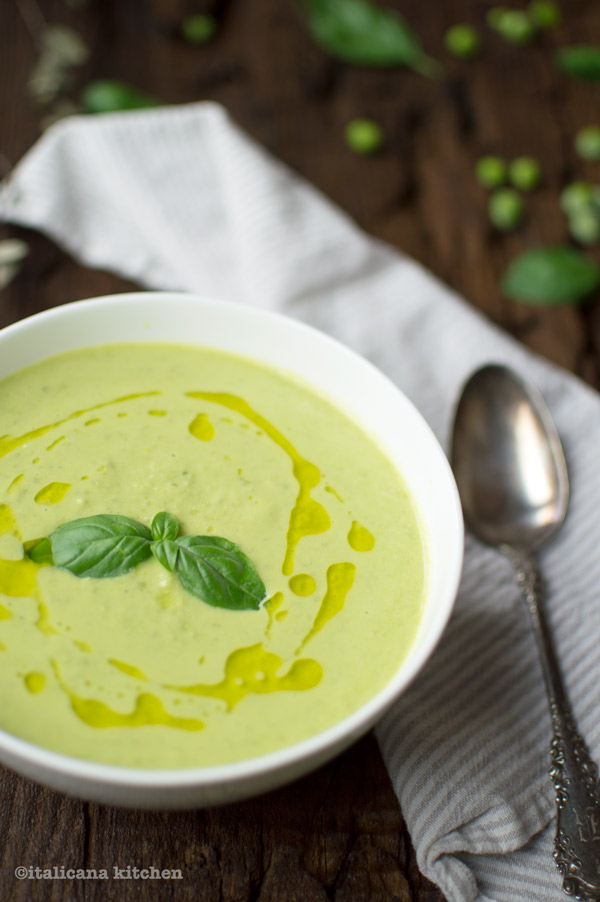
Now we’re back in Correggio, Emilia-Romagna and are melting in the humid heat. These hot days kill any ambition that I have to cook things on the stove, let alone bake. Thanks to the tormenting tiger mosquitos outside I’m not too big on grilling either. Therefore, I look for recipes that I can make quickly and that will yield a large batch so we can eat leftovers for a few days and I can stay out of the hot kitchen. My go-to summer meals are quinoa salads (constantly substituting in season vegetables) or soups that are delicious when eaten cold, like this delicious pea and basil soup. Depending on where you live, you still may be able to find fresh peas in the market or garden; otherwise, frozen ::surgelati peas work just dandy as well. (I usually buy a lot of fresh peas when they are in season and then store them in the freezer to use in the following months.)
Even though it’s hot and humid :: umido and I don’t have much desire to cook, I have been recipe testing like crazy for my upcoming cooking show events (July 9th, 16th and 23rd) that will take place at the new Smeg store in Milan! I’ve created a number of delicious new recipes based on different themes using Smeg’s new 50’s style kitchen line of small appliances (stand mixer, toaster, blender and kettle). You can check out more details about my July events here on this website. I hope to see you there in person!
Note for all email subscribers: I haven’t disappeared! This week I realized that there was a technical problem with my recipes being delivered by email. I don’t want to fill your inboxes with the 12 recipes since then, so go directly to my blog if you are looking for more yummy recipes!
Raise your hand if you don't like to cook when it's hot. Okay, then this recipe is for you. A great soup to be eaten cold during these hot summer evenings.
Bring the water to boil in a medium sized soup pot. Add the carrots, celery, onion and garlic. Boil for 10-45 minutes depending on how much of a hurry you are in. The more you let the broth boil, the more flavorful it will be, although I’ve also let it boil for just 10 minutes and it works just fine.
In the meantime, heat the extra virgin olive oil in a large skillet and add the onions. Cook over medium heat until they are soft, about 5 minutes, stirring often. Add the peas and one ladle of the broth that you are preparing.
Toast the bread in a toaster and whiz the slices into breadcrumbs using a blender until coarsely ground. Put the breadcrumbs in a medium sized skillet, add a swirl of extra virgin olive oil and the fresh herbs. Toast for 3-4 minutes until golden and slightly crunchy.
Filter the broth with a fine mesh strainer and return the liquid to the soup pot. Pour in the pea and onion mixture and bring to a simmer for 10 minutes. Let cool, then whiz in a blender. This soup is fantastic cold or reheated. Serve with a swirl of extra virgin olive oil and the herb breadcrumbs.
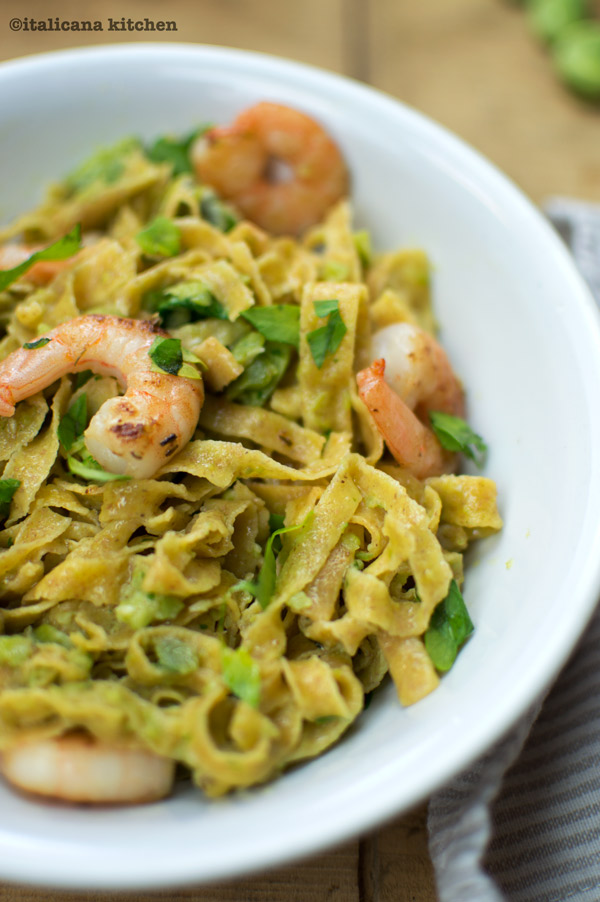
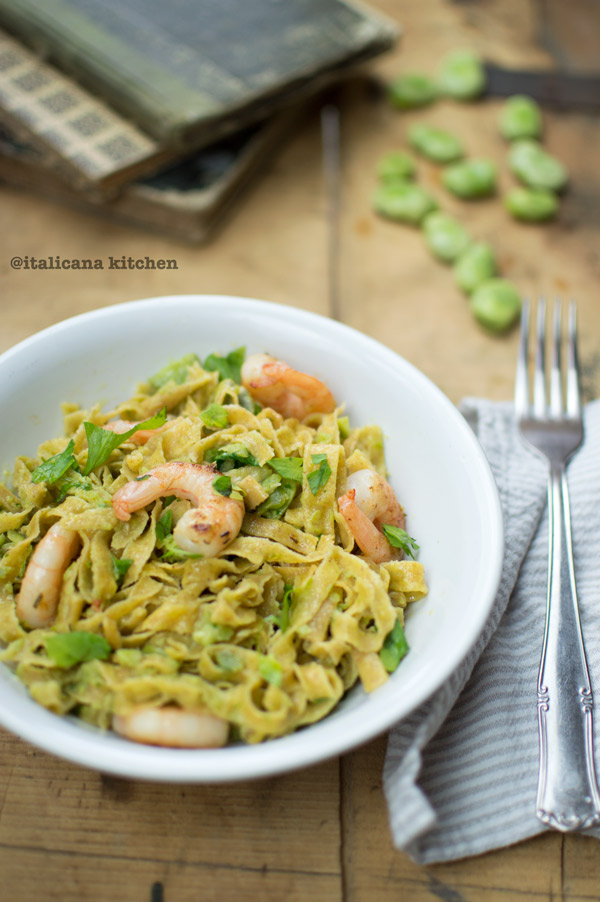
Fava beans, or broad beans, are in season :: in stagione in Italy, and I just can’t get enough of them! You can add them to vegetable stews like this Scafata recipe, you can puree the heck out of them to make a delicious fava bean and avocado dip or you can give them a short twirl in the blender and create a healthy chunky pesto that you can eat with crackers, toss it into a pasta dish or do like Mr. Italicano and gobble down spoonfuls straight from the jar.
In some recipes I keep the fava bean skins :: le bucce on to add texture, in this recipe I shucked them so that the creaminess of the fava beans had a moment in the spotlight. Oh, boy did they shine. Straight out of Mr. Italicano’s mouth came the words, “This is so f$&*@!*$ buona.” This time, I didn’t scold him for cursing and instead beamed him a smile, happy to receive his mixed Italian/English compliment.
Homemade pasta is really easy to make, especially if you have a stand mixer :: un’impastatrice. It may seem daunting or difficult, but it’s not. It takes just a few minutes in the stand mixer, 1/2 hour rest time in the fridge and 15 minutes to roll it out and cut the desired shape. Unlike dried pastas where the cooking time is often from 10-18 minutes, fresh pastas only need a few minutes in a pot of boiling salty water. It’s probably quicker to make your own at home than battle the traffic and check out counter lines to buy a bag of dried pasta and a sauce filled with preservatives. Bam. You can impress someone with homemade fresh pasta and a delicious healthy pesto even on a weeknight.
(For those of you who simply can’t be bothered to make the pasta, use the store bought kind, but at least try making the fava bean pesto below…trust me, it’s dynamite! You can also easily make this into a vegetarian pasta dish by omitting the shrimp.)
Impress someone with this delicious homemade farro tagliatelle pasta and fava bean pesto. They'll think you are Italian!
Serves: 4-5
Ingredients
For the Farro Tagliatelle:
1¾ cups (210g) whole grain farro
½ cup + 2 tablespoons (90g) durum wheat semolina
3 large eggs (2.2-2.4 ounces each)
2 pinches unrefined salt
1 tablespoon extra virgin olive oil
For the Fava Bean Pesto:
14 oz (400g) fava beans
1 garlic clove, minced
1 handful parsley
½ cup Parmigiano Reggiano
A few dashes of sweet paprika
Salt and black pepper, to taste
Extra virgin olive oil, as needed
For the shrimp:
20 shrimp or prawns
A few dashes of sweet paprika
2 tablespoons of dry white wine
1 tablespoon of extra virgin olive oil
Instructions
For detailed instructions on how to make homemade pasta with photos, check out this post. Attach the dough hook to the stand mixer and add the flours, eggs, salt and extra virgin olive oil. Mix on speed 1 for a few minutes, adding a tablespoon of water at a time, if needed, until it comes together in a ball. Stop the mixer and push against the dough with your finger. If it leaves an imprint (like a ripe peach) and doesn’t stick to your finger, it’s ready. If the dough, however, is sticky turn the stand mixer back on and gradually add a little more flour, stopping every so often to check the consistency until it no longer sticks to your finger.
If don’t have a stand mixer, follow the same procedure but knead by hand until the dough is homogenous, leaves an imprint when poked and isn’t sticky.
Divide the dough into two balls and wrap each one individually with some plastic wrap; place in the refrigerator for 30 minutes.
In the meantime, make the fava bean pesto.
Bring a medium pot of water to boil, add the fava beans and cook them for a few minutes. Run them under cold water and shuck their outer skin. Put the inside bean in a blender or food processor. Add the garlic, parsley, Parmigiano Reggiano, paprika, salt, pepper and a few spoonfuls of extra virgin olive oil. Blend everything together, adding in more olive oil until it because a think chunky sauce.
Attach the pasta roller accessory and sprinkle some flour on top. Divide each ball into two pieces (four pieces total), shape them into flat rectangles and flour generously on top and bottom. Pass one of the pieces through the machine on speed 1. Fold it back over on itself, and pass it through again. Repeat one more time before moving on to the next level of thickness. Pass the dough several times reducing the thickness from no. 0 to 5.
Generously flour a large wooden board and lay the pasta sheets on top as you roll them out.
If you are rolling out the dough with a rolling pin, it will be easier to divide the dough into two pieces and roll each one out on a generously floured wooden board. The dough should be rolled out thin enough that when you hold the dough up against a light you can see the light almost pass through.
Roll each side of the pasta sheet towards the center. Even off the ends with a knife but don’t throw away these scraps, you can stick them in the middle of the little pasta nests.
Use the stand mixer tagliatelle pasta device to cut them to the right size (or another shape of pasta). If you don’t have the pasta device, slice the noodles so that they are about ¼ inch.
Lay out the pasta ribbons on a generously floured board. Take a small handful in one hand and roll them around your fingers as if you were rolling up a cord.
When all of the pasta has been loosely wrapped around your fingers, gently set it down on the floured board. These little clusters of pasta are called “nidi” in Italian, or “nests”, since they resemble bird nests. Repeat with the remaining dough.
Bring a medium pot of water to boil; add course salt then dump the tagliatelle inside. Cook for 2-3 minutes then check one to see if one is ready. The pasta should be “al dente” or slightly firm. If it is not ready, continue to cook for 1 minute and check again.
In a medium skilled at the extra virgin olive oil, white wine, shrimp and a few dashes of sweet paprika. Cook for 3-4 minutes over medium high heat or until the shrimp are no longer transparent. Remove the skillet from the heat.
Drain the pasta reserving a cupful of the water. Add the pasta to the shrimp along with the fava bean pesto. Stir well, adding a few spoonfuls of cooking water if needed to thin the sauce.
Conservation:
The uncooked tagliatelle can be stored in the refrigerator for 1 day max, or you can freeze them. The best way to store them in the freezer is to put them on a cookie sheet so that they are not touching. Tuck them in the freezer until frozen, otherwise they will stick together, then you can place them in plastic bags, one on top of the other and take out the quantity you want as needed.
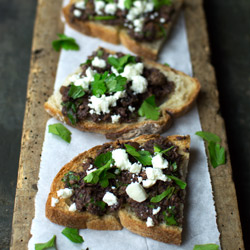
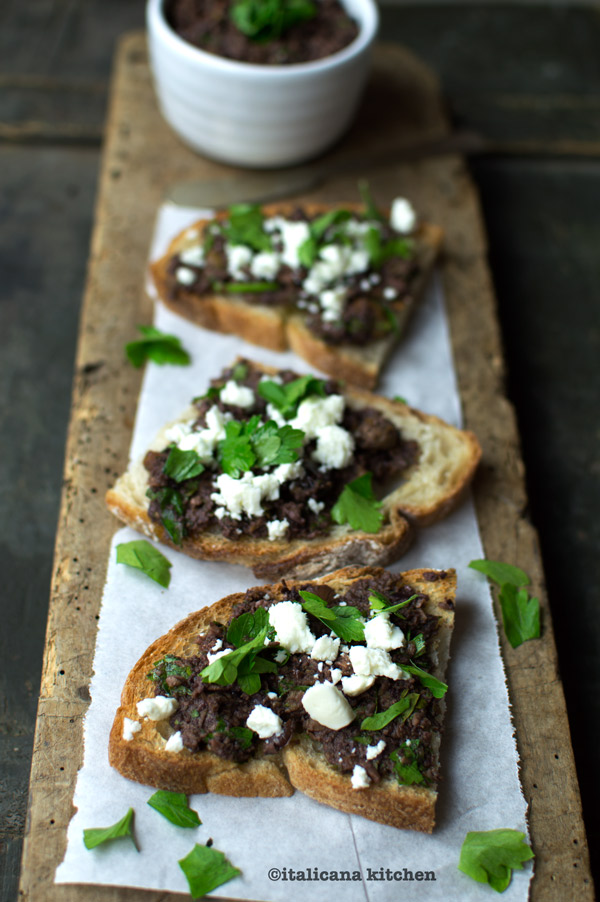
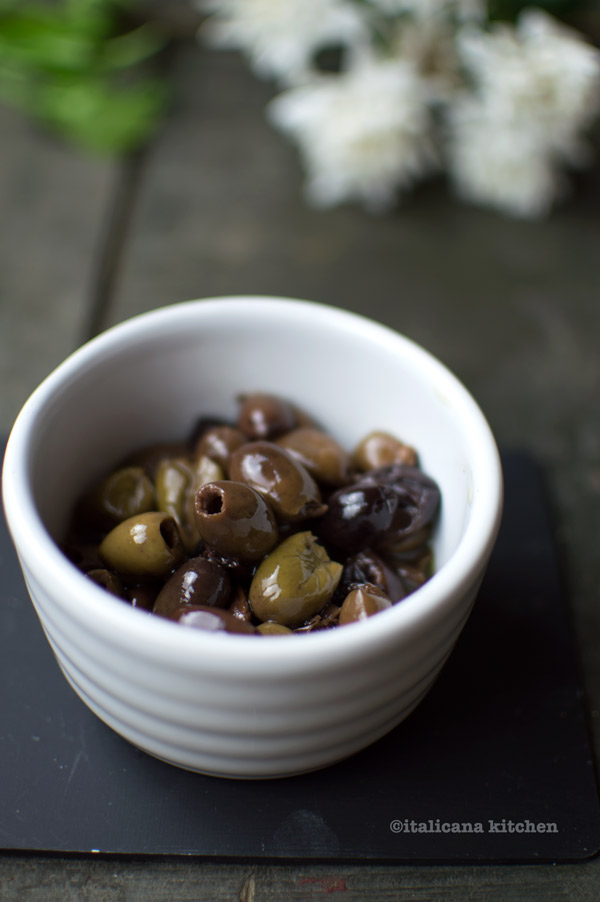
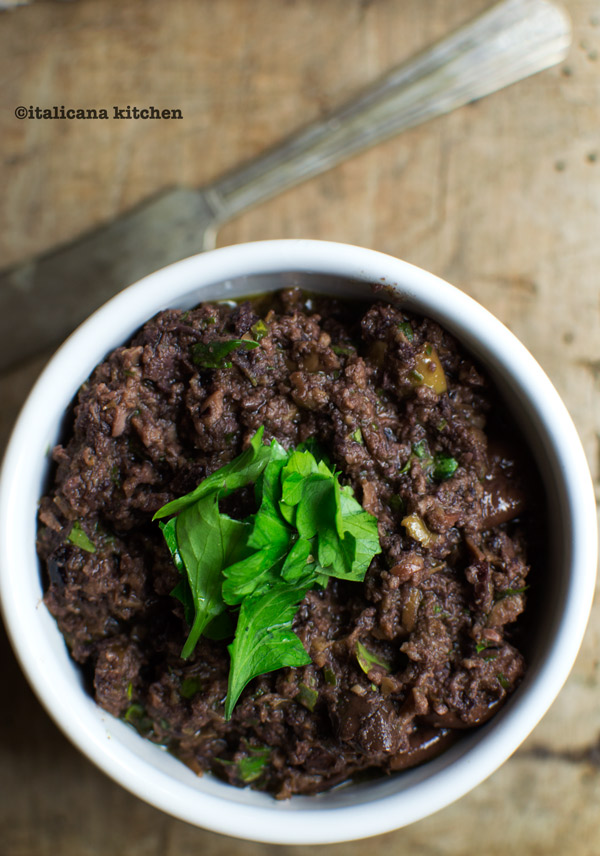
You might be wondering what that weird foreign word is in the title. It’s the variety of one of my favorite Italian olives and is pronounced taj-jas-kay. These small greenish-purplish-brownish olives are cultivated on the rocky mountain slopes ::pendenze of the Italian Riviera in Liguria.
Taggiasche olives have a meaty texture and a slightly tart salty flavor. They are perfect ground up in this pesto or just plopped into various salads or entrees, especially with white fish like rockfish :: loscorfano.
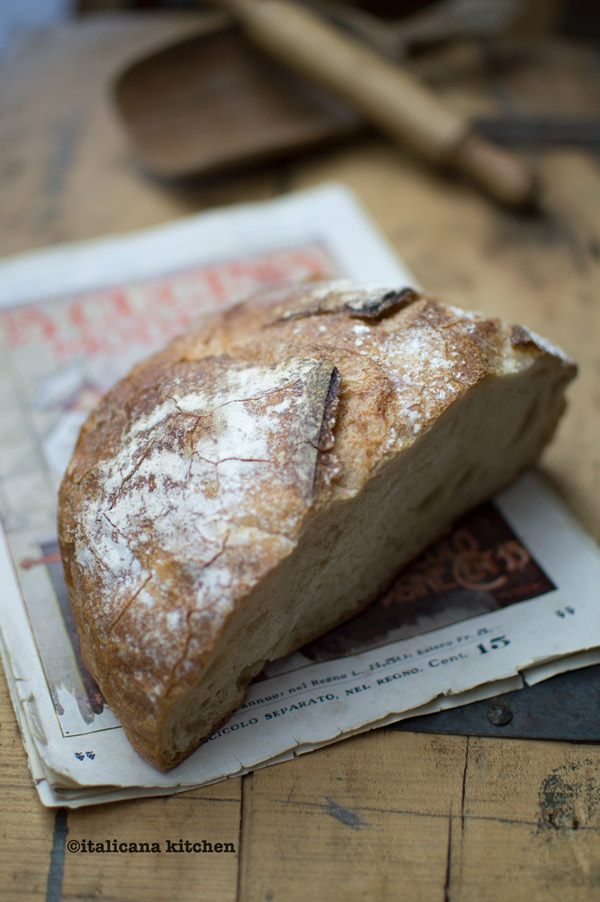
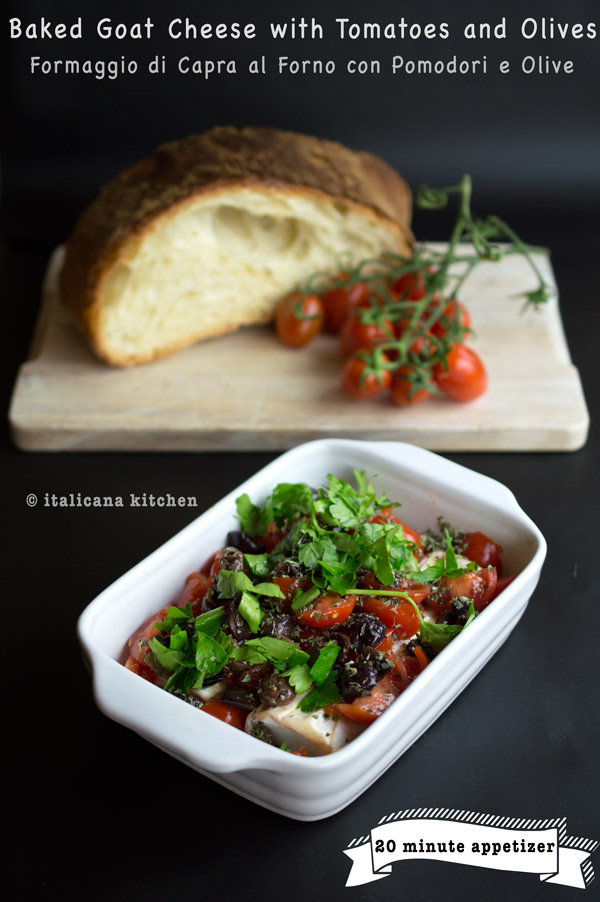
If there is one thing I beg of you, it’s to use a good rustic bread, not the store bought sliced kind. Mr. Italicano and I shot a video this weekend at our favorite bakery :: forno, Forno di Mario, located in Correggio. The video will be coming soon but in the meantime we took home a loaf of miracle bread made with natural yeast and antique grains. This bread was perfect for a light and crunchy bruschetta.
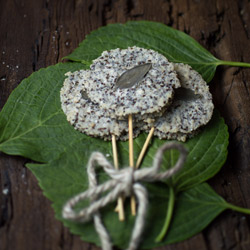
This appetizer :: antipasto is perfect for last minute guests as you can whip it together in just 5 minutes. It helps to have a jar of good quality taggiasche olives in the cupboard for occasions like this.
This appetizer is perfect for last minute guests as you can whip it together in just 5 minutes.
Serves: 10-12 bruschette
Ingredients
6 tablespoons of extra virgin olive oil
12 ounces (340g) taggiasche olives, drained
2 tablespoons lemon juice (about half a lemon)
1 clove garlic, minced
1 cup (10g) loosely packed Italian flat leaf parsley
1 loaf of rustic bread, sliced
Crumbled feta, as needed
Instructions
Put the oil, olives, lemon juice, garlic, capers and parsley in a food processor or blender and mix until slightly chunky. Add more extra virgin olive oil if needed to arrive at the desired consistency.
Serve with toasted bread, some crumbled feta and parsley.
3.2.2925
Here’s some other great recipe to try with taggiasche olives:
 Umbria’s landscape consists of endless rolling hills, forests, meadows, valleys and vineyards stretching as far as the eye can see with castles, borghi and medieval farm houses scattered along the way. Many of these farm houses and stables have been been restored and converted into “agriturismi” or farm vacations. Mr. Italicano and I had the opportunity to spend a relaxing weekend at the lovely Agriturismo L’Elmo which is found in the peaceful countryside only 15 miles from the medieval town of Orvieto.
 Like everything in Italy, it all starts with a story. In 1788 the farm, stables and servant houses for the prince of the area was built using local materials like stones, sand, and oak trees. The property belonged to the Ruspoli family until the late 1970’s when the Agneni family acquired it, introducing the cultivation of organic hazelnuts :: noccioli bio. Mr. Italicano and I had never seen hazelnut trees up close before. Come to find out, prestige truffles spontaneously grow near the trunks of the trees which are often used in the agriturismo’s dinner menus. Yes, please!
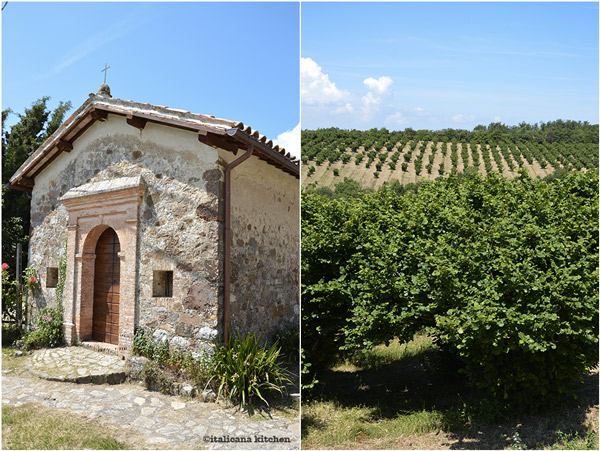 Throughout the years the farmhouse and stable :: stalla were restored and created into an agriturismo which opened its doors in 2000. The rustic quaint room that we stayed was absolutely delightful. Country sleeping is so peaceful. There was no noise of cars passing by, just the nighttime sounds through the open window: the chirping of the crickets and rustle of the wind through the nearby trees that rocked us to sleep.
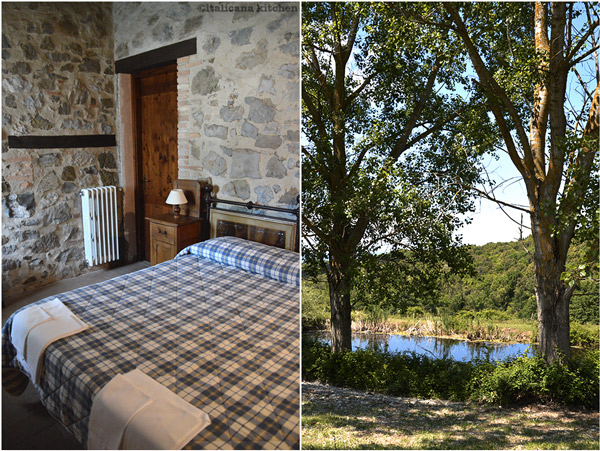 I had strolled around the agriturismo, but hadn’t appreciated the well maintained gardens until Marina gave me a private tour of her family property pointing out the various plants, flowers, trees and shrubs :: cespugli. When we stayed, there still wasn’t any fruit so I hadn’t realized that many of the trees were fruit trees like kiwis, cherries and walnuts or that the shrub I had passed was really a laurel where she got her bay leafs for cooking. And, how did I not see the large lavender plants that lined the walkway? There was so much for me to discover thanks to Marina.
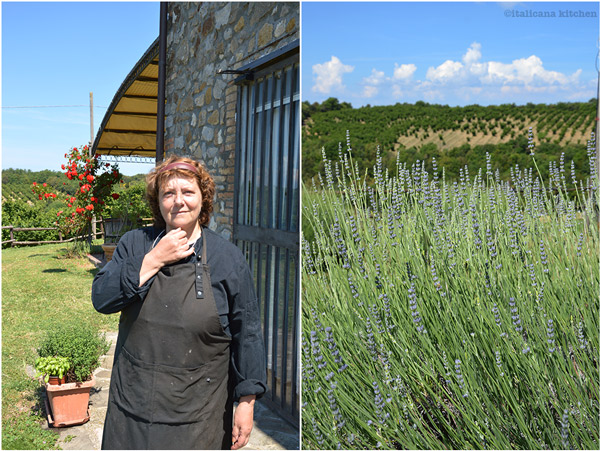 Shortly after, Marina showed me her large organic vegetable garden :: orto bio where in the summer she grows over seven varieties of tomatoes, various types of salads, celery, peppers, artichokes and cucumbers, just to name a few. In the winter, you’ll find broccoli Romanesco, brussel sprouts, cime di rapa and other winter vegetables. Breakfast and dinners are prepared by Marina ultilizing these organic fruit and vegetables, as well as sheep and chickens raised on the farm. You’ll also find organic products produced by Argriturismo L’Elmo, like extra virgin olive oil, hazelnut spreads and jams. If you are looking for a true farm to table experience, this is the place to go.
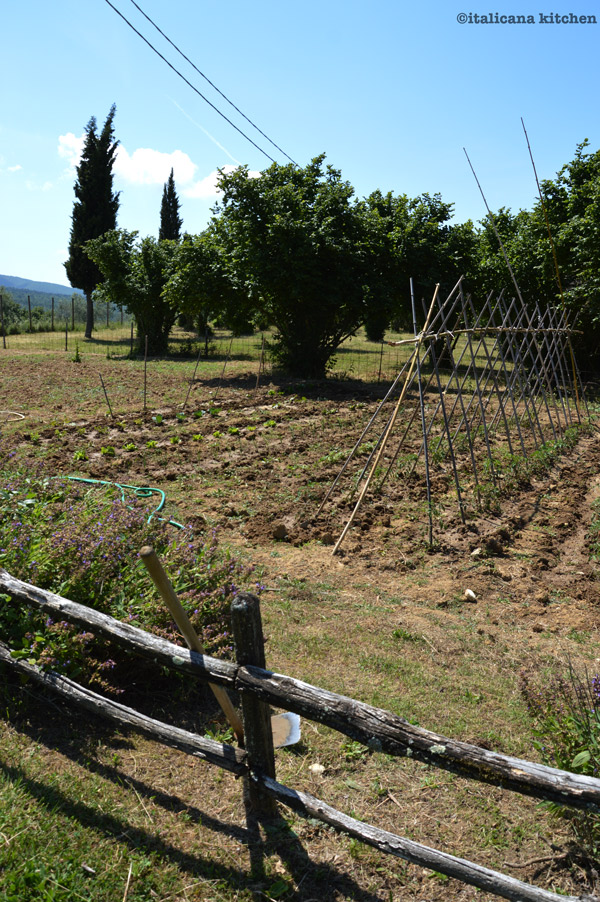 As for activities, you can head to nearby wineries for local wine tastings :: degustazioni di vini, make the short drive to see the beautiful town of Orvieto where there is a remarkable cathedral or simply relax poolside at the agriturismo with a good book and a glass of white wine. The views are breathtaking.
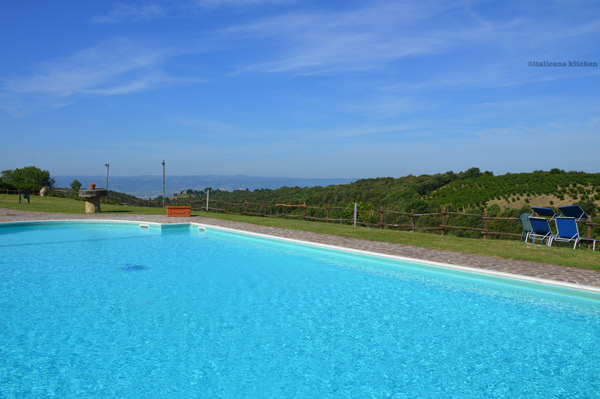 Or, if you want to do something more active, how about a guided horseback ride through the beautiful countryside? There is a stable with a variety of trained horses for beginners and experts. Mr. Italicano and I are taking horseback riding lessons in a closed ring near where we live, but it was a whole other experience to trot through the open field and dirt trails :: sentieri di terra.
 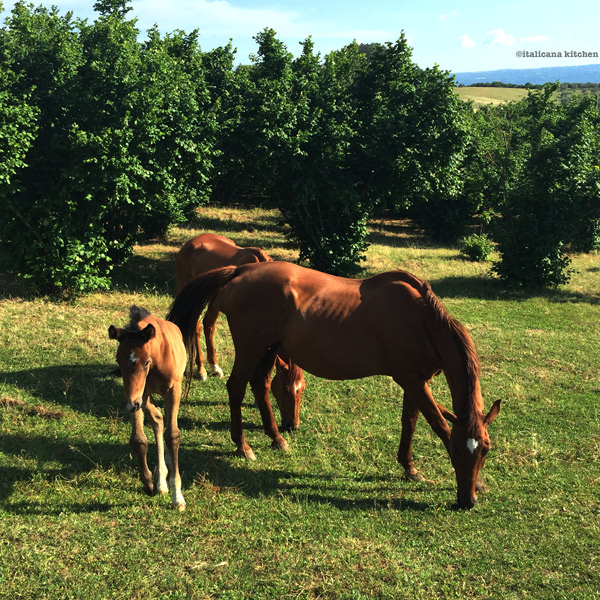 We couldn’t have asked for a more relaxing weekend. If you are looking for a place to unwind and to enjoy the nature, homemade food and incredible views, I would highly suggest booking a stay at the Argiturismo L’Elmo.