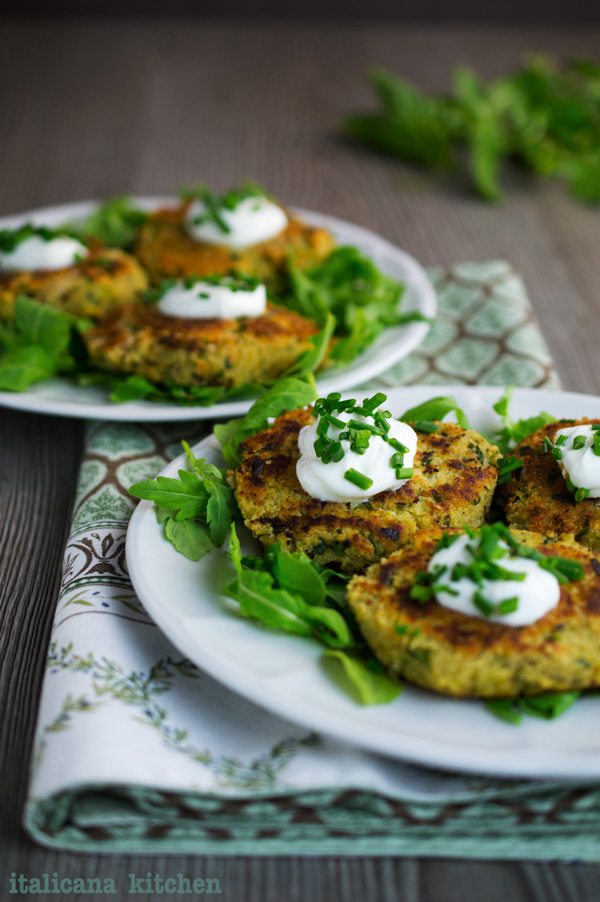
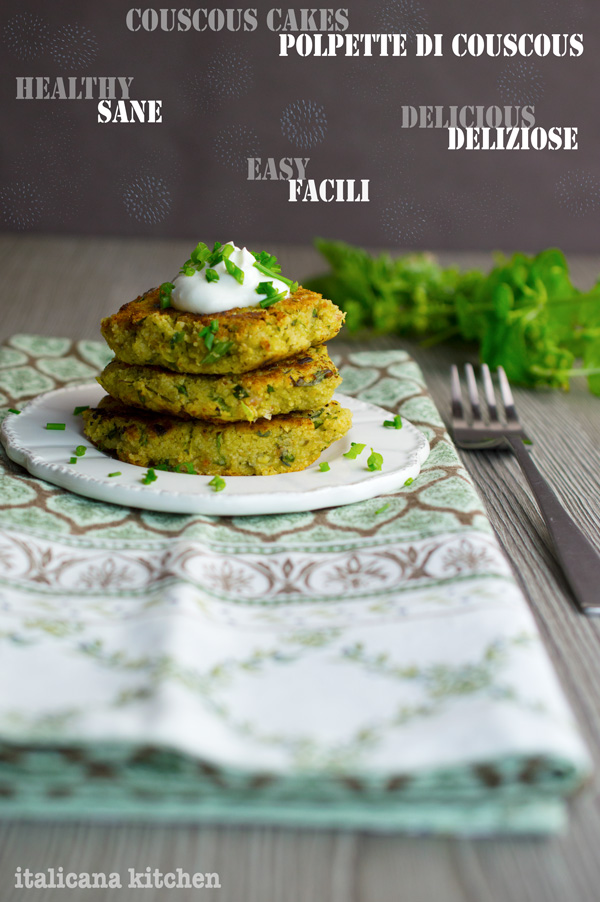
These couscous cakes are a busy person’s lifesaver. In under 20 minutes you can have an elegant, delicious and wholesome meal on the table. They are a great make-ahead dish and freeze fantastically. If you find yourself constantly on the go but want a healthy meal or snack, this is the perfect recipe for you!
I am on a mad dash to create fifteen 20 minute meals to present to the television producers ::produttori televisivi for when I will appear on Italy’s most famous national television cooking show, La Prova del Cuoco, this September. My first attempt was these couscous cakes, and, boy, were they a winner. Hopefully the judges will think so as well!
Buttery avocado and smooth cannellini are mashed together with crunchy bread crumbs :: pane grattugiato, aromatic basil, pungent chives and to add some heat, I’ve thrown in some finely diced hot peppers. Now toss in the cooked couscous to add texture and drizzle in some extra virgin olive oil and Organic Balsamic Vinegar of Modena from La Vecchia Dispensa. (One of my favorite balsamic vinegar producers.) Season with a pinch of sea salt and freshly ground black pepper before scooping up handfuls of the mixture to form 6 patties. Pour in a few spoonfuls of extra virgin olive oil in a skillet and set the couscous cakes con top and cook until the out layer turns a nice golden hue. If you prefer a lighter version, you can skip the oil and heat the couscous cakes directly on the pan, although they won’t brown as nicely.
Arrange the couscous cakes on a serving plate, or over arugula :: rucola that has been tossed with extra virgin olive oil and balsamic vinegar. Top each cake with a dollop of greek yogurt and scatter some chives over the creamy white mountain. If you want to impress your guests and have them drooling over your food, remember this gold rule: garnish, garnish, garnish. Just check out the difference it makes in the photo below!
Now comes the best part: devouring these little cakes. If any remain (which, I assure you will be unlikely) you can store them in the refrigerator; just reheat them for a few minutes or enjoy them cold. Double ::raddoppiate the batch and pop these couscous cakes in the freezer for a meal to have on hand for unexpected guests or an unexpected change in your lunch or evening plans.
These couscous cakes are a busy person’s lifesaver. In under 20 minutes you can have an elegant, delicious and wholesome meal on the table. They are a great make-ahead dish and freeze fantastically. If you find yourself constantly on the go but want a healthy meal or snack, this is the perfect recipe for you!
Serves: 6 cakes
Ingredients
¼ cup (48g) couscous
½ ripe avocado* (very important that it is mature)
½ cup canned cannellini beans (or other white bean), drained
¼ cup (33g) finely ground bread crumbs
⅓ cup (7g) loosely packed basil, finely chopped
2 tablespoons (10g) chives, finely chopped + more for garnish
Pinch of sea salt, freshly ground black pepper, as needed
Greek yogurt, as needed (optional)
Instructions
In a small bowl, combine the couscous with ¼ cup hot (but not boiling) water. Set aside.
In a medium bowl, mash the avocado and cannellini beans together then toss in the bread crumbs, basil, chives, hot pepper, balsamic vinegar, extra virgin olive oil, sea salt and black pepper. Stir in the couscous and form 6 patties with your hands.
Drizzle 1-2 tablespoons of extra virgin olive oil in a skillet. Set the patties on top and cook over medium heat for 3-5 minutes on each side or until the outer layer has a nice golden hue. Top with a dollop of greek yogurt and sprinkle chopped chives on top. Serve alone or with salad greens that have been tossed with extra virgin olive oil and balsamic vinegar.
3.4.3177
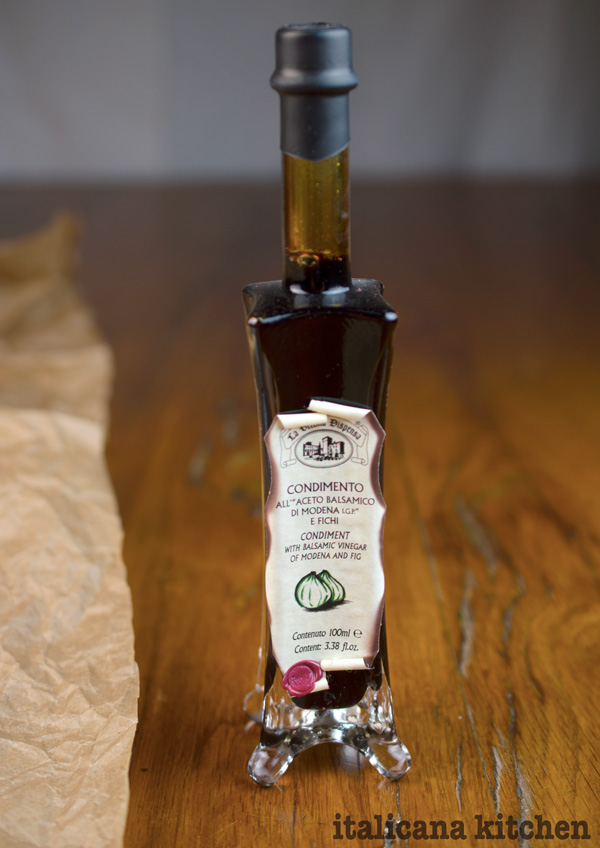
Note: This post is not paid by La Vecchia Dispensa. They were kind to send me some samples of their products; I only support the companies I believe in and the products I love and would use myself.
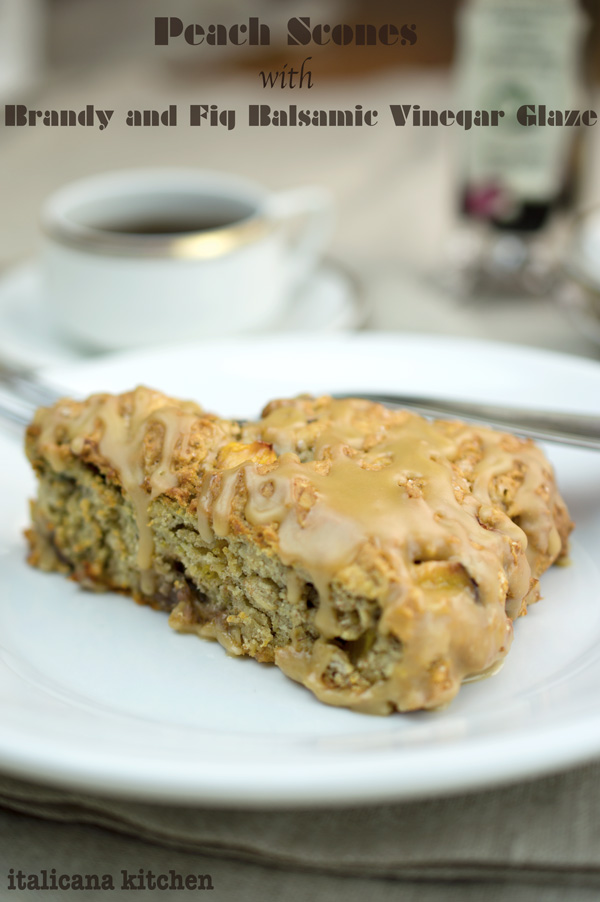
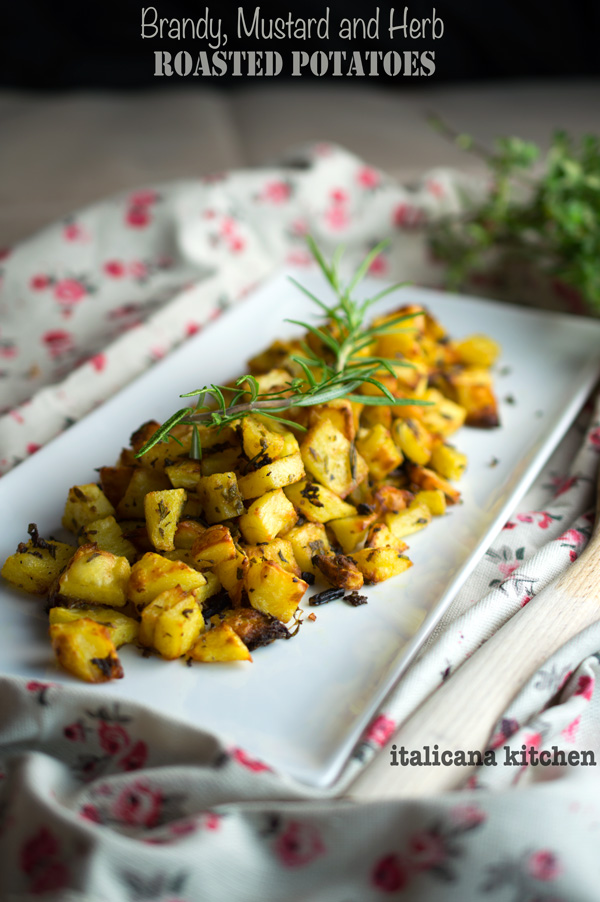
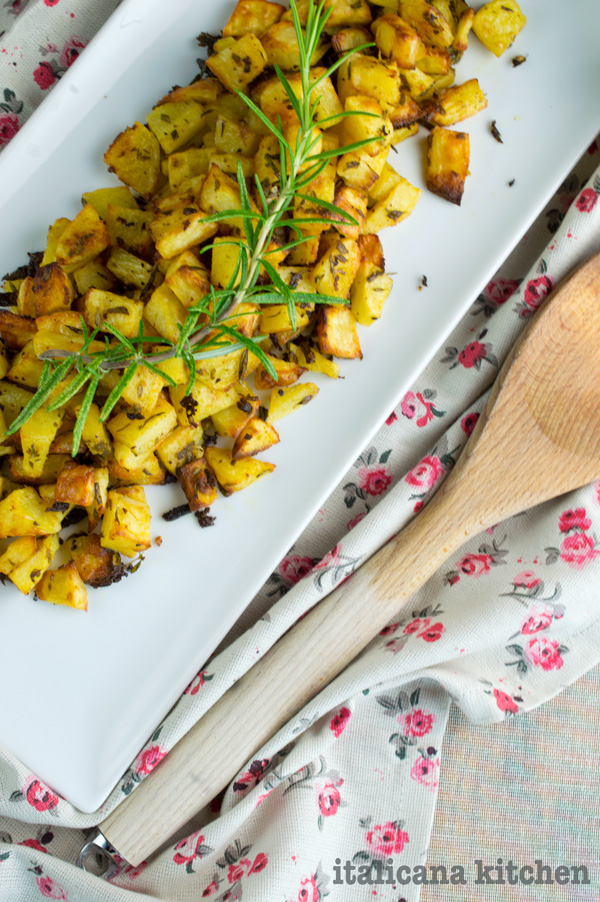
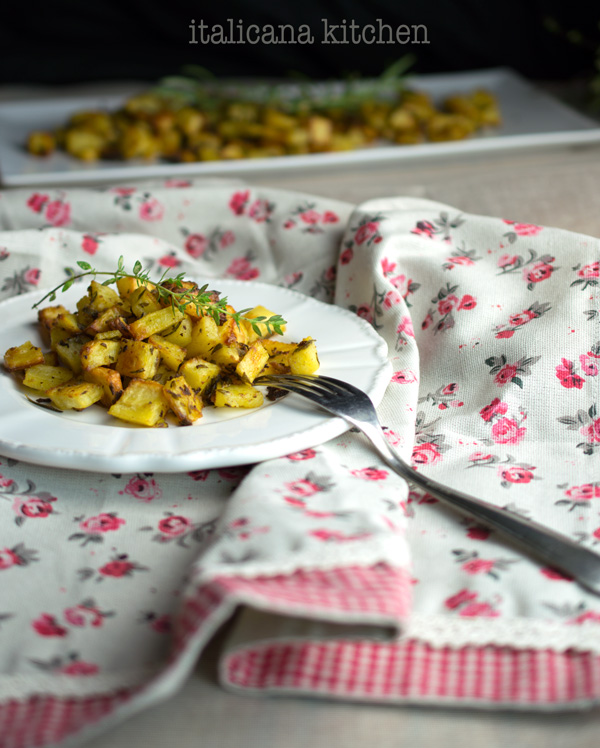
These brandy, mustard and herb roasted potatoes are rockin’. If you like flavorful food, you are going to love these potatoes that are bathed in a tangy brandy mustard :: senape then cooked until crisp and crunchy. There are no mushy pieces here. Bleekk. You may be a bit curious about the brandy flavor on potatoes, but I can ensure you that they are beyond awesome and give the dish an extra kick. I got inspired to douse these babies with brandy because the day before I made these to-die-for peach scones with brandy and fig balsamic vinegar glaze to celebrate some HUGE news!
If you’ve been on my social media pages in the last few days you’ve probably already seen the news :: la notizie. If you haven’t, here it is: I am going to be participating on Italy’s most famous cooking show, La Prova del Cuoco with Antonella Clerici!!! It’s an all-expenses paid trip to Rome for a week and we will be shooting 5 episodes live on Italian national T.V. from the 15th -19th of September. The program is on air from 12:00p.m.-1:25p.m., and is one of the most watched lunch time shows. Talk about some huge visibility for italicana kitchen. I’m sure it will be quite a riot to watch as well since I will be trying to: 1) speak well in Italian 2) cook something delish and 3) work on not cutting off the tips of my fingers on national T.V. More details to come in September about how you can watch it!
So, back to these darn tootin’ good potatoes. Really? Did I just write tootin? Coming from a gal that has been abroad for 6 years, that is such a strange word. Just saying. Anyhoo, Mr. Italicano devoured these. And…more importantly he said they were buonissime :: very good. If I get the approval from Mr. Italicano, it’s a good thing. He’s quite the food critique and has no problem giving it to me straight. I love that man. And, I love these roasted potatoes. I think you will too. The potatoes, of course. Have a great weekend everyone!
These brandy, mustard and herb roasted potatoes take normal roasted potatoes to a whole new level.
Serves: 2
Ingredients
2 large potatoes
2 tablespoons chopped fresh rosemary
1 tablespoon chopped fresh oregano
2 tablespoons chopped fresh sage
1 clove garlic, finely chopped
3 tablespoons extra virgin olive oil
2 tablespoons dijon mustard
1 tablespoon brandy
Sea salt and freshly ground pepper pepper
Instructions
Preheat the oven to 425°(218°). Line a baking sheet with parchment paper.
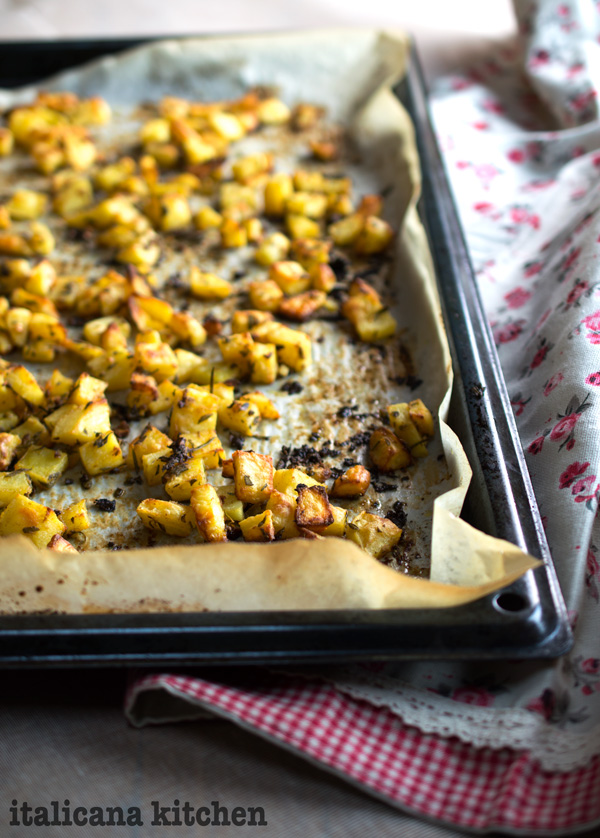
Peel the potatoes and dice them in cubes. The smaller you cut the crunchier they’ll be. I like them sugar cube size pieces, but each to his own.
Soak the chopped potatoes in a large bowlful of water. Change the water at least 2-3 times.
In a small bowl combine the rosemary, oregano, sage, garlic, extra virgin olive oil, dijon mustard, brandy, course salt and pepper.
Drain the potatoes and return them to the bowl. Pour the sauce of the potatoes and use your hands to cover them completely. Don’t be afraid to get them dirty.
Drop the potatoes by the handfuls on the baking sheet and spread them out so they are in a single layer. Use two baking sheets if needed.
Bake for 30-35 minutes turning the potatoes at least once. Serve warm.
*I forgot to add fresh thyme so you can throw a tablespoon or two in the sauce if you want to.
**If your potatoes haven’t turned a nice golden brown, turn on your broiler for a few minutes but be sure to watch them so they don't burn.
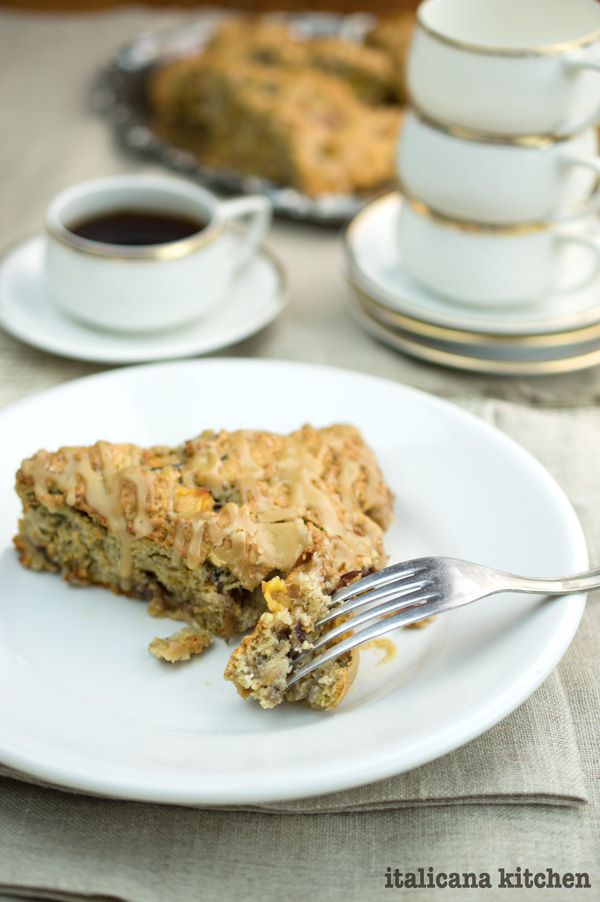
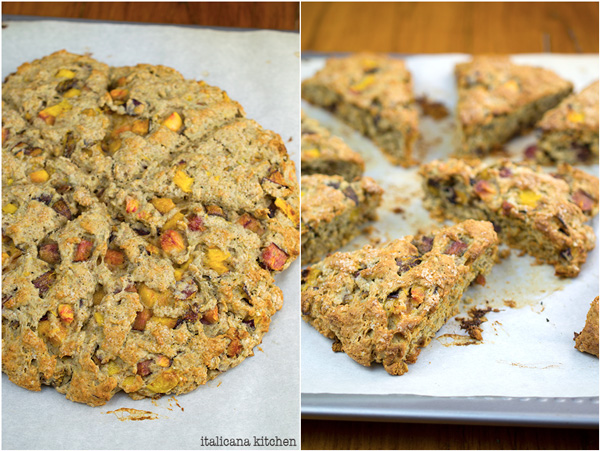
Italy is the land of croissants (after France, of course) or “brioche” as they call them in my region, and although they are beyond delicious sometimes a gal just needs a little variety. So, last weekend I attempted to make my first homemade scone, with a twist of course.
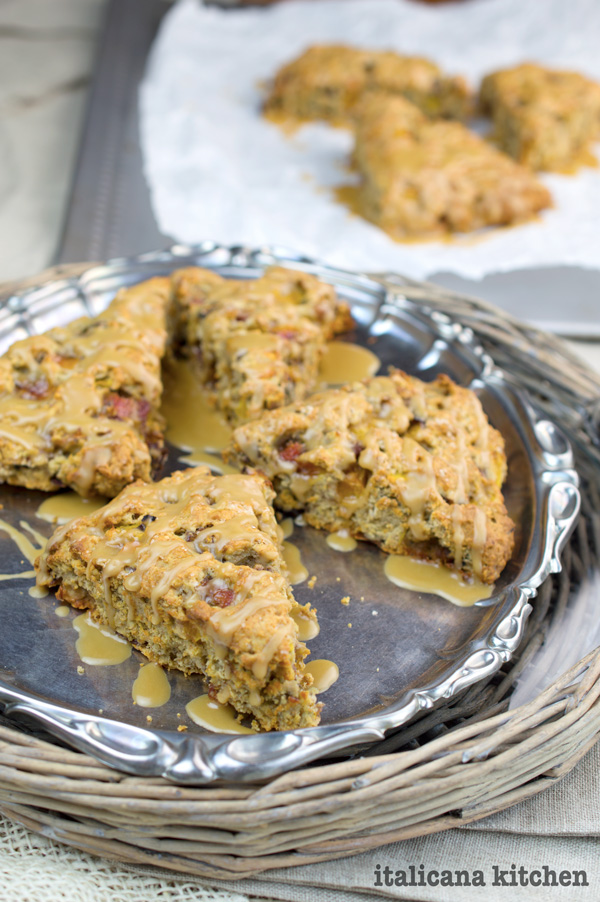
I wanted to give this classic English dessert, that is enormously popular also in America, an Italian flair by using Fig Condiment with Balsamic Vinegar from Modena from La Vecchia Dispensa to create a creamy glaze :: glassa to drizzle over these freshly baked peach scones. What I love about La Vecchia Dispensa, a small family run company, is that they are extremely attentive about selecting only the highest quality of raw materials and only work with fresh seasonal produce. Their products also don’t contain colorants, additives or preservatives. Hallelujah!
Oh, how I relish peaches :: pesche and their summer sweet smell, soft fuzzy skin and glorious fresh flavor that bursts in your mouth with every bite. Couple that with brandy’s tangy raison taste and sweet natural fig balsamic vinegar that warmly coats your tongue like when you immerse yourself in a bath after a day out in the snow, enveloping your senses in pure pleasure and relax.
These scones are also healthier than traditional recipes as they are made with whole wheat and kamut flours and there is less butter :: burro. This is my third attempt on this recipe because I wanted to make sure I got it just right, and I have to humbly say, that it is a winner. 🙂 When you bite into one of these golden peach scones with brandy and fig balsamic vinegar glaze you get a taste of Italian summer love.
Peach Scones with Brandy and Fig Balsamic Vinegar Glaze
Preheat oven to 375°F. Line a baking sheet with a silpat or parchment paper.
In a medium sauce pan add the peaches and fig balsamic vinegar condiment. Cook over medium heat until the vinegar has reduced and thickened, about 10-15 minutes. Set aside.
In the meantime, measure out the soy milk and add the white wine vinegar or lemon juice in a small bowl. Set aside for 5 minutes.
In a large bowl, combine the flours, oats, baking powder, baking soda, sea salt, cinnamon and cane sugar; mix.
Cut the butter into the bowl and use a pastry cutter to mix together (or a knife if you don’t have one) until the butter is chopped into fine pieces and mixed well with the flour mixture.
Spoon in the peaches, leaving the extra balsamic vinegar in the saucepan. Set the pan aside.
Add the soy milk mixture to the dry ingredients and mix well with a spatula then knead together for 5-6 times. The dough will be really sticky but don't add more flour.
Put the dough in the middle of the prepared baking sheet and form a circle that is about 1-inch high. With a wet knife, cut 8 slices. Keep wetting the knife as necessary so the dough doesn’t stick. Leave the slices touching each other.
Sprinkle raw cane sugar on top.
Bake for 20 minutes then take them out. Using a knife, separate the slices and space them apart on the baking sheet.
Cook for another 5-10 minutes until golden brown. Let cool completely otherwise they will crumble when you try to pick them up.
For the glaze:
Add the powder sugar to the saucepan used to cook the peaches. Add the balsamic vinegar, brandy and water. Stir well. Adjust the taste and consistency by adding more liquid or powdered sugar. Drizzle over the cooled scones and let cool so the glaze slightly hardens, about 10 minutes. Buon appetito!
*You can also use regular balsamic vinegar; I highly recommend using a good one like what you find at the La Vecchia Dispensa because the quality definitely makes a difference.
Note: This post is not paid by La Vecchia Dispensa. They were kind to send me some samples of their products; I only support the companies I believe in and the products I love and would use myself.
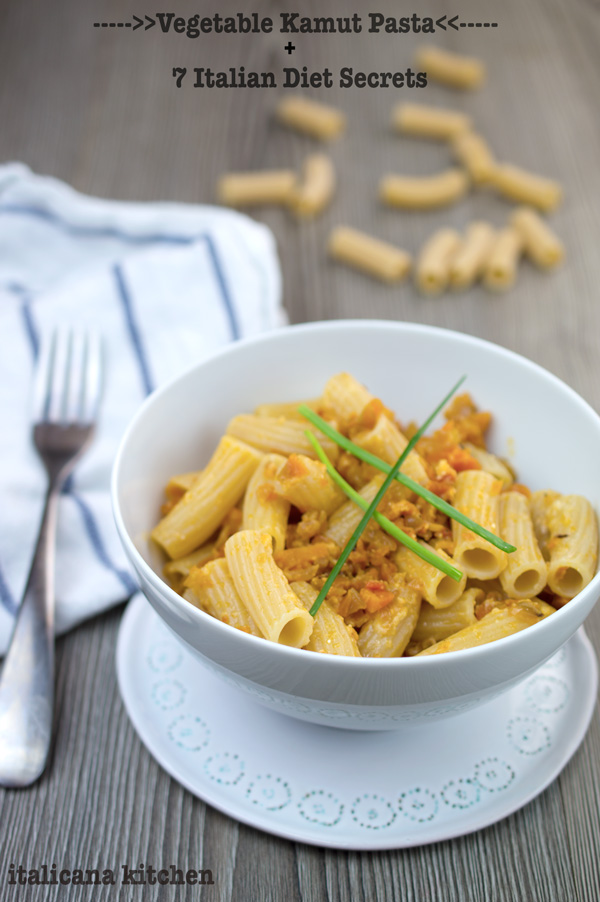
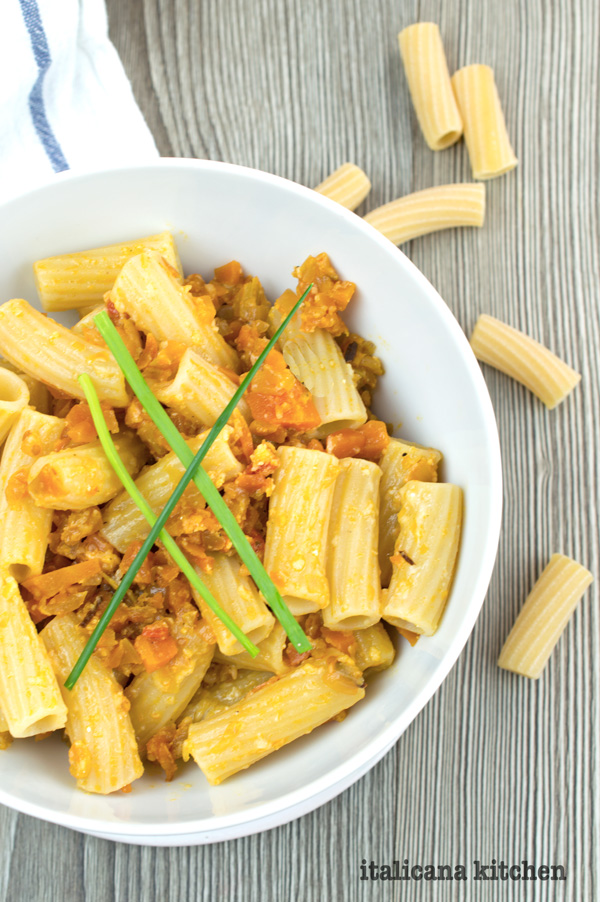
The majority of Italians eat pasta every day for lunch. Of course they vary their recipes so it doesn’t get boring and prepare dishes like this vegetable kamut pasta,tagliatelle with asparagus and peas,tortelli verdi,lumaconi or pasta with a simple tomato sauce. But, yes, that’s right, most Italian eat some kind of pasta every day. But that’s not all. The typical weekday Italian lunch usually includes some kind of meat or fish, vegetables, fruit and espresso. On the weekends expect to find various desserts and gelato. You would think that with these extravagant lunches everyday, the whole country would be obese, no? Yet, Italy is considered to have one of the healthiest diets in the world and is ranked among the highest life expectancies. What’s the deal?
From my observation of the last 5 years living in Italy, there are a few eating behaviors that play a large role in the Italians healthy style of living. This is not a scientific study, so take what I say with a grain of salt. This is only my observation/opinion. This reflection is for the majority of Italians; certainty, there are individuals who follow a less healthy diet.
7 Italian Diet Secrets
1) Fresh foods—Italians typically prepare food by hand instead of buying pre-packaged goods loaded with preservatives and sugar. They eat a lot of fresh fruit, vegetables, beans, whole grains, dairy products, fish and extra virgin olive oil. Recipes are simply and don’t require loads of caloric condiments like mayonnaise.
2) Sauces, pesto and dressings—Sauces are made by hand with just a few whole ingredients. Tomatoes and basil are picked from the vegetable garden to make tomato sauce and pesto. Alternatively, if you don’t have a garden, both markets and supermarkets carry extremely fresh produce which often times even lists the place of origin; many products come from local farmers. Salad dressings consist of just healthy extra virgin olive oil and balsamic vinegar. Meat is usually eaten alone or with a drizzle of balsamic vinegar. Think of all the calories Italians save by not loading their salads with ranch, thousand island or blue cheese dressing or dipping their meat into mountains of bbq sauce?
3) Snacks—Mid morning or mid afternoon snacks typically consist of a yogurt, nuts or piece of fruit.
4) Sugary drinks—Coca cola and similar beverages are typically drunk on special occasions. Italians drink wine and natural or sparkling water at meals.
5)Quantity—Italians dishes aren’t meager portions by any means; however, they aren’t exaggerated and super-sized like you often find in the states or restaurants with all-you-can-eat buffets.
6)Quantity vs.meal time—Typically Italians eat sweets for breakfast, a large and varied lunch, and a light dinner. This gives their body fuel for the entire day and they slowly and consistently burn most of it off by evening. Makes sense. Not sure why in the states it’s the reverse and we often go to bed with a full belly of food.
7) Walk—Italians have a tradition of a “passeggiata” or “stroll” after meals, which aids in digestion.
There you have it, 7 Italian diet secrets for a healthier lifestyle. These 7 secrets aren’t hard at all to incorporate into your everyday life. It just takes some self-will and determination to undo some of the habits you may have grown accustom to.
From every culture we can learn something new that can help us live better. And, in this case, Italy’s healthy style of eating can be an inspiration to all of us to alter the way we think about consuming food. Remember, what we put in our body affects how we feel. If we feel good, we are happy. If we are happy, we are more productive. If we are productive, we are motivated to live fully. All this, just by eating better.
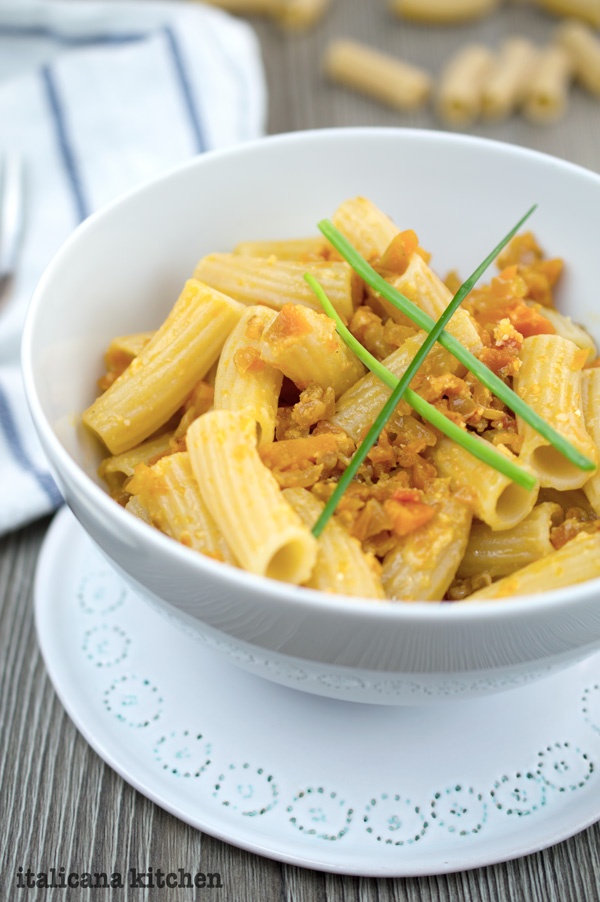
Forget the store bought sauces and make your own with vegetables for a flavorful and healthy Italian meal.
Serves: 4
Ingredients
¼ cup (25g) extra virgin olive oil
1 vegetable bouillon cube*
½ onion, finely chopped
3 carrots, finely chopped
3 celery stems, finely chopped
1 clove garlic, finely chopped
4 datterini or grape tomatoes, skin removed (I freeze the tomatoes then the skins just pop off under water)
10 cloves
½ Cinnamon stick
Dry white wine, as needed (enough to cover the vegetables)*
12 ounces (340g) pasta (I used kamut tortiglioni pasta)*
½ tablespoon coarse salt
½ cup (38g) grated Parmigiano Reggiano (parmesan cheese)*
Instructions
In a medium-sized saucepan, add: extra virgin olive oil, vegetable bouillon cube, onion, carrots, celery and garlic. Cook on medium low heat for 15-20 minutes, stirring occasionally.
Add the tomatoes, cloves and crumble in the cinnamon stick. Cover the vegetable mixture with white wine and stir.
Cover and simmer over low heat for 25 minutes, checking periodically to make sure that there is some liquid at all times, adding a bit more wine or water if needed.
In a medium pot, bring water to a boil and add the coarse salt. Cook the pasta according to the indications on the package. Drain and mix in the sauce and Parmigiano Reggiano. Buon appetito!
*For a vegan recipe, check the vegan-friendly wines here, double check the vegetable bouillon ingredients list (or buy vegan bouillon cubes), make sure that the pasta doesn’t have egg and don’t include the cheese.
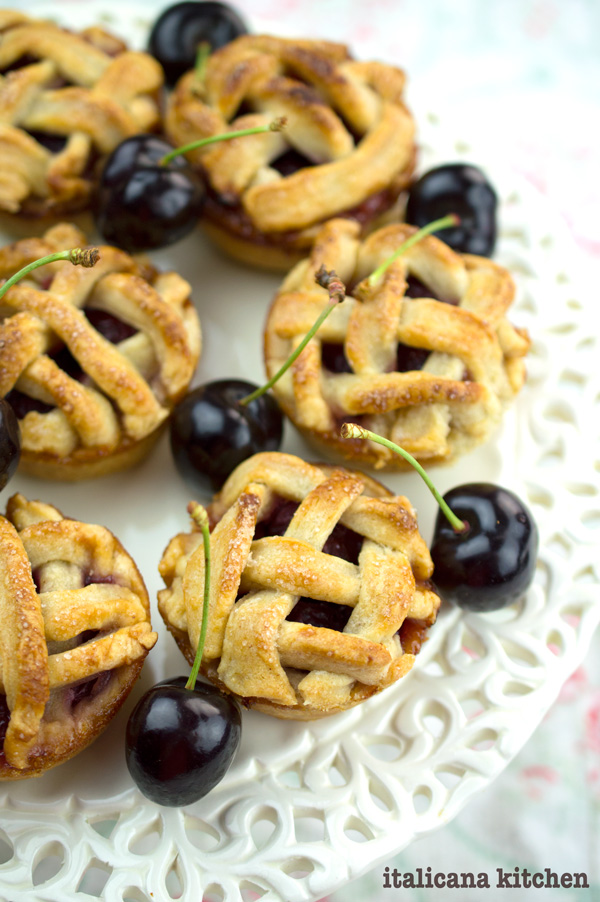
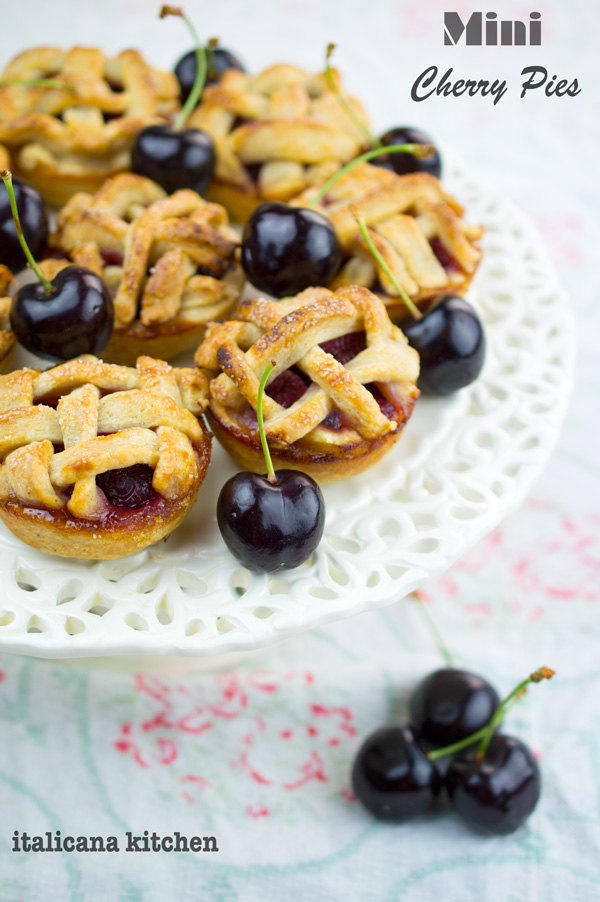
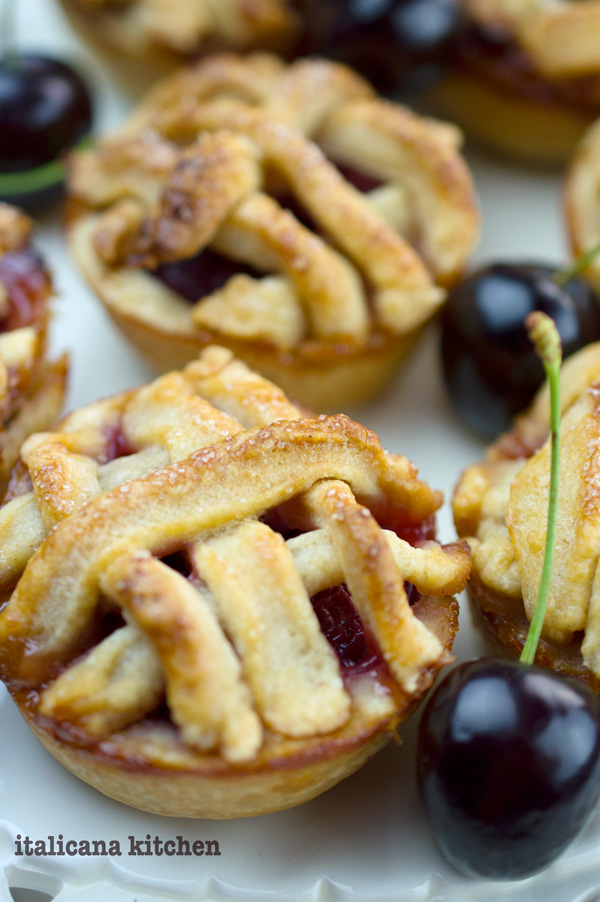
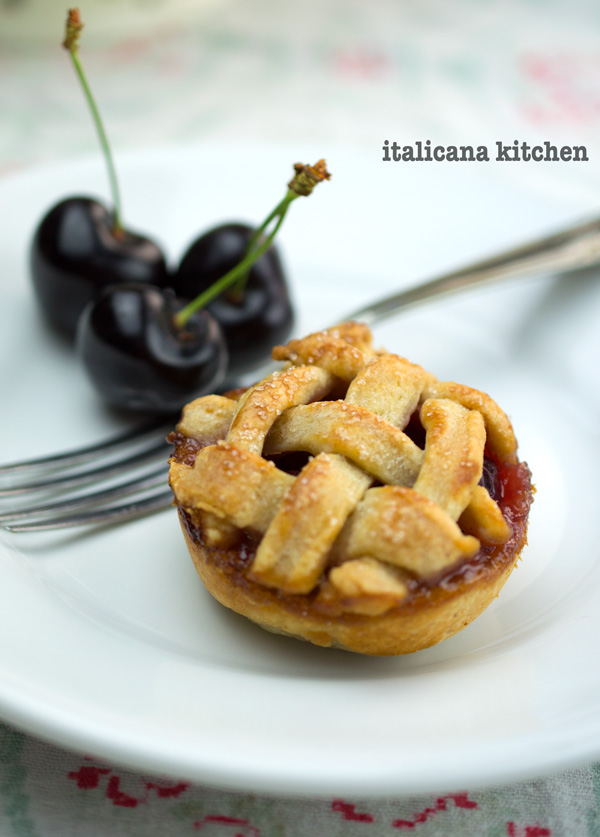
I am so behind! I made these delicious mini cherry pies a few weeks ago and have yet to write about them. Where does the time go? Before too long cherries will be out of season and I’ll have to update the recipe with mini apple pies. Speaking of which, that’s not a bad idea. I’ll have to add it to my list. Although I haven’t tested their baking times, you could experiment with any kind of fruit filling :: ripieno di frutta like blueberries, apples, peaches or rhubarb. If you do use another filling, let me know how they turn out and if you needed to adjust the baking time.
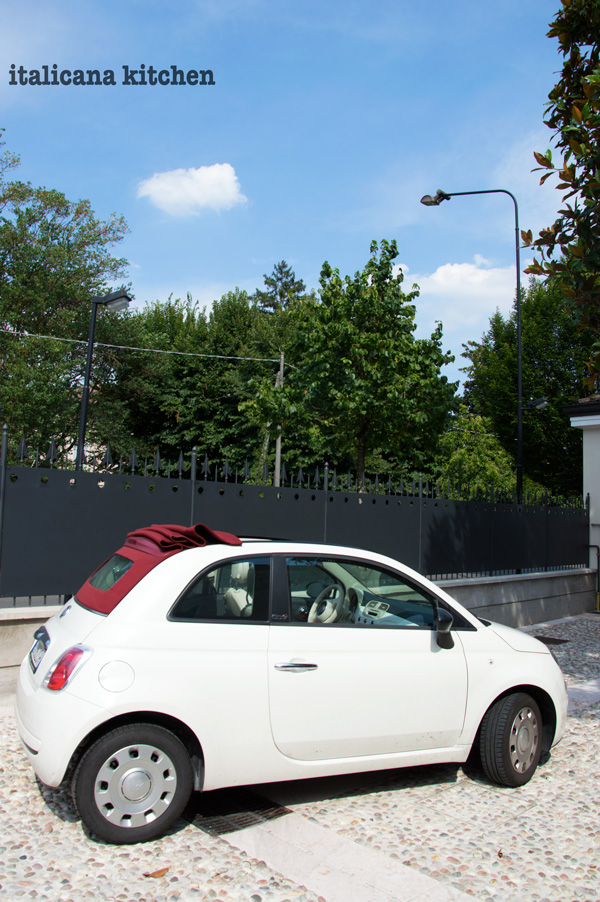
I’ve seen a lot of markets and grocery stores :: supermercati slashing prices on cherries. If you’ve taken advantage of a good deal but now are staring at a box (or boxes) of cherries and don’t know what to do with them all, these mini cherry pies are a great solution. Of course, you could could easily make a regular pie and call it a day; but, there is something about “mini” things that just are more appealing. Take my little Fiat 500, for example. It’s cuteness factor increases just for being so small. (Although, I’m sure if I drove this in the states a lot of truck drivers would laugh at the lego car on the road! I should have really taken the photo with me next to the car so you can get a feel for how tiny it is.)
Although these mini cherry pies :: tortine di ciliegie require a bit more time in the kitchen due to their cute little lattice tops, it’s definitely worth it—especially if you have guests you want to impress. I mean, who doesn’t want a pie all to themselves? You get that same rush of happiness you do on your birthday when you know that someone made something special just for you. I served these mini cherry pies with fior di latte gelato, which is basically a neutral white gelato.
The classic vanilla would of course accompany these perfectly, and for an extra splash of flavor add a dash of aged balsamic vinegar or sprinkle a bit of cinnamon :: cannella on top. Buon appetito!
These mini cherry pies are perfect for BBQ's and potluck dinners. You don't even need silverware or plates to serve them. Just pick one up and take a bite!
Measure out the soy milk and add the vinegar to create homemade buttermilk. Store in the refrigerator.
In a large bowl, whisk together the flours, salt, sugar and cinnamon.
Cut up the butter into small pieces and add it to the bowl. Mix. (Easiest if using a pastry cutter, but I just used a rubber spatula.)
Add the buttermilk and vodka. Mix until the dough starts to stick together. Add water by the tablespoon, if necessary. Divide the dough into 2 balls, wrap each ball in plastic and flatten slightly to form a disc. Refrigerator at least 1 hour or up to two days.
In the meantime, make the filling. In a medium bowl, combine the cherries, lemon juice, sugar, salt, cornstarch, vanilla extract, almond extract and cinnamon.
When the dough is ready, preheat the oven to 400°F (204°C).
Take out one disc of dough and place on a floured workspace. Roll out the dough until it is around ¼-inch thick. Flour a round cutter or top of a glass/jar (about 3½ inches round) and punch out 6 circles. Place the circles in the in an ungreased muffin tin and slightly press down the sides. Gather the scraps and wrap in plastic wrap and store in the freezer. Take out the other disc and repeat the process so that the muffin tin is full. Cut the remaining dough into 48 narrow strips, use the chilled dough in the freezer if necessary.
Divide the filling among the 12 muffin cups. Put four strips on each muffin and weave together in a lattice pattern. Trim and press the edges together to seal each cup.
In a small bowl, whisk egg white and water together and brush over the lattice tops. Sprinkle with raw sugar.
Bake for 30-32 minutes. Cool mini pies on a wire rack for at least 30 minutes before sliding them out of the muffin pan. (I used a knife to prop them up and they easily came out).
Note: If you have extra dough, you can make cinnamon and sugar sticks. Simply cut it into strips, twist into a spiral and lay on a cookie sheet with parchment paper. Combine a bit of sugar and cinnamon, sprinkle on top and bake at 400°F (204°C) until the top is golden brown and the inside well cooked.
 I am on a mad dash to create fifteen 20 minute meals to present to the television producers :: produttori televisivi for when I will appear on Italy’s most famous national television cooking show, La Prova del Cuoco, this September. My first attempt was these couscous cakes, and, boy, were they a winner. Hopefully the judges will think so as well!
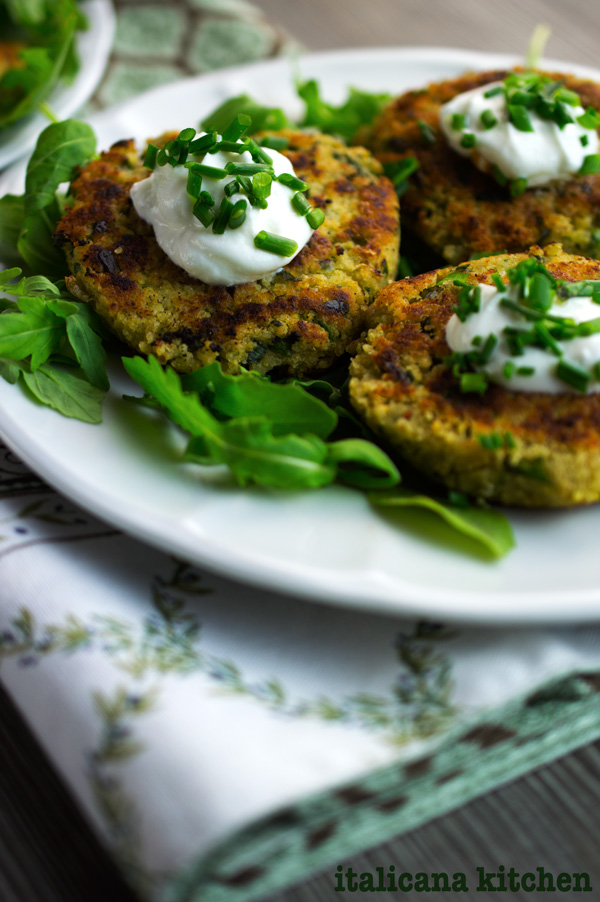 Buttery avocado and smooth cannellini are mashed together with crunchy bread crumbs :: pane grattugiato, aromatic basil, pungent chives and to add some heat, I’ve thrown in some finely diced hot peppers. Now toss in the cooked couscous to add texture and drizzle in some extra virgin olive oil and Organic Balsamic Vinegar of Modena from La Vecchia Dispensa. (One of my favorite balsamic vinegar producers.) Season with a pinch of sea salt and freshly ground black pepper before scooping up handfuls of the mixture to form 6 patties. Pour in a few spoonfuls of extra virgin olive oil in a skillet and set the couscous cakes con top and cook until the out layer turns a nice golden hue. If you prefer a lighter version, you can skip the oil and heat the couscous cakes directly on the pan, although they won’t brown as nicely.
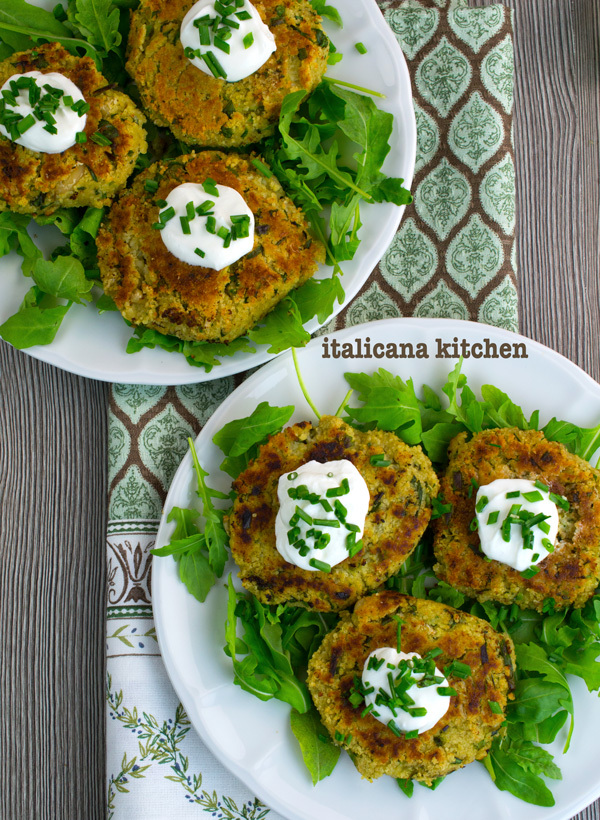 Arrange the couscous cakes on a serving plate, or over arugula :: rucola that has been tossed with extra virgin olive oil and balsamic vinegar. Top each cake with a dollop of greek yogurt and scatter some chives over the creamy white mountain. If you want to impress your guests and have them drooling over your food, remember this gold rule: garnish, garnish, garnish. Just check out the difference it makes in the photo below!
 Now comes the best part: devouring these little cakes. If any remain (which, I assure you will be unlikely) you can store them in the refrigerator; just reheat them for a few minutes or enjoy them cold. Double :: raddoppiate the batch and pop these couscous cakes in the freezer for a meal to have on hand for unexpected guests or an unexpected change in your lunch or evening plans.