Remember the never ending summer days of playing in the backyard on the swing set with a clan of ripped jean, t-shirt stained friends where Kool-Aid mustaches lined the rims of lips and blisters dotted everyone’s hands from the countless hours swinging from the bars? These were the days of childhood freedom where imaginations ran wild and the grass around the house was an uninhabited jungle waiting to be explored. An intrepid journey until the mom’s called, “Dinner Time!” from their wooden porch steps and each kid sluggishly made his/her way home. Why, I ask, should the fun stop there? Shouldn’t dinner time also be a place of adventure and discovery?
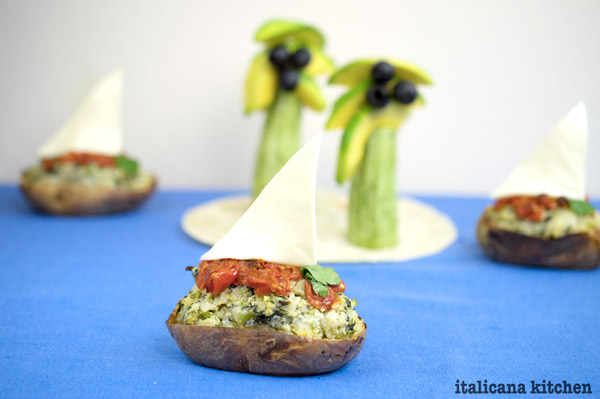
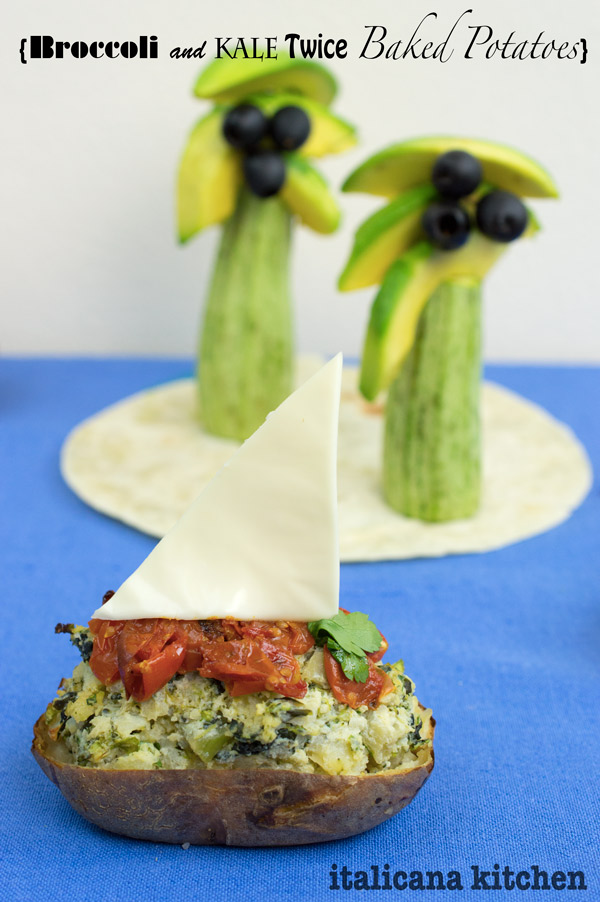
Food doesn’t have to be boring nor a chore to get your kids eating a healthy dose of vegetables. Take these broccoli and kale twice baked potatoes, for example. Moored on top of a blue tablecloth, it would be hard for any kid to resist an edible sailboat or a tortilla island with a zucchini, avocado and olive palm tree. Meal time just got fun.
During the dinner lead your children on an educational discovery of geographical locations you can reach by sea, the kind of boats you can find on the water and keep them interested with a few real pirate facts. Take turns creating an imaginative story in between bites of good wholesome food. Build special, creative moments your children will remember throughout their adult days. Plus, it’s a lot more fun then pulling out your hair trying to get them to eat their broccoli!
These broccoli and kale twice bake potatoes are also great for adults. Skip the cheese sail if you need a gluten-free recipe. and just serve them topped with flavorful roasted tomatoes.
These broccoli and kale twice baked potatoes are perfect for a fun-filled and healthy dinner that your kids will love.
Serves: 3
Ingredients
For the roasted tomatoes:
2 cups datterini or grape tomatoes, diced
1 tablespoon extra virgin olive oil
½ tablespoon course salt
For the twice baked potatoes:
6 potatoes
½ tablespoon extra virgin olive oil
Course salt, as needed
3 cups (115g) chopped kale leaves
2½ cups (220g) finely chopped broccoli
1 cup (230g) ricotta
½ cup (35g) Parmigiano Reggiano (Parmesan) cheese, grated
1 handful parsley, chopped
2 pinches fine salt
Instructions
Preheat the oven to 400°F (200°C). Line the baking sheet with parchment paper or a silicon mat.
Arrange the diced tomatoes in one layer on top of the baking sheet. Drizzle with extra virgin olive oil and sprinkle with coarse salt. Bake for 15-20 minutes or until the tomatoes are roasted, keeping a close eye on them so they don’t burn.
Wash and dry the potatoes then cover them with extra virgin olive oil and a sprinkle of course salt. Set them on top of another baking sheet and bake for 1 hour.
In the meantime, sauté the kale and broccoli in a medium pan over medium heat, adding 1-2 spoonfuls of water or vegetable broth at a time until the vegetables are soft and the liquid has absorbed.
Transfer the cooked vegetable into a medium bowl and add the ricotta, parmigiano reggiano cheese, parsley and two pinches of fine salt. Stir well and store in the refrigerator until the potatoes are done.
When the potatoes are cooked, remove them from the oven and cool. Cut them in half lengthwise and scoop out the potato flesh making sure not to rip the skin.
Add the potato flesh to the bowl of vegetables and cheeses. Mix well and fill each potato skin with the mixture.
Put the potatoes in the oven for another 20-25 minutes. Top with the roasted tomatoes and serve warm.
Note: If you want to conserve the twice baked potatoes in the freezer, cover each one with aluminum foil and pop them in the freezer. When you are ready to bake them, preheat the oven to 350°F (175°C), remove the aluminum foil, put the potatoes on top of a baking sheet, set the aluminum foil loosely on top and cook for 45 minutes. Remove the aluminum foil and continue baking for another 15 minutes.
Sailboat option: Cut a piece of cheese in a triangle and fix it on top of the twice baked potato with a toothpick supporting it from the backside.
Edible Palm Tree: Cut off the top and bottom of a small zucchini, cucumber, or carrot. Break a wooden skewer in half and insert it on the top side of the vegetable. Add a few slices of avocado. Break a tooth pick in half and fix a few black olives to the front side of the avocado. If the palm tree is starting to lean and fall, use the other half of the skewer to support it from the back. Set the palm trees on a warmed tortilla to create a little island.
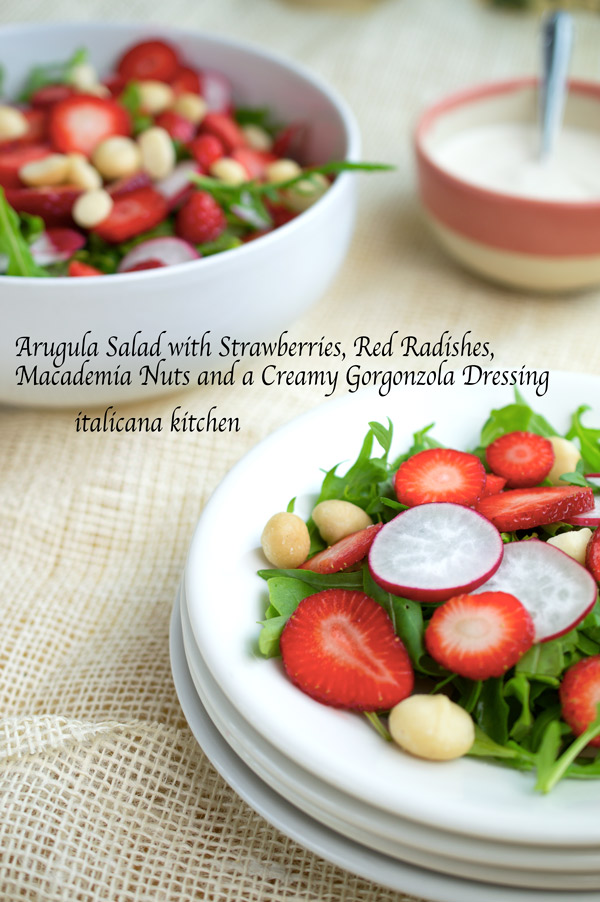
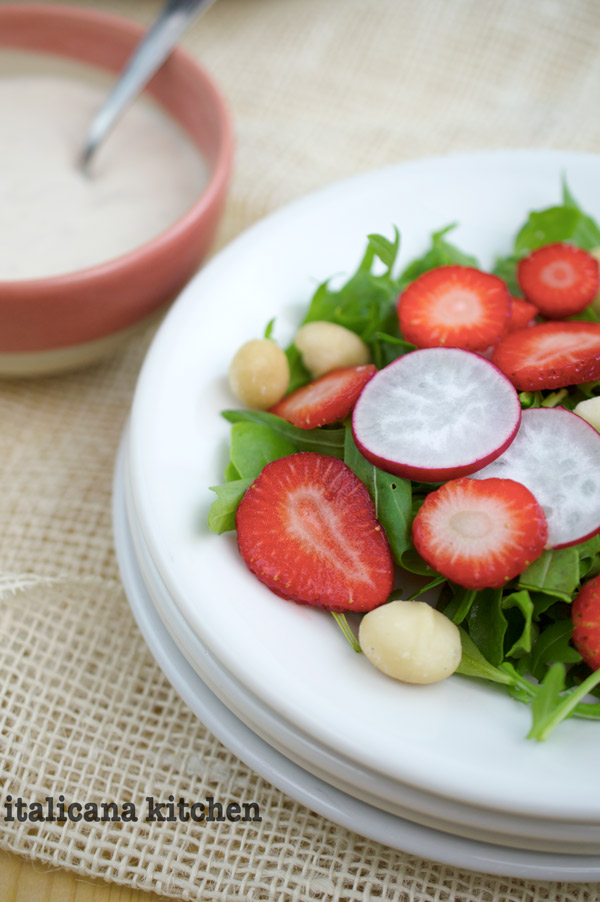
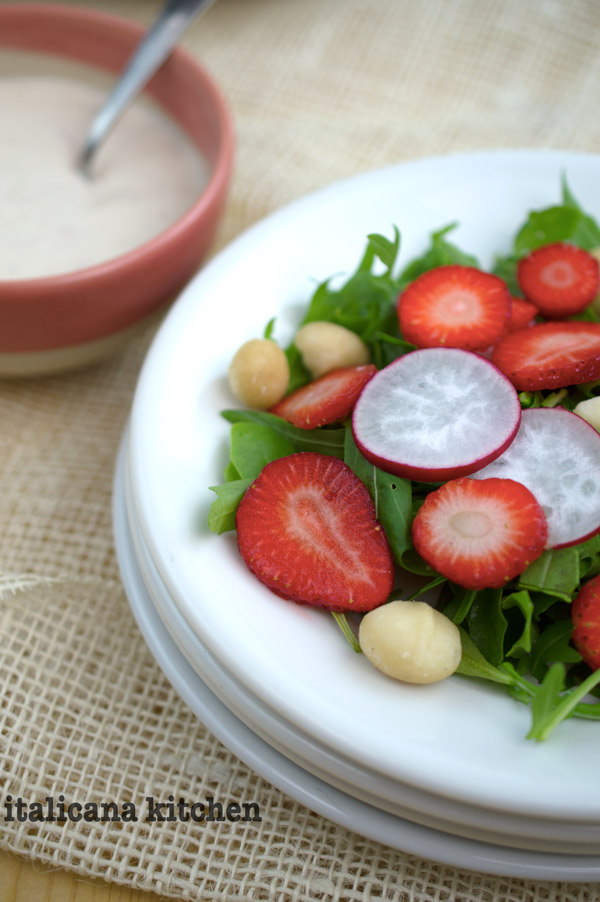
I am addicted to salads in the spring and summer :: estate months. Who doesn’t love bright and flavorful seasonal produce adorning a bed of fresh crisp lettuce? If you mix up your ingredients, you are sure to never get bored.Here are just a few of my favorites: lentil salad in radicchio cups;quinoa salad with feta and caramelized walnuts; apple, dried cranberry, caramelized almonds and feta salad and, of course, not to be missed from this list is this rucola salad with strawberries, radishes and macadamia nuts topped with a rich gorgonzola dressing.
When I lived in the U.S., the word “gorgonzola” for me was just a name of an Italian blue cheese. Little did I know that gorgonzola bears the name of the Italian city :: città where the product originated. Asiago is another example of a cheese named after a city, as well as Parmigiano Reggiano (what we often call parmesan cheese), an area that includes the cities of Parma and Reggio Emilia.
Gorgonzola has quite a strong taste, so if you are not a fan of this cheese you can simply add a splash of extra virgin olive oil and balsamic vinegar. I personally love gorgonzola as you can use it for both sweet or savory dishes. Add gorgonzola to a pear and walnut pizza, melt it down to create a gorgonzola sauce for pasta or risotto or prepare an apple and gorgonzola pie. A while back I made some very bland savory muffins :: muffin salati. Instead of throwing them out, I created a hole in the center with a small spoon, added a dollop of gorgonzola and instantly they were transformed into gourmet savory muffins with a gorgonzola-filled center.
Make the dressing :: condimento right after preparing the salad as the strawberries that are blended in the gorgonzola dressing become too sour if stored for days or overnight in the refrigerator. I also like to warm my radish slices in a splash of apple vinegar on the stove.
You may already be accustomed to buying your blue cheese salad dressings in a bottle, but living in a country where these are practically non existent, I’ve learned to make my own. I also make homemade dressings to moderate what goes inside. Who needs 10+ ingredients and preservatives with long names that you don’t know? All that is needed to make a tasty and satisfying salad dressing is just a few simple ingredients.
Arugula Salad with Strawberries, Red Radishes, Macadamia Nuts and a Creamy Gorgonzola Dressing
Light and colorful ingredients make this arugula salad with strawberries, red radishes and macadamia nuts perfect for celebrating the summer days; all topped with a creamy homemade gorgonzola dressing.
Serves: 4-6
Ingredients
Makes 4-6
For the dressing:
2 tablespoons Greek yogurt
½ cup (105g) gorgonzola
4 tablespoons extra virgin olive oil
4 strawberries
Salt and pepper, to taste
For the salad:
8 ounces arugula (about 12 cups)
15 strawberries, hulled and thinly sliced
4 red radishes, thinly sliced
¼ cup (38g) macadamia nuts
Instructions
In a blender, mix together the Greek yogurt, gorgonzola, extra virgin olive oil, strawberries, sat and pepper. Pour into a small serving bowl. In a large bowl, add the arugula, strawberry slices, radish slices and macadamia nuts.
Note: Since the gorgonzola dressing has a strong flavor, I suggest serving the dressing separately from the salad so that each person can add as much flavor as he/she desires. Due to the strawberries, the gorgonzola dressing doesn’t conserve well in the refrigerator, so make the dressing right before serving the salad.
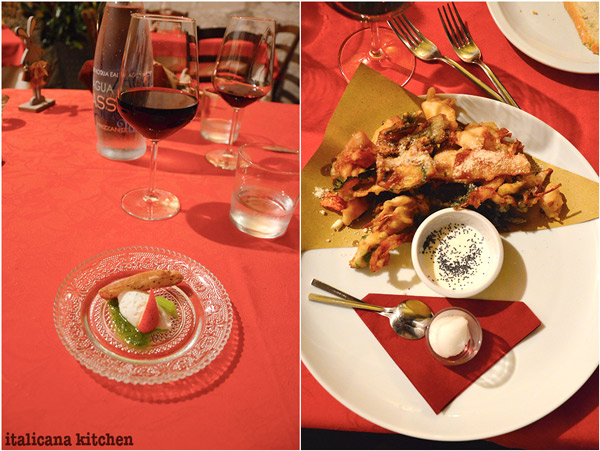
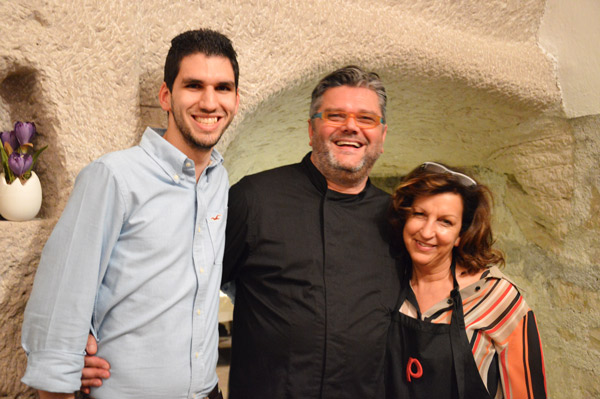
I’ve been to many great restaurants in Italy, but few have captured my heart like La Berlera in Riva del Garda. La Berlera offers more than just exceptional food, it provides a unique dining experience that will be etched in your memory forever thanks to the uniqueness of its location :: la posizione, selection of ingredients, creative dishes, attention to detail and warm service.
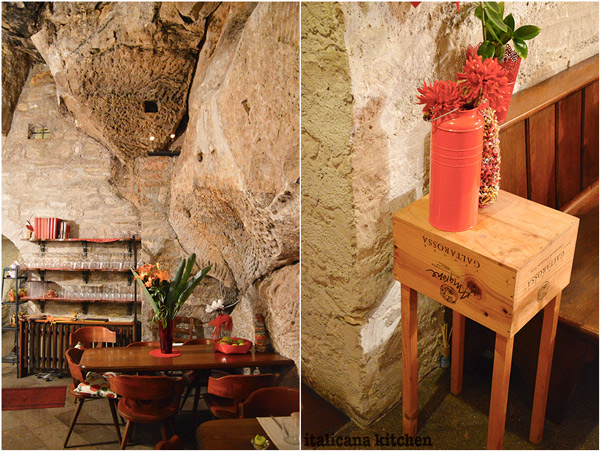
So what makes La Berlera’s location stand out among others? To begin, the restaurant is located inside of a boulder that was carved out in 1794. The jutting structure attached to the boulder resembles a small castle tower all surrounded by mountains and rolling vineyards.
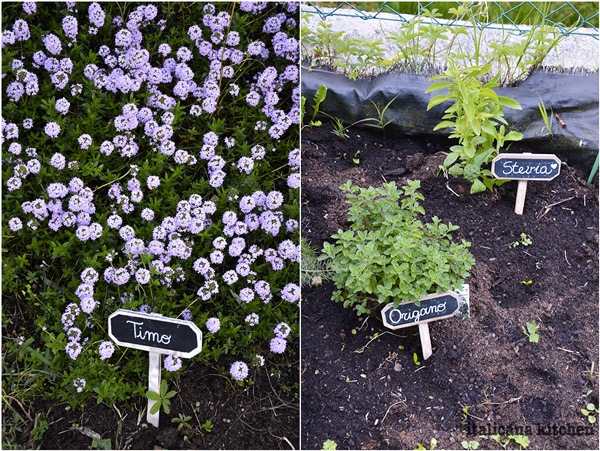
Lining the edge of the property is a vegetable garden :: orto with various herbs that are used to create interesting flavor combinations like vanilla and rosemary gelato and bay leaf sorbet, just to name a few. Besides some varieties of beef, all of the ingredients used at La Berlera are KM 0 (kilometer 0), meaning that they are purchased locally in order to support local farmers and vendors.
In addition, Owner and Chef, Gianluca Guglielmi, advocates the consumption of seasonal products :: prodotti di stagione. The menu is therefore changed periodically to implement only the freshest and tastiest in-season ingredients.
Although you are dining in a slightly cool damp cave :: grotta, the interior decorating and attention to details give you the feeling of home: there are wooden tables, chairs with bright colored seat cushions, bowls full of fruit, plants and flowers and not to be missed are the book shelves that line the walls. Also on display is a metal storage rack lined with homemade canned goods, just like my mom’s in her root cellar.
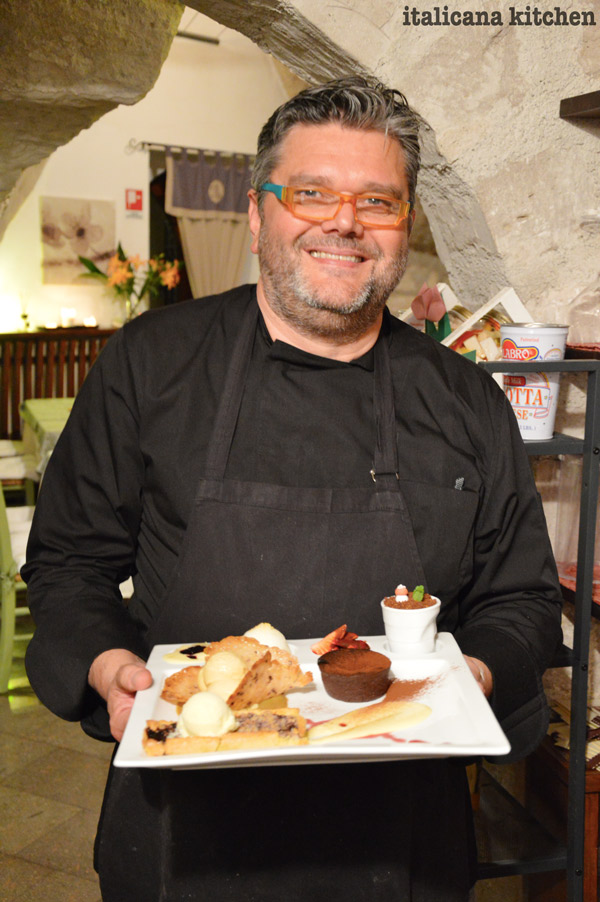
With decades of experience in restaurant ownership and consulting, the thing I like most about Chef Guglielmi’s recipes is that each dish has a variety of textures to excite the palate :: palato: from creamy to crunchy, rich to refreshing, the taste buds are led through a maze of twists and turns in consistencies and flavors along the way.
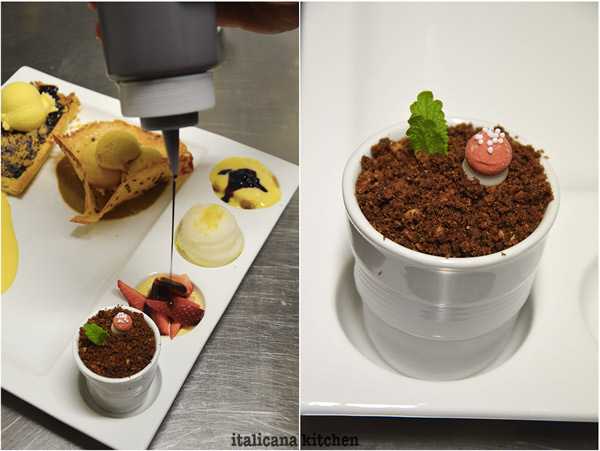
I have mentioned in previous posts that Mr. Italicano and I aren’t big of fans of dessert. I wish I would have taken pictures of the plate after we devoured :: divorato every morsel on this dessert platter.
As you can see from the photo, we weren’t just eating any ol’dessert. What we had before us was gorgeous food art. I felt guilty destroying the masterpiece :: capolavoro before me, but it looked just too good to resist!
What I love about family-run businesses, is that you typically get fantastic service and great hospitality :: ospitalità. At La Berlera, husband, wife, and son worked seamlessly together to make each customer’s dining experience unique and memorable.
So, if you are planning a trip to Italy, definitely put Riva del Garda on your list of places to visit. It is just off the beaten path where you will escape the swarms of tourists and can relish :: assaporare a magical moment enjoying views of a mountain lake, hillsides lined with wine yards and olive groves and enjoy a unique dining experience at La Berlera.
Note: This post is not sponsored or paid by Riva del Garda tourism or La Berlera restaurant. I just thought you would be interested in discovering one of my favorite locations and restaurants here in Italy.
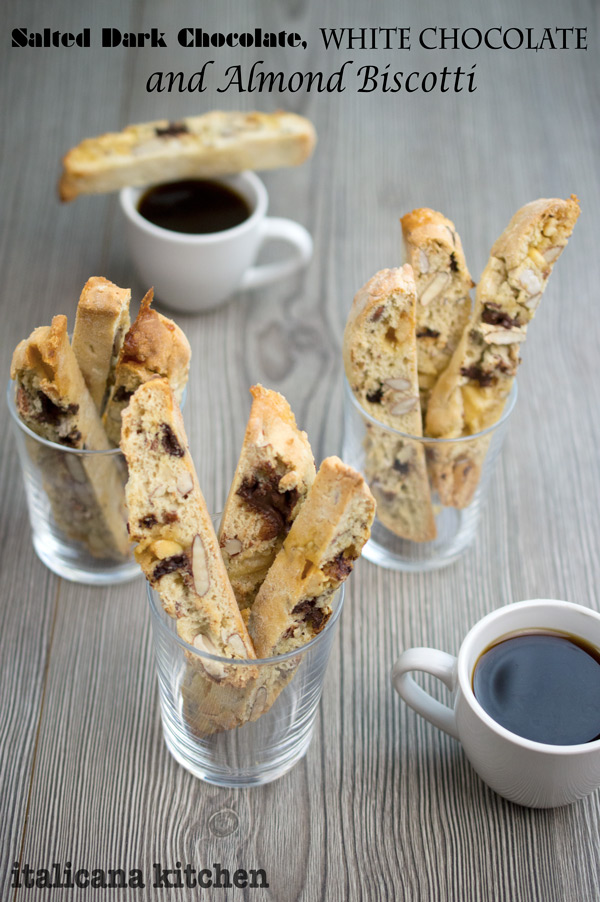
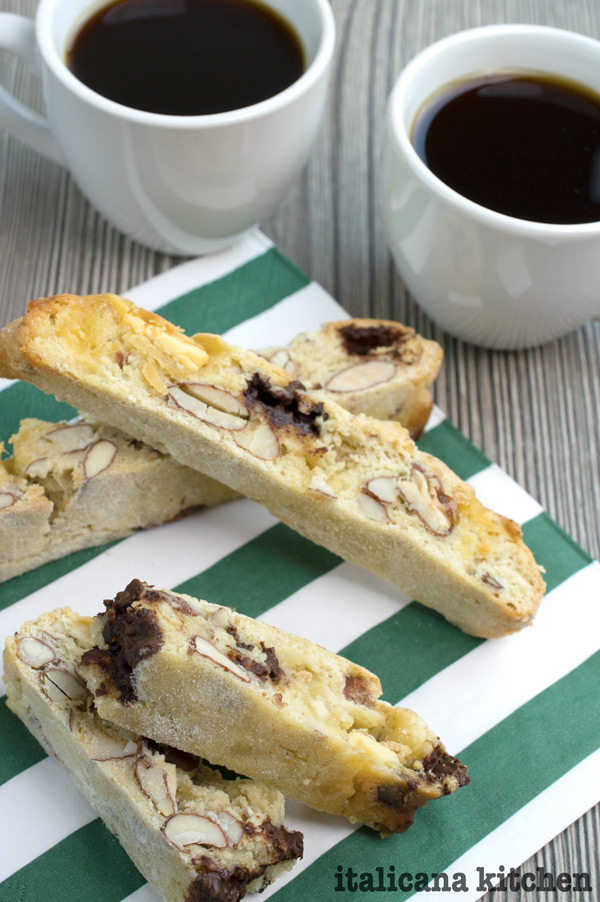
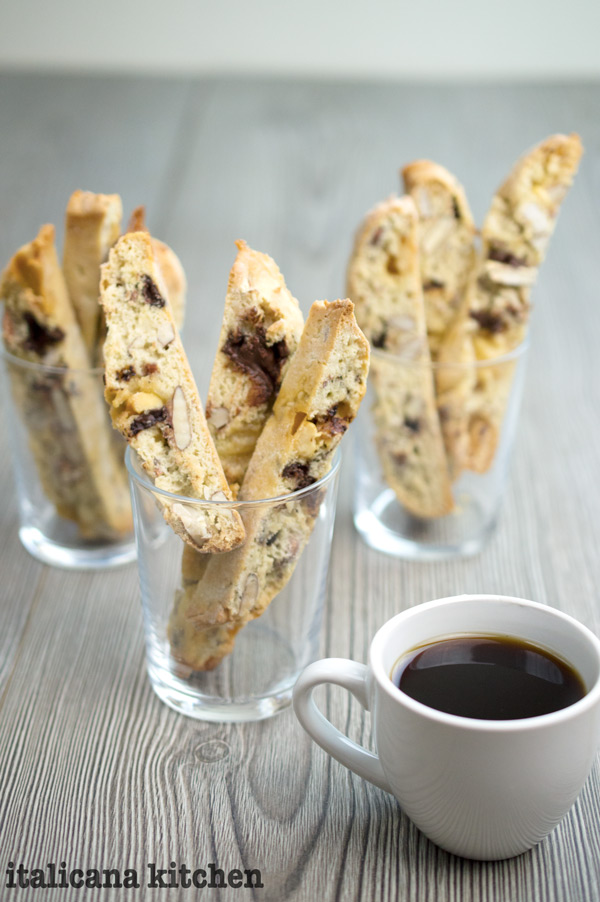
These salted dark chocolate, white chocolate and almond biscotti are perfect to dunk in your morning cup of coffee or just to snack on throughout the day :: giorno.
My brother and sister-in-law sent me two cookbooks :: libri di cucina for my birthday. I instantly read through them both while gawking at the food porn splashed on each glossy page, drooling like an adolescent boy with his first Playboy in hand. The pictures weren’t enough to satisfy me though, I had the urge to bake. I decided to adapt one of the recipes from David Lebovitz’s book Ready for Dessert.
If you have never heard of David Lebovitz, he is to the food blogging world what Michael Jordan is to basketball, and is one of my figures of inspiration as he too leads a bi-cultural life; born in America but lives in Paris :: Parigi. He started out as a traditional chef working at the Chez Panisse in Berkeley, California for 13 years before becoming a cookbook author and blogger. If you like witty humor, his books and blog posts are a good read. What a shame that I missed his book tour in the states with one of his stopovers being in Seattle. I guess I’ll have to go to Paris…oh, shucks. 🙂
I imagine that David Lebovitz’s original recipe is absolutely divine, but I decided to play with the ingredients I had on hand instead of heading to the store. Am I lazy…frugal…or resourceful? I suppose all of the above. I therefore used a mix of all-purpose flour and kamut flour :: farina al kamut, lowered the amount of eggs from 3 to 1 (substituting apple sauce in its place) and chopped up both salted dark chocolate and white chocolate that was inside my cookie jar screaming to be used up.
I can’t compare the two recipes, but I can say that these beautiful long thick biscotti :: cookies that came out of the oven were absolutely heavenly. Full of salted dark chocolate and white chocolate chunks, but not overly sweet and sugary. And, there is no butter. Hip hip hooray for a baked good without butter when you want a dessert that’s a bit lighter.
Salted Dark Chocolate, White Chocolate and Almond Biscotti
These salted dark chocolate, white chocolate and almond biscotti are perfect to dunk in your morning cup of coffee or just to snack on throughout the day.
Serves: About 34 biscotti
Ingredients
1 cup (130g) all purpose flour
1½ cups (230g) kamut flour
1 teaspoon (4g) baking powder
1 egg
⅔ cup (200g) apple sauce
1 cup (200g) sugar
½ teaspoon (2ml) vanilla extract
¾ cup (90g) almonds, toasted and coarsely chopped
3.5 ounces (100g) salted dark chocolate, chopped
3.5 ounces (100g) white chocolate, chopped
Instructions
Preheat the oven to 350°F (175°). Line a baking sheet with parchment paper.
In a small bowl, stir together the flours and baking powder.
In a large bowl, beat the egg, apple sauce, sugar and vanilla on medium speed for about 5 minutes. Stir the flour mixtures into the larger bowl then add the almonds and chocolate. Stir until combined.
On a lightly floured work surface, divide the dough in half. With moist hands, shape the pieces into two 9 by-3-inch (22x7cm) logs. Set them on the already prepared baking sheet, leaving enough space between them as they will flatten out when cooking.
Bake for 20 minutes. At this point the logs should be slightly browned, remove them from the oven and reduce the temperature to 300°F (150°C). Allow the logs to cool on the baking sheet for at least 15 minutes.
Transfer the logs to a cutting board. Using a serrated knife, cut the logs into ½ inch thick diagonal slices. Place the biscotti cut side down in a single layer on the same baking sheet. Use an additional baking sheet if necessary. Bake until the biscotti are pale golden and firm, about 20-25 minutes. Let the biscotti cool completely; they will keep in an airtight container for up to 1 week.
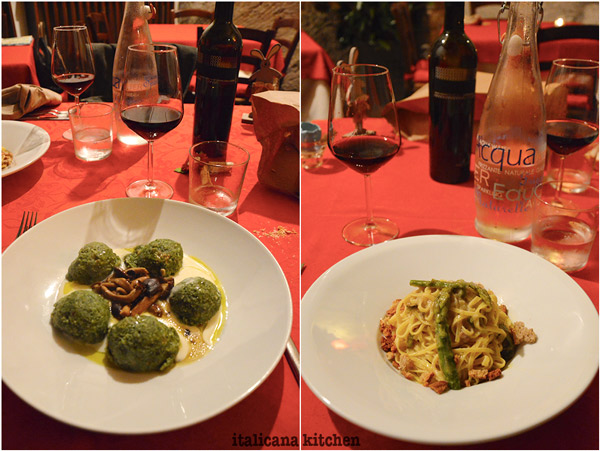
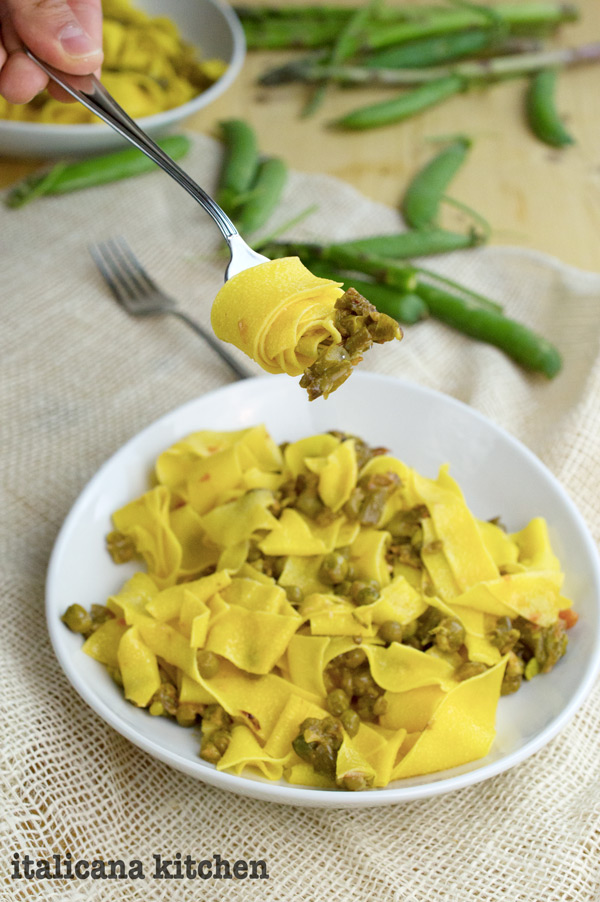
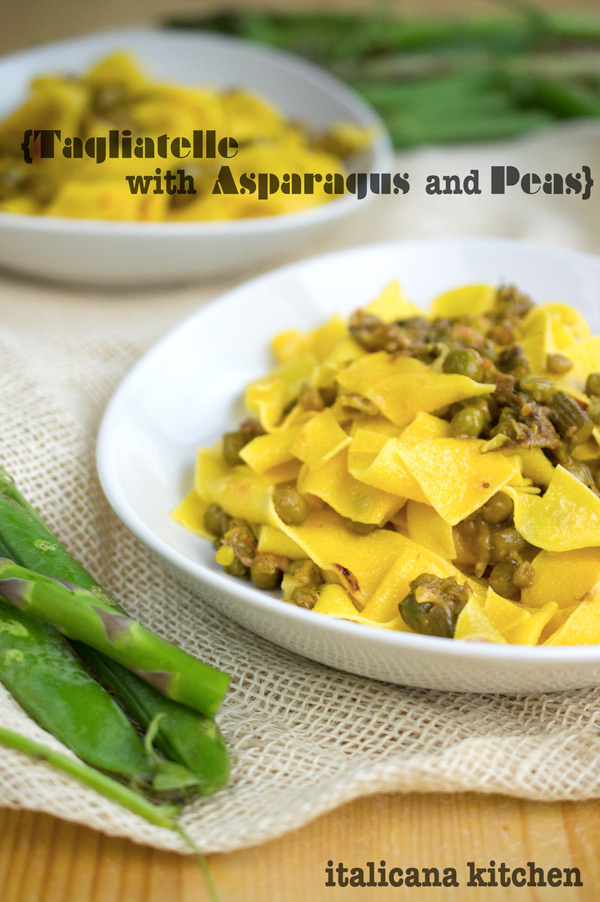
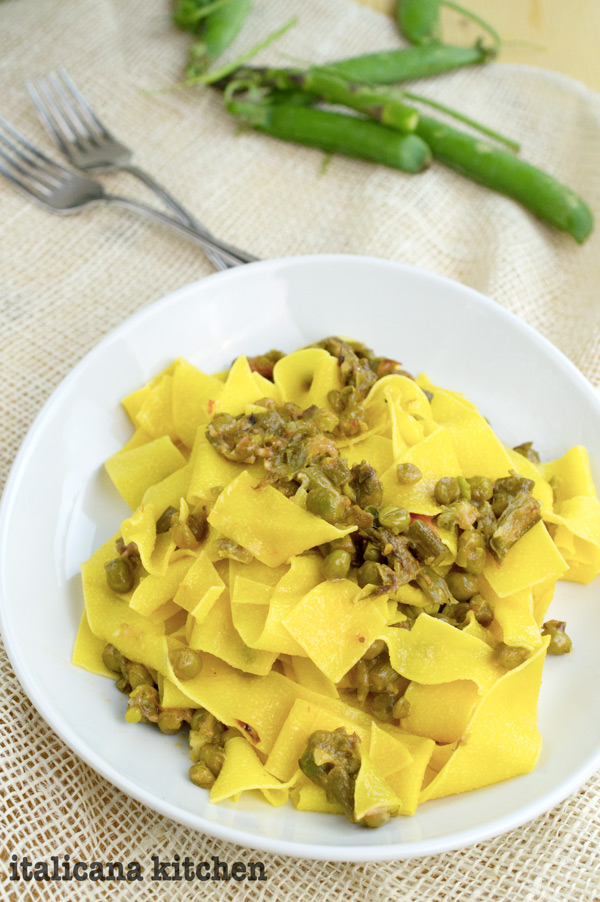
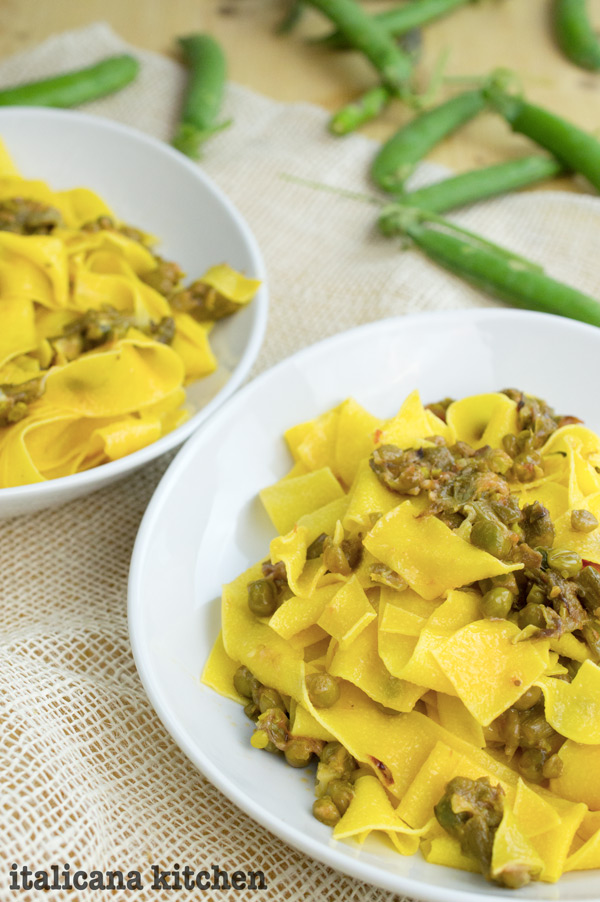
Pasta dishes don’t have to always be smothered in tomato sauce :: sugo and loaded with meat to be satisfying. In fact, some of the best Italian pasta dishes are those made with a vegetable sauce, like this recipe for tagliatelle with asparagus and peas given to me by my aunt-in-law.
There are three main secrets to preparing a delicious pasta dish like they make in Italy :: Italia:
1. Use fresh seasonal produce
2. Cook the pasta in generously salted water until it is al dente (slightly firm when bitten).
3. Top with freshly grated parmigiano reggiano cheese.
Italian women are clever :: furbe; they prepare mouthwatering dishes with just a few ingredients. What is their secret? They buy fresh vegetables that are in season. Often Italian women have a vegetable garden at home, otherwise they head directly to a farmer or vegetable stand at the market. Choosing good in-season vegetables allows you to enjoy the maximum flavors since the produce is in its prime. Good sauces aren’t difficult to make, they only need fresh and flavorful raw materials.
The next important trick is how you cook the pasta. The first rule of thumb of a good Italian cook is that you should always add coarse salt to the water once it comes to a boil. Secondly, you should always read the cooking time on the outside of the pasta package and be sure to start checking the pasta’s firmness a minute or two before it should be ready, especially if you mix the pasta with a sauce over heat, like in this recipe, as it will continue to cook. Although overcooked pasta is perfect for those who wear dentures :: la dentiera, it is by no means good. So set a timer folks and cook the pasta al dente!
The last important tip to making this tagliatelle with asparagus and peas dish absolutely delicious, is to load it with freshly grated parmigiano reggiano cheese. I might be impartial since I live in Emilia Romagna, the origin of this delectable ingredient, but I can definitely tell you there is a major difference between pasta dishes with and without parmigiano reggiano. And, no, for all you Americans, I am not talking about the powdery stuff in the cylinder green tube made by Kraft, that stuff for Italians has the same affect as kryptonite on Superman.
There you have it, some of the most important tricks :: trucchi you need to know to make some tasty Italian pasta dishes. If you have any other tips, leave them below in the comments section.
Pasta dishes don’t have to always be smothered in tomato sauce and loaded with meat to be satisfying. In fact, some of the best Italian pasta dishes are those made with a vegetable sauce, like this recipe for tagliatelle with asparagus and peas.
Serves: 2
Ingredients
For the sauce:
¼ cup extra virgin olive oil
1 shallot, thinly sliced
10 asparagus spears, hard ends snapped off & discarded, then chopped
1 cup (145g) freshly shelled peas
1 organic vegetable bouillon cube
White wine, enough to cover the vegetables
4 datterini or grape tomatoes, skin removed (I freeze the tomatoes then the skins just pop off under water)
½ cup (38g) parmigiano reggiano
For the pasta:
200g tagliatelle pasta (or any kind of pasta)
½ tablespoon coarse salt
Instructions
For the sauce:
In a medium-sized saucepan, cook the shallot in the extra virgin olive oil over low heat. When the shallot begins to become golden brown, discard.
Add the asparagus, peas, tomatoes, vegetable bouillon cube and white wine (enough to cover the vegetables); bring to a boil then reduce the heat to simmer. Cook for 40-60 minutes.
For the pasta:
Bring a pot of water to boil, add the course salt and cook the pasta according to the instructions located on the package. Check the doneness around 1-2 minutes before it should be ready, remove from heat and drain when it is al dente (slightly firm when bitten).
Add the pasta and parmigiano reggiano cheese to the sauce previously prepared and stir over low heat until combined and the cheese has melted. Serve immediately. Buon appetito!
Note For vegetable based sauces, I like to cook them around 40 minutes but you could also let them simmer for less time.
 Food doesn’t have to be boring nor a chore to get your kids eating a healthy dose of vegetables. Take these broccoli and kale twice baked potatoes, for example. Moored on top of a blue tablecloth, it would be hard for any kid to resist an edible sailboat or a tortilla island with a zucchini, avocado and olive palm tree. Meal time just got fun.
 During the dinner lead your children on an educational discovery of geographical locations you can reach by sea, the kind of boats you can find on the water and keep them interested with a few real pirate facts. Take turns creating an imaginative story in between bites of good wholesome food. Build special, creative moments your children will remember throughout their adult days. Plus, it’s a lot more fun then pulling out your hair trying to get them to eat their broccoli!
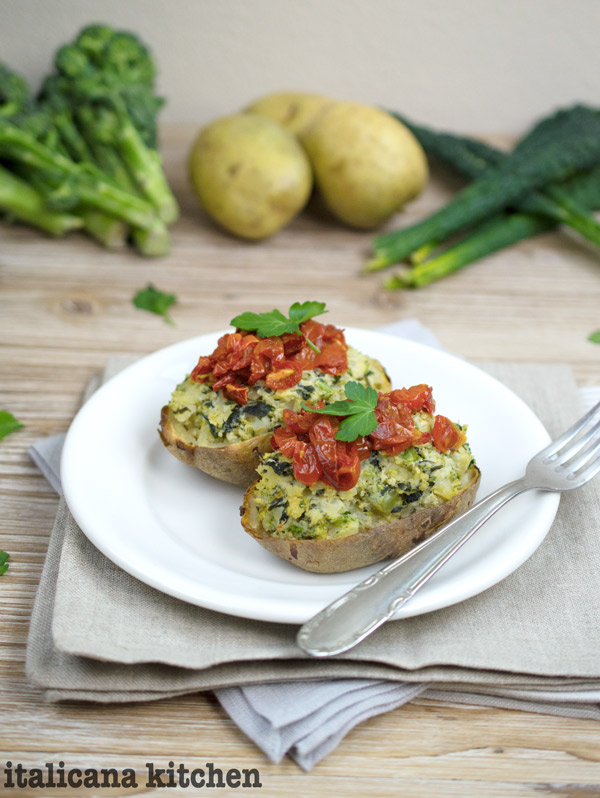 These broccoli and kale twice bake potatoes are also great for adults. Skip the cheese sail if you need a gluten-free recipe. and just serve them topped with flavorful roasted tomatoes.
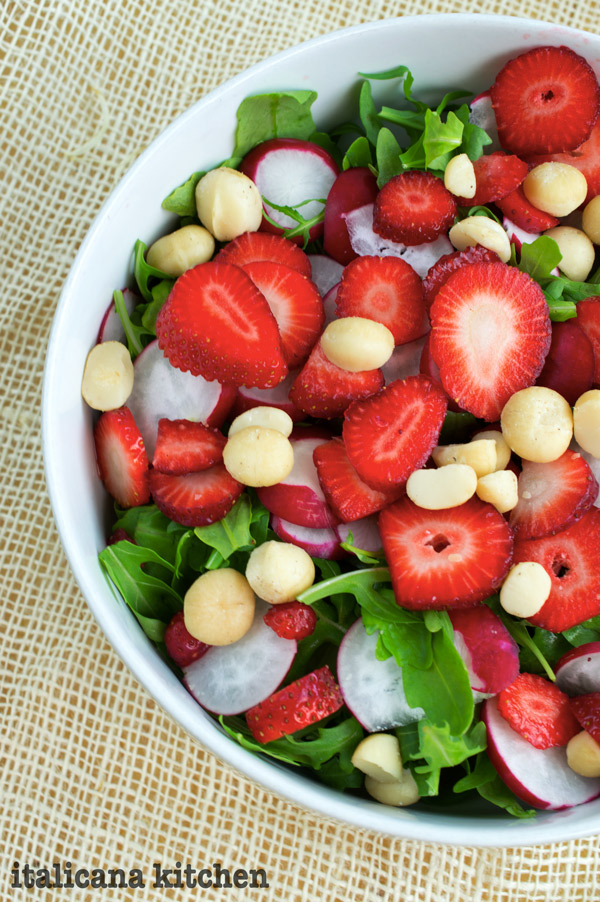


