There are two ways to make colored pasta. The first is to have a very colorful sauce that changes the pasta’s color completely. The second way, is to add in various purees, spices, herbs or other natural colorings when making the dough. Although you see photos for the pink pasta I would suggest making just a normal colored fresh pasta since the color will turn pink regardless thanks to the beet sauce!
Here’s a 30 second time lapse video of me in my italicana kitchen making three types of homemade pasta and sauces (all recipes to come!) You can pop on over to my youtube channel for more videos.
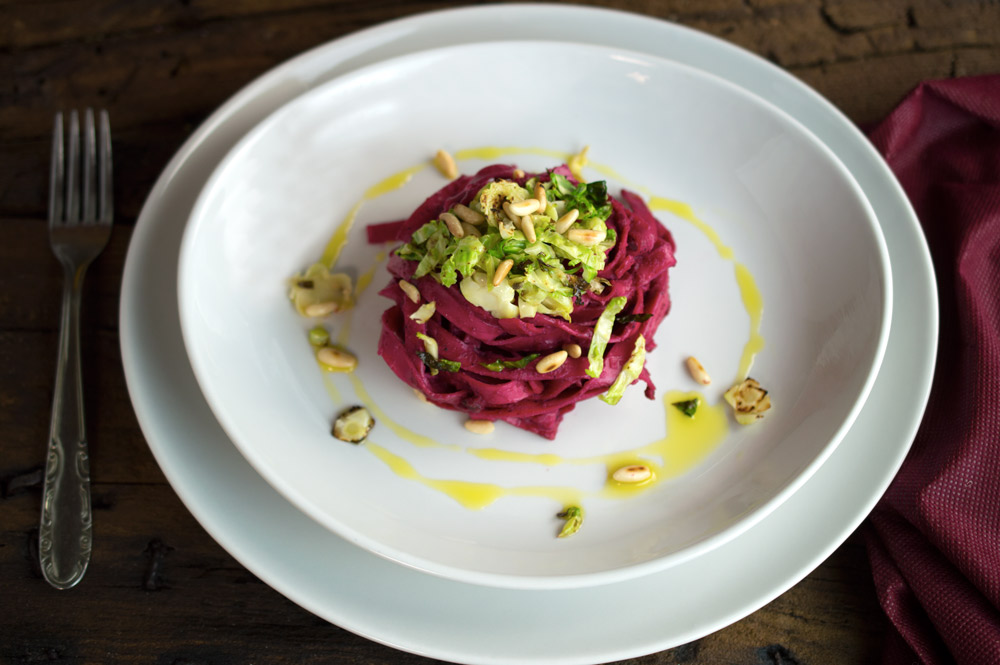
Oh man, this recipe is a winner. It’s quite the pleasant surprise for even the pickiest of eaters. For example, my dad, a steak and potatoes kind of guy, LOVED this fresh pasta with beet sauce topped with roasted Brussels sprouts, goat cheese and toasted pine nuts. Then there is Mr. Italicano who snubs any recipe made with beets, yet devoured a whole plate of this pasta before I could relay to him the main ingredient. Um. Yah. It’s that good.
Apart from it’s utter deliciousness, it’s also festive—look at those vibrant colors! I mean, who doesn’t like to wow their dinner party guests with stunning dishes at Thanksgiving or Christmas? So to recap: it’s super yum, it’s downright beautiful, but I still haven’t even told you the best part:CONTINUE READING
Smoothie bowls are a huge food trend these days, and what’s not to love? Eat them as a healthy breakfast, lunch or a snack. Pack them with superfoods to jumpstart your day or keep you going when you need a burst of energy.
So what is the difference between asmoothie and a smoothie bowl? Two things:CONTINUE READING!
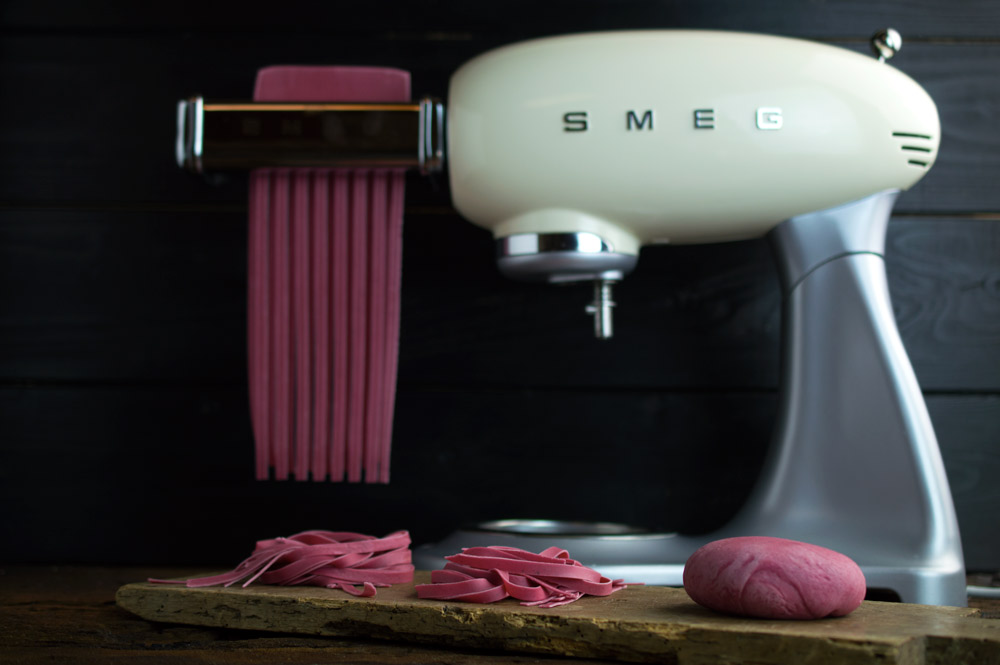
I apologize for the absence in the past month! If you’ve been following italicana kitchen on Facebook, Instagramor Twitter then you’ve probably been following my USA food tour. I’ve been reporting back on Radio Bruno, an Italian radio station,on new food and wine trends in America, I’m organizing private pasta-making classes in people’s homes using the lovely Smeg stand mixer, which I absolutely adore, and I’m doing pasta-making demonstrations at various Williams-Sonoma stores and The Culinary Stone in Seattle,Spokane and Coeur d’Alene.
If you are in the Seattle or Spokane area, contact me to organize a homemadepasta-making class! I’ll be in Seattle until READ MORE!
The festivities are now over, and the new year has kicked off. Start right: incorporate healthy meals into your daily diet, like this Green Detox Smoothie that can be eaten for any meal or as a healthy and energy boosting snack. If you are in Milan and want to learn how to make delicious smoothies :: frullati and other healthy meals, come join me tomorrow at the Smeg store. Sign up asap (the event is tomorrow: Thursday, January 21st!), on the Smeg Moscovawebsite.
In today’s fast paced world, it’s not always easy to eat healthy :: mangiare sano. I’m often tempted to buy ready-made food, especially when I don’t have a lot of time or don’t feel like cooking. However, I try to resist. I always check the nutritional facts on the back of the product. If it’s made with whole, natural products, then it’s okay for me. If it’s made with CONTINUE READING
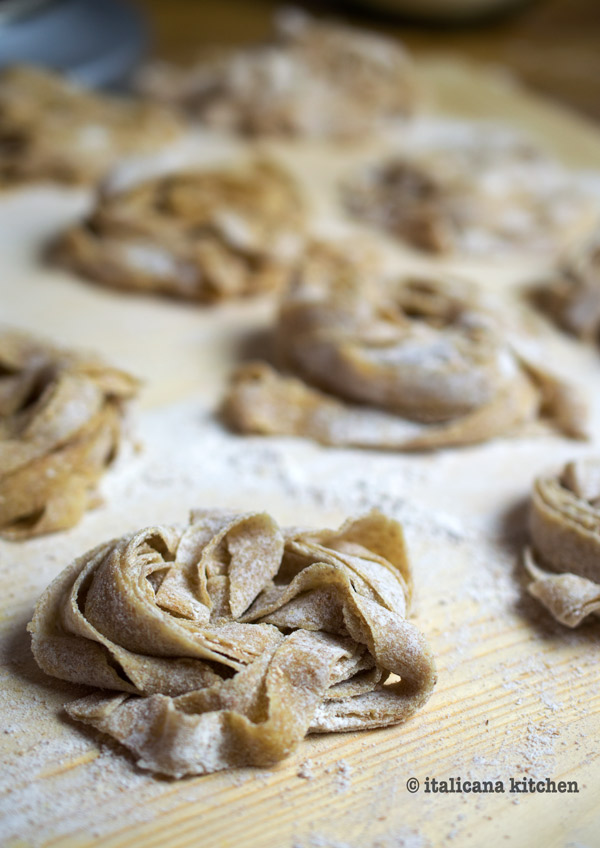
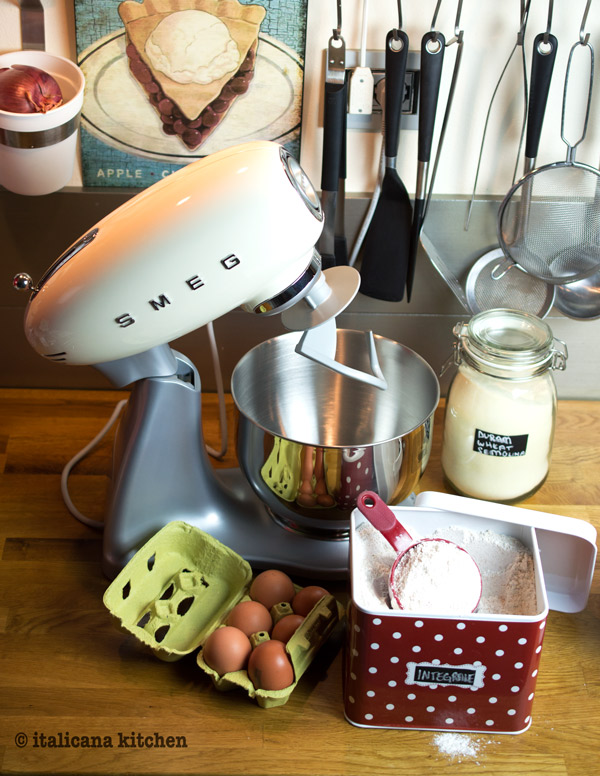
Tagliatelle is a traditional pasta from Emilia-Romagna, the region where I live. Tagliatelle is an egg pasta that resembles a long flat ribbon and is very similar to fettuccine, which are made in the same manner but are slightly wider in size. My mother-in-law Patrizia taught me how to make the traditional recipe by hand. (How lucky am I to have an Italian mother-in-law to pass down her secrets to me!) The traditional recipe is made with all-purpose flour or durum wheat semolina. I wanted to make a more nutritious pasta and therefore experimented 14 times (yes 14!) to find the right flours and amounts to create the perfect pasta that you can make entirely by hand or by using a stand still mixer. The winning flours that provided the perfect consistency were whole grain flour and durum wheat semolina.
This Smeg stand mixer is the first one I have every used, and, I can honestly say that, I’m in love. I always thought that stand mixers were a big investment and took up a lot of countertop space; yet, that is so worth the trade off for efficiency in the kitchen. I am always in a race with time, and while this machine mixed my dough I was able to set up my work space, clean some dishes and take some pictures. Plus, I honestly don’t mind having this Smeg stand mixer on my countertops as the 1950’s design is absolutely gorgeous and adds an element of style to my kitchen.
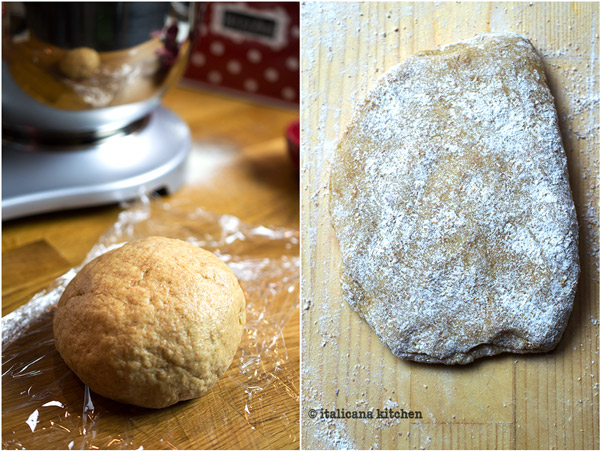
After you have mixed up the ingredients, it is important to divide the dough into two balls, wrap them in plastic wrap and store in the refrigerator for at least 1/2 hour. Then divide the dough into four equal parts, pat them into a rectangle shape and flour them well.
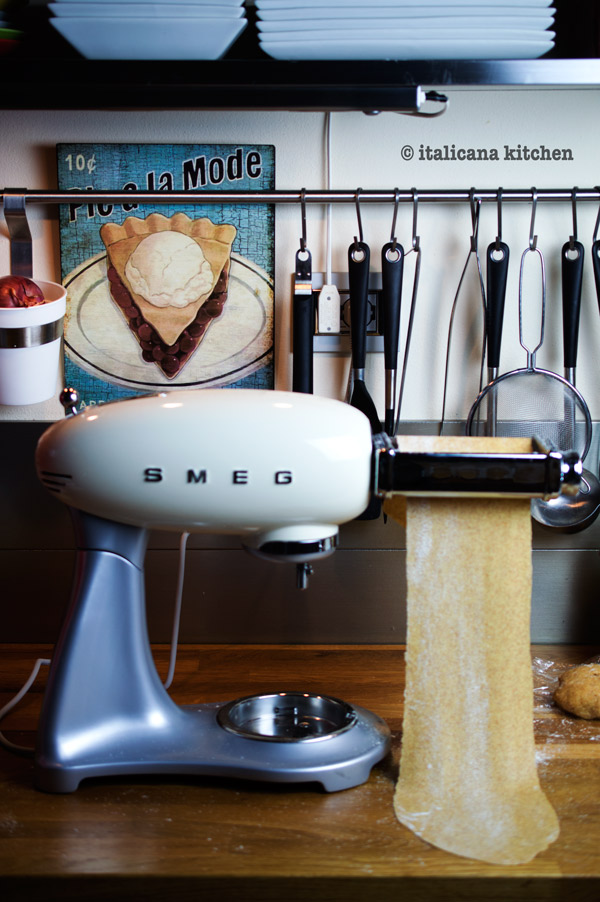
Flour the pasta roller accessory and run one piece of dough through it on setting 0 at speed 1 (the slowest.) Fold the dough over and pass it through again. Repeat another time. Continue to run the dough through the machine several times reducing the thickness from 0 to 5.
Repeat for all of the sheets of pasta, adding more flour each time to the pasta roller accessory.
Generously flour a large wooden board and place the pasta sheets on top. Generously flour both top and bottom of the pasta sheets. If you don’t flour them enough, the pasta will stick to itself when rolled and will be impossible to unroll.
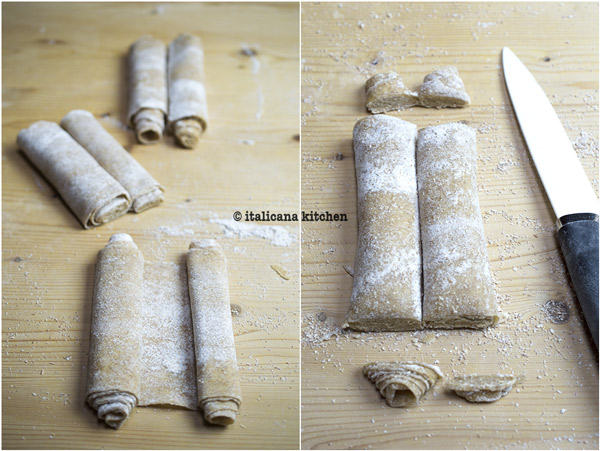
To easily unroll the tagliatelle ribbons, here is a little trick: instead of rolling the pasta sheet only to one side, roll both sides towards the middle, then even out the edges with a knife.
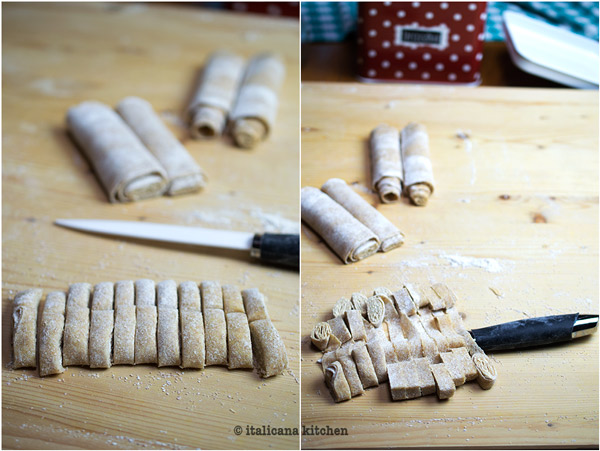
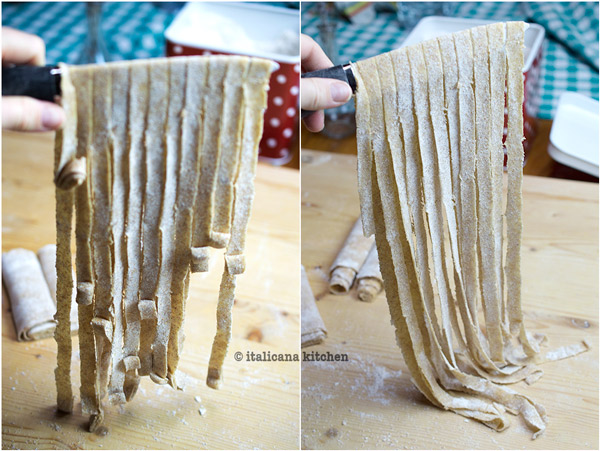
Slice the noodles so that they are 1/4 inch (10mm) and slide the knife under the pasta sheet.
Lift up with the sharp part of the knife pointing downwards so it doesn’t cut through the pasta sheet, and carefully unravel any pasta curls that didn’t automatically fall to the board.
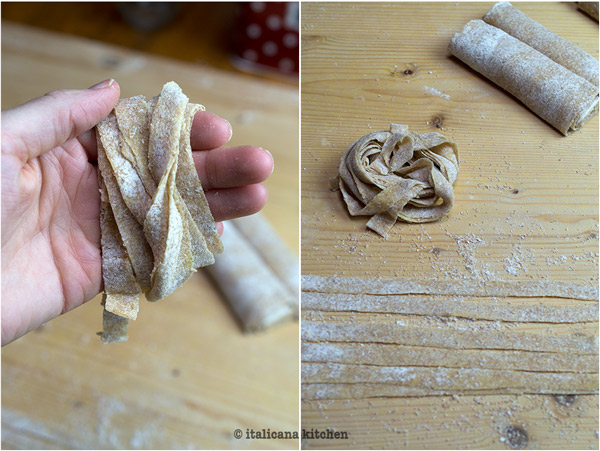
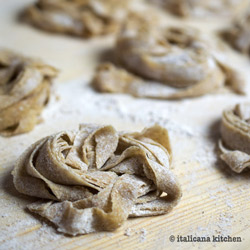
Lay out the pasta ribbons on the floured board. Take 3-4 ribbons in one hand and roll around your fingers as if you were rolling up a cord.
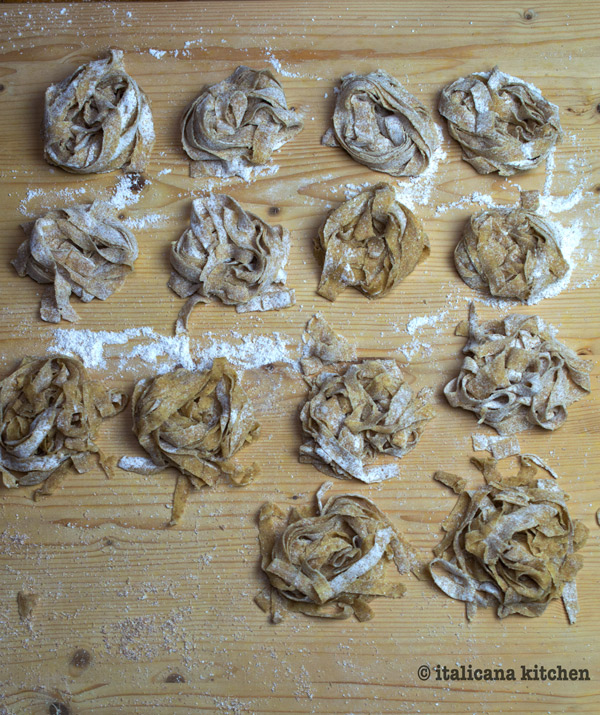
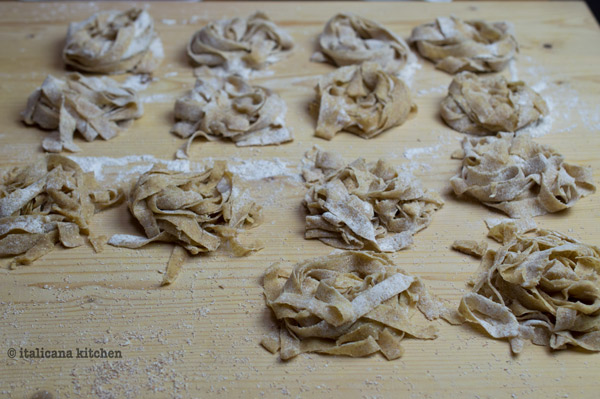
When all of the pasta has been loosely wrapped around your fingers, gently set it down on the floured board. These little clusters of pasta are called “nidi” in Italian, or “nests”, since they resemble bird nests. Repeat with the remaining dough.
It is usually recommended to allow fresh pasta to dry for a few hours before cooking; however, I couldn’t wait that long and tried cooking the pasta right after I made these and it turned out great.
The trick to a good Italian pasta is to generously salt the water after it is boiling; Mr. Italicano always notices if I forgot. This fresh tagliatelle only takes a few minutes to cook. I usually check after 2 minutes and every minute after until ready. The pasta should be “al dente” or slightly firm when bitten into.
The tagliatelle can be stored in the refrigerator for 1 day max, or you can freeze them. The best way to store them in the freezer is to put them on a cookie sheet so that they are not touching. Tuck them in the freezer until frozen, otherwise they will stick together, then you can place them in plastic bags, one on top of the other and take out the quantity you want as needed. Two little nests are 1 portion size.
Get a little taste of Italy without leaving your kitchen by making these handmade whole grain tagliatelle.
Serves: 4
Ingredients
1¾ cups (210g) whole grain flour
½ cup + 2 tablespoons (90g) durum wheat semolina
3 large eggs (2.2-2.4 ounces each)
2 pinches unrefined salt
1 tablespoon extra virgin olive oil
Instructions
Attach the dough hook to the stand mixer and add the flours, eggs, salt and extra virgin olive oil. Mix on speed 1 for five minutes. Stop the mixer and push against the dough with your finger. If it leaves an imprint (like a ripe peach) and doesn’t stick to your finger, it’s ready. If the dough, however, is sticky turn the stand mixer back on and gradually add a little more flour, stopping every so often to check the consistency until it no longer sticks to your finger.
If don’t have a stand mixer, follow the same procedure but knead by hand until the dough is homogenous, leaves an imprint when poked and isn’t sticky.
Divide the dough into two balls and wrap each one individually with some plastic wrap; place in the refrigerator for 30 minutes.
Attach the pasta roller accessory and sprinkle some flour on top. Divide each ball into two pieces (four pieces total), shape them into flat rectangles and flour generously on top and bottom. Pass one of the pieces through the machine on speed 1. Fold it back over on itself, and pass it through again. Repeat one more time before moving on to the next level of thickness. Pass the dough several times reducing the thickness from no. 0 to 5.
Generously flour a large wooden board and lay the pasta sheets on top as you roll them out.
If you are rolling out the dough with a rolling pin, it will be easier to divide the dough into two pieces and roll each one out on a generously floured wooden board. The dough should be rolled out thin enough that when you hold the dough up against a light you can see the light almost pass through.
Roll each side of the pasta sheet towards the center. Even off the ends with a knife but don’t throw away these scraps, you can stick them in the middle of the little pasta nests.
Slice the noodles so that they are ¼ inch (10mm) and slide the knife under the pasta sheet.
Lift up with the sharp part of the knife pointing down so it doesn’t cut through the pasta sheet, and carefully unravel any pasta curls that didn’t automatically fall to the board.
Lay out the pasta ribbons on a generously floured board. Take 3-4 ribbons in one hand and roll them around your fingers as if you were rolling up a cord.
When all of the pasta has been loosely wrapped around your fingers, gently set it down on the floured board. These little clusters of pasta are called “nidi” in Italian, or “nests”, since they resemble bird nests. Repeat with the remaining dough.
It is usually recommended to allow fresh pasta to dry for a few hours before cooking; however, I couldn’t wait that long and tried cooking the pasta right after I made these and it turned out great.
Bring a large pot of water to boil; add course salt then dump the tagliatelle inside. Cook for 2-3 minutes then check one to see if one is ready. The pasta should be “al dente” or slightly firm. If it is not ready, continue to cook for 1 minute and check again. Drain and serve with your sauce of choice and a big sprinkle of freshly grated Parmesan cheese.
Conservation
The tagliatelle can be stored in the refrigerator for 1 day max, or you can freeze them. The best way to store them in the freezer is to put them on a cookie sheet so that they are not touching. Tuck them in the freezer until frozen, otherwise they will stick together, then you can place them in plastic bags, one on top of the other and take out the quantity you want as needed. Two little nests are 1 portion size.
 Apart from it’s utter deliciousness, it’s also festive—look at those vibrant colors! I mean, who doesn’t like to wow their dinner party guests with stunning dishes at Thanksgiving or Christmas? So to recap: it’s super yum, it’s downright beautiful, but I still haven’t even told you the best part: CONTINUE READING
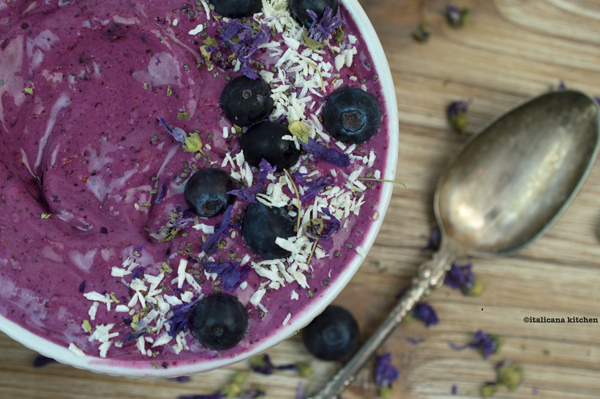
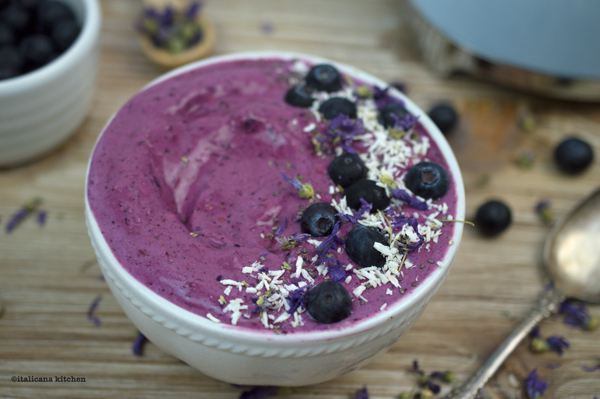 So what is the difference between a smoothie and a smoothie bowl? Two things:
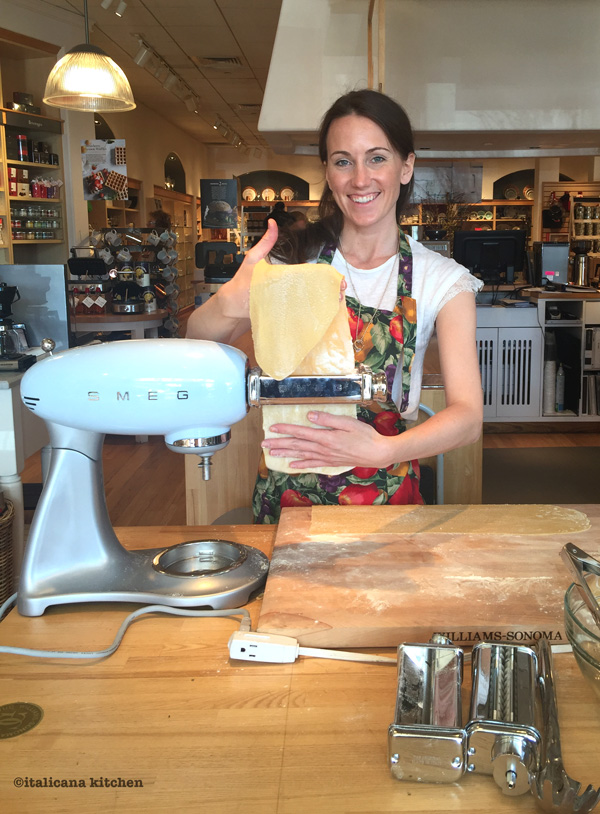


 After you have mixed up the ingredients, it is important to divide the dough into two balls, wrap them in plastic wrap and store in the refrigerator for at least 1/2 hour. Then divide the dough into four equal parts, pat them into a rectangle shape and flour them well.