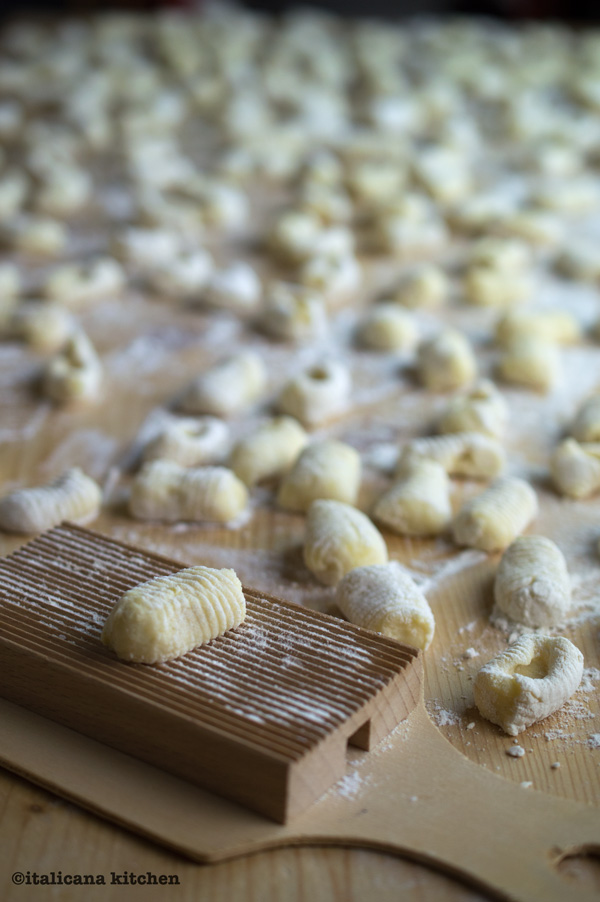
Making gnocchi is easy to do; making greatgnocchi is hard. There are many factors that could make your 4 ingredient recipe go awry. Luckily I have some tips and tricks straight from my Italian mother-in-law, Patrizia, that will make your gnocchi melt in your mouth every time.
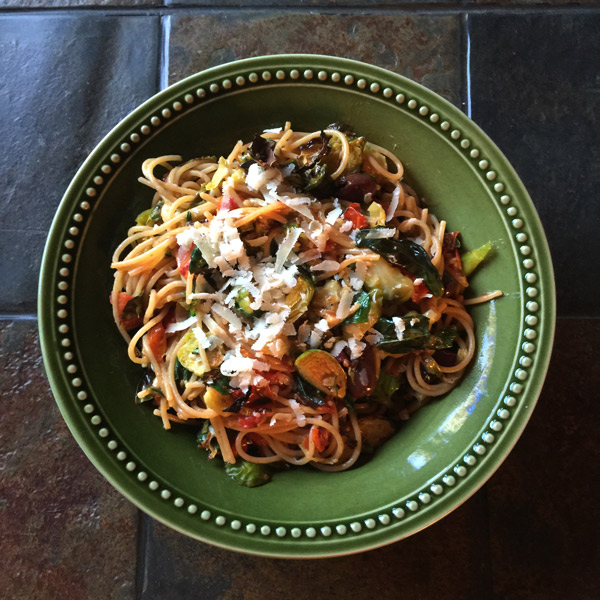
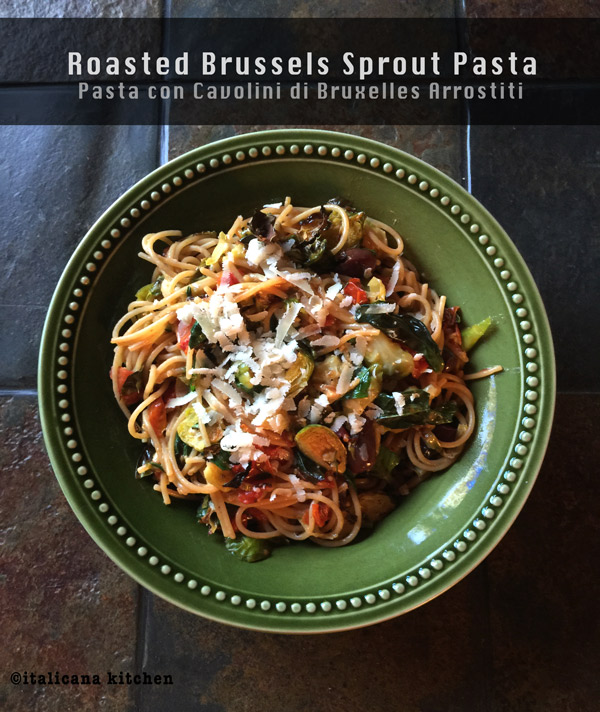
A Brussels sprout side dish is usually a staple on the holiday table, but have you tried them tossed with pasta and other roasted vegetables :: verdure arrostite? If not, you are in for a treat. And, no, these aren’t boiled and mushy, but delectable crunchy slivers of goodness.
In Italy, usually no family Sunday lunch or holiday meal is served without a bowl of pasta as a first course. In fact, Sunday lunches and holiday meals are a CONTINUE READING
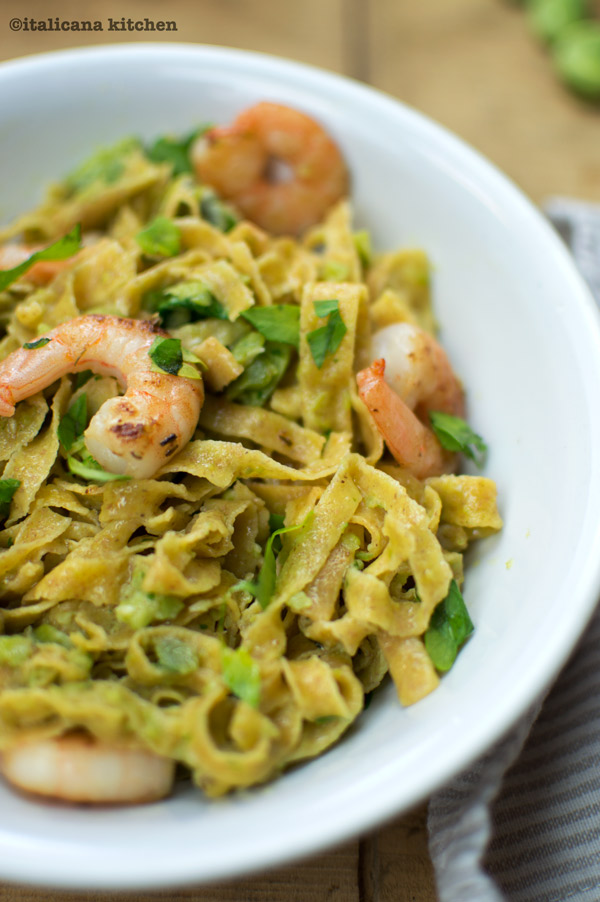
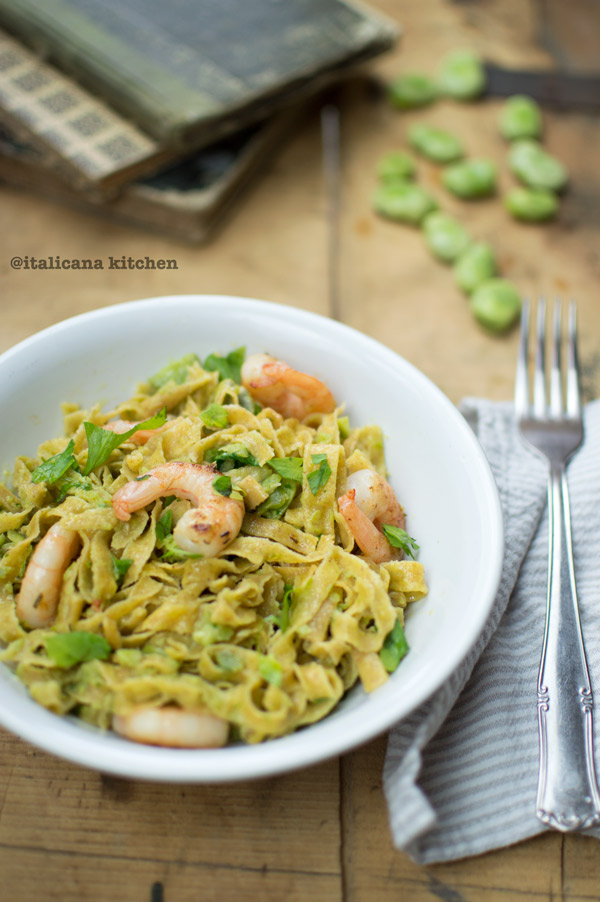
Fava beans, or broad beans, are in season :: in stagione in Italy, and I just can’t get enough of them! You can add them to vegetable stews like this Scafata recipe, you can puree the heck out of them to make a delicious fava bean and avocado dip or you can give them a short twirl in the blender and create a healthy chunky pesto that you can eat with crackers, toss it into a pasta dish or do like Mr. Italicano and gobble down spoonfuls straight from the jar.
In some recipes I keep the fava bean skins :: le bucce on to add texture, in this recipe I shucked them so that the creaminess of the fava beans had a moment in the spotlight. Oh, boy did they shine. Straight out of Mr. Italicano’s mouth came the words, “This is so f$&*@!*$ buona.” This time, I didn’t scold him for cursing and instead beamed him a smile, happy to receive his mixed Italian/English compliment.
Homemade pasta is really easy to make, especially if you have a stand mixer :: un’impastatrice. It may seem daunting or difficult, but it’s not. It takes just a few minutes in the stand mixer, 1/2 hour rest time in the fridge and 15 minutes to roll it out and cut the desired shape. Unlike dried pastas where the cooking time is often from 10-18 minutes, fresh pastas only need a few minutes in a pot of boiling salty water. It’s probably quicker to make your own at home than battle the traffic and check out counter lines to buy a bag of dried pasta and a sauce filled with preservatives. Bam. You can impress someone with homemade fresh pasta and a delicious healthy pesto even on a weeknight.
(For those of you who simply can’t be bothered to make the pasta, use the store bought kind, but at least try making the fava bean pesto below…trust me, it’s dynamite! You can also easily make this into a vegetarian pasta dish by omitting the shrimp.)
Impress someone with this delicious homemade farro tagliatelle pasta and fava bean pesto. They'll think you are Italian!
Serves: 4-5
Ingredients
For the Farro Tagliatelle:
1¾ cups (210g) whole grain farro
½ cup + 2 tablespoons (90g) durum wheat semolina
3 large eggs (2.2-2.4 ounces each)
2 pinches unrefined salt
1 tablespoon extra virgin olive oil
For the Fava Bean Pesto:
14 oz (400g) fava beans
1 garlic clove, minced
1 handful parsley
½ cup Parmigiano Reggiano
A few dashes of sweet paprika
Salt and black pepper, to taste
Extra virgin olive oil, as needed
For the shrimp:
20 shrimp or prawns
A few dashes of sweet paprika
2 tablespoons of dry white wine
1 tablespoon of extra virgin olive oil
Instructions
For detailed instructions on how to make homemade pasta with photos, check out this post. Attach the dough hook to the stand mixer and add the flours, eggs, salt and extra virgin olive oil. Mix on speed 1 for a few minutes, adding a tablespoon of water at a time, if needed, until it comes together in a ball. Stop the mixer and push against the dough with your finger. If it leaves an imprint (like a ripe peach) and doesn’t stick to your finger, it’s ready. If the dough, however, is sticky turn the stand mixer back on and gradually add a little more flour, stopping every so often to check the consistency until it no longer sticks to your finger.
If don’t have a stand mixer, follow the same procedure but knead by hand until the dough is homogenous, leaves an imprint when poked and isn’t sticky.
Divide the dough into two balls and wrap each one individually with some plastic wrap; place in the refrigerator for 30 minutes.
In the meantime, make the fava bean pesto.
Bring a medium pot of water to boil, add the fava beans and cook them for a few minutes. Run them under cold water and shuck their outer skin. Put the inside bean in a blender or food processor. Add the garlic, parsley, Parmigiano Reggiano, paprika, salt, pepper and a few spoonfuls of extra virgin olive oil. Blend everything together, adding in more olive oil until it because a think chunky sauce.
Attach the pasta roller accessory and sprinkle some flour on top. Divide each ball into two pieces (four pieces total), shape them into flat rectangles and flour generously on top and bottom. Pass one of the pieces through the machine on speed 1. Fold it back over on itself, and pass it through again. Repeat one more time before moving on to the next level of thickness. Pass the dough several times reducing the thickness from no. 0 to 5.
Generously flour a large wooden board and lay the pasta sheets on top as you roll them out.
If you are rolling out the dough with a rolling pin, it will be easier to divide the dough into two pieces and roll each one out on a generously floured wooden board. The dough should be rolled out thin enough that when you hold the dough up against a light you can see the light almost pass through.
Roll each side of the pasta sheet towards the center. Even off the ends with a knife but don’t throw away these scraps, you can stick them in the middle of the little pasta nests.
Use the stand mixer tagliatelle pasta device to cut them to the right size (or another shape of pasta). If you don’t have the pasta device, slice the noodles so that they are about ¼ inch.
Lay out the pasta ribbons on a generously floured board. Take a small handful in one hand and roll them around your fingers as if you were rolling up a cord.
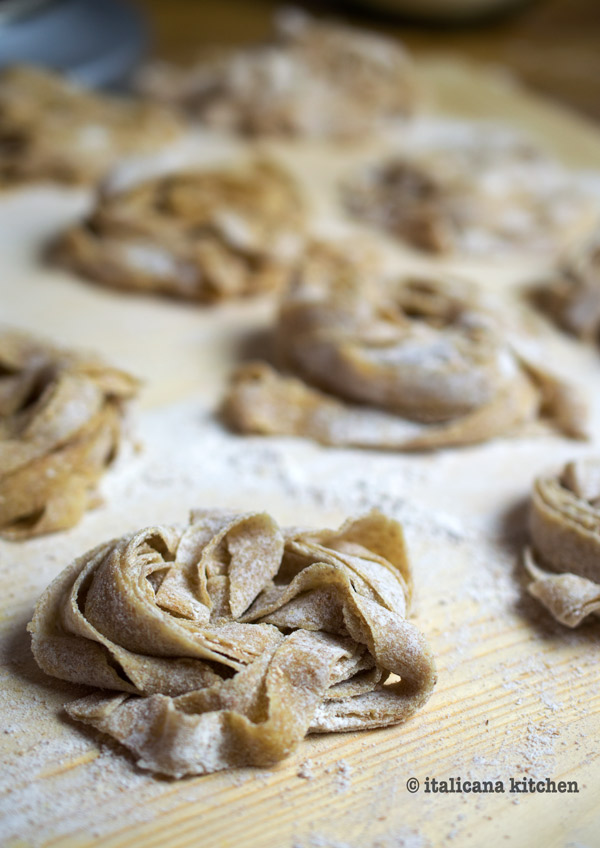
When all of the pasta has been loosely wrapped around your fingers, gently set it down on the floured board. These little clusters of pasta are called “nidi” in Italian, or “nests”, since they resemble bird nests. Repeat with the remaining dough.
Bring a medium pot of water to boil; add course salt then dump the tagliatelle inside. Cook for 2-3 minutes then check one to see if one is ready. The pasta should be “al dente” or slightly firm. If it is not ready, continue to cook for 1 minute and check again.
In a medium skilled at the extra virgin olive oil, white wine, shrimp and a few dashes of sweet paprika. Cook for 3-4 minutes over medium high heat or until the shrimp are no longer transparent. Remove the skillet from the heat.
Drain the pasta reserving a cupful of the water. Add the pasta to the shrimp along with the fava bean pesto. Stir well, adding a few spoonfuls of cooking water if needed to thin the sauce.
Conservation:
The uncooked tagliatelle can be stored in the refrigerator for 1 day max, or you can freeze them. The best way to store them in the freezer is to put them on a cookie sheet so that they are not touching. Tuck them in the freezer until frozen, otherwise they will stick together, then you can place them in plastic bags, one on top of the other and take out the quantity you want as needed.
Last week I talked about the beauty of food boxes and without further ado here is the full video-recipe for Spaghettoni with Red Wine Tomato Sauce made with delicious high quality Italian artisanal products.
P.S. If you want to support small Italian artisans who have outstanding quality products head over to augustoitalianfood.com . Just for italicana kitchen followers you can get a 10% discount at checkout by entering in ITALICANAKITCHEN. Buon appetito!
Note:This post is not paid by augusto italian food. All thoughts and opinions are my own.
Spaghetti with Red Wine Tomato Sauce is a delicious Italian pasta dish that is made with high quality artisanal products from AuGusto Italian Food.
Cuisine: Italian
Serves: 4
Ingredients
Extra virgin olive oil, as needed
1 garlic clove, cut into thick slices
1 shallot, cut into thick slices
400g Peeled San Marzano DOP Tomatoes
¼ cup still red wine
1 teaspoon milk
2 anchovy fillets, under oil
2 teaspoons capers in salt, desalinated
3 pinches of dried oregano
1 handful of fresh basil, chopped
Salt and black pepper, to taste
400g of Spaghettoni (or spaghetti)
Instructions
Bring a large pot of water to boil, add course salt and cook the pasta for 15 minutes.
Put some extra virgin olive oil in a large pan and over low heat, cook the shallot and garlic for a few minutes to give flavor to the oil. Discard the shallot and garlic.
Add the tomatoes and smash them in the pan with a wooden spoon. Bring to a simmer then add the red wine, milk, anchovies, capers, oregano and bay leaves. Continue to simmer for 5-10 minutes or until the sauce has thickened. Add the basil and season with salt and black pepper, to taste.
While the pasta and sauce are cooking, pour yourself a glass of wine. Drain the pasta, keeping some of the water aside in case you need to thin the sauce. Mix the pasta with the sauce until the sauce has been thoroughly distributed. Serve with freshly grated Parmesan cheese. Buon appetito!
Notes
You can also use tomatoes with the skins, but you will need to blend the sauce in a food processor before mixing it with the pasta.
For foodies, the varied and plentiful gastronomic festivals in Italy are a dream come true. Throughout the year there are countless celebrations that take part in big cities as well as small countryside towns. Cobblestone city squares are filled with numerous stands offering passersby the opportunity to taste and buy artisanal products specific to the festival’s theme. From wine to cheese, pumpkin to risotto—you’ll find numerous festivals :: sagre that promote local beverages, vegetables or typical Italian dishes.
A few weeks ago Mr. Italicano and I went to the sagra di tartufo :: truffle festival with 20 some friends in Cavola, a small country town in the region of Emilia Romagna. We spent the warm Autumn morning touring the stands that were selling truffle oil, truffle cheese and of course truffles straight from the ground. Although the white truffles were out of my budget (around 300 euros a piece!), I picked up a small paper bag full of black summer truffles.
We then headed into a large community hall where over 500 people packed in for lunch with a set menu: truffle rose pasta and truffle risotto for the first course; roasted pig and roasted potatoes for the main dish followed by fruit tarts :: crostate di frutta. That lunch reminded me of the pancake feeds the Lions Club put on in the small town where I grew up in Eastern Washington.
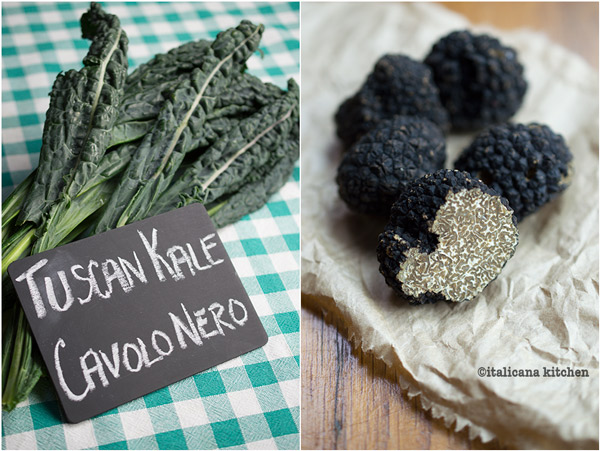
There are different kinds of truffles but the three most common are:
White Truffle—The most prestigious and expensive truffle that is found in Italy, Croatia, Slovenia and France.
Black Truffle (or Black Périgord Truffle)—The second most valued species and is native to Southern Europe.
Black Summer Truffle—More economic than the first two truffles but still highly prized.
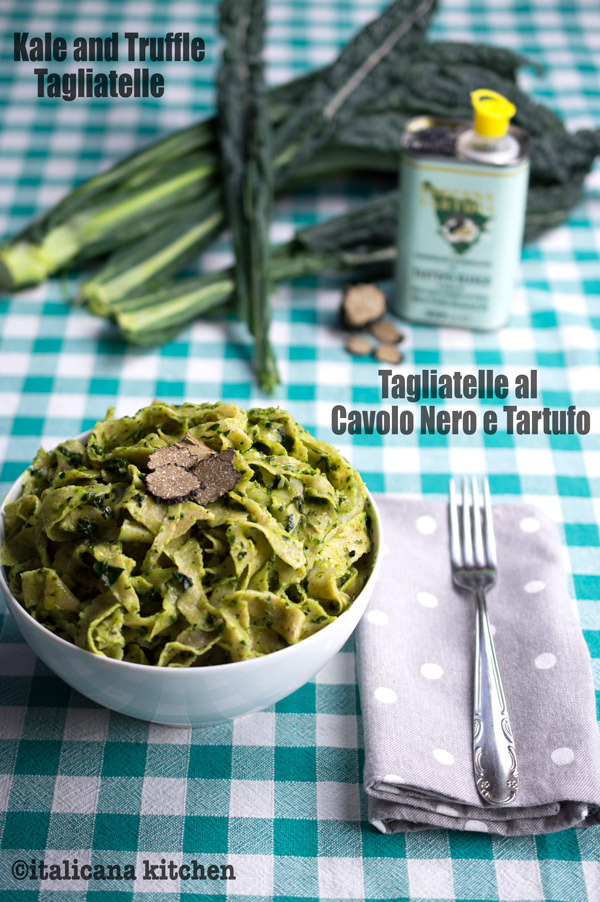
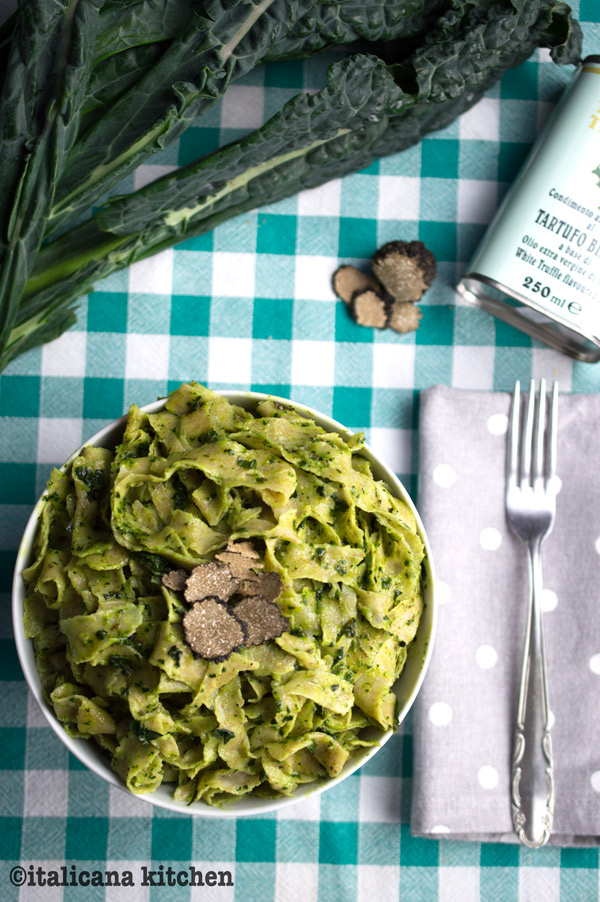
Black summer truffles ::tartufi neri estivi are extremely versatile in the kitchen. They are often shaved fresh over a dish or infused into sauces to add depth. In this kale and truffle tagliatelle recipe I grated them into the mixture as well as topped with some shavings.
I like strong flavors and therefore added a dash of truffle oil. Even at the truffle festival lunch they used a concentrated truffle butter and freshly shaved truffles to create a rich flavorful dish. If you already have black summer truffles on hand, this is a great recipe to try; for those who don’t, you can simply use truffle oil or truffle butter :: burro di tartufo instead.
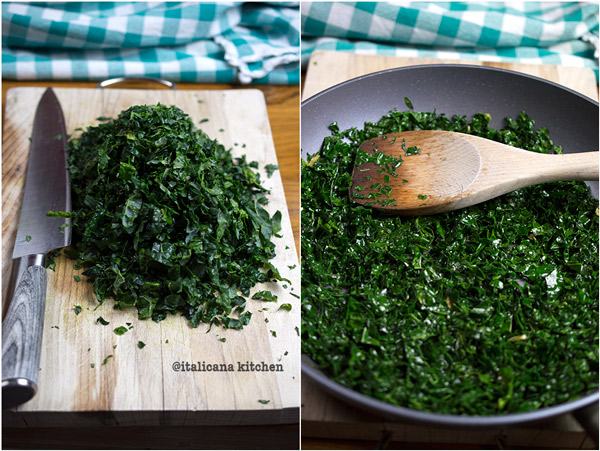
12 ounces (350g) tuscan kale (or other kale variety), center ribs removed, leaves chopped
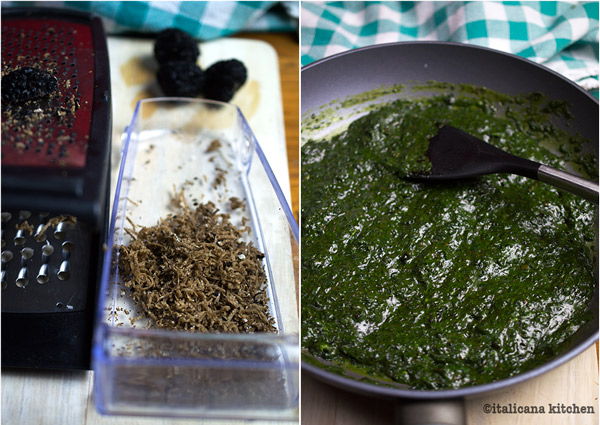
5 summer truffles (45g, 1.5 ounces), washed and scrubbed
1-2 teaspoons truffle oil
1 cup rice cream (or heavy cream)
Knob of butter
Salt
Instructions
Bring a medium pot of water to boil.
Add 1 tablespoon of extra virgin olive oil to a medium skillet and sauté the garlic over medium low heat for 2-3 minutes. Add the chopped kale and continue to cook until the kale is wilted; 3-4 minutes.
Put the mixture into a blender or food processor, add 1 tablespoon extra virgin olive oil and blend until smooth.
Return the mixture to the pan and add the grated truffles, truffle oil, cream, butter and salt. Cook on medium heat until warm.
When the water is boiling, add coarse salt and cook the homemade tagliatelle for 2-3 minutes or according to the instructions on the package. Drain the pasta and mix with the sauce. Top with a few pieces of freshly shaved truffles.
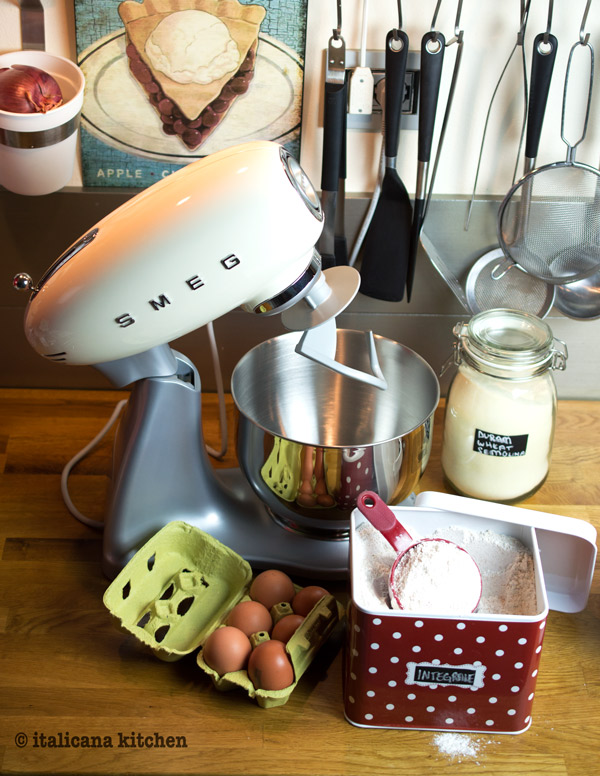
Tagliatelle is a traditional pasta from Emilia-Romagna, the region where I live. Tagliatelle is an egg pasta that resembles a long flat ribbon and is very similar to fettuccine, which are made in the same manner but are slightly wider in size. My mother-in-law Patrizia taught me how to make the traditional recipe by hand. (How lucky am I to have an Italian mother-in-law to pass down her secrets to me!) The traditional recipe is made with all-purpose flour or durum wheat semolina. I wanted to make a more nutritious pasta and therefore experimented 14 times (yes 14!) to find the right flours and amounts to create the perfect pasta that you can make entirely by hand or by using a stand still mixer. The winning flours that provided the perfect consistency were whole grain flour and durum wheat semolina.
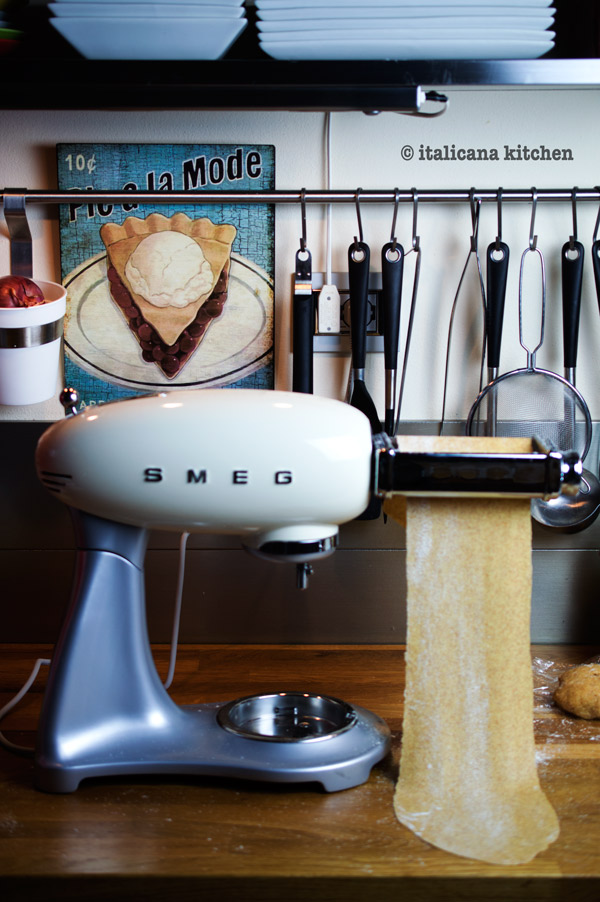
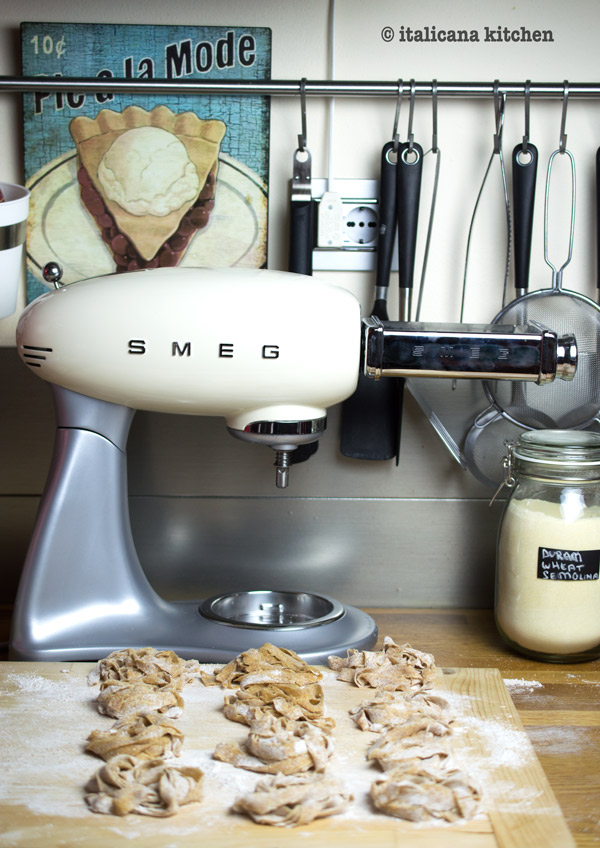
This Smeg stand mixer is the first one I have every used, and, I can honestly say that, I’m in love. I always thought that stand mixers were a big investment and took up a lot of countertop space; yet, that is so worth the trade off for efficiency in the kitchen. I am always in a race with time, and while this machine mixed my dough I was able to set up my work space, clean some dishes and take some pictures. Plus, I honestly don’t mind having this Smeg stand mixer on my countertops as the 1950’s design is absolutely gorgeous and adds an element of style to my kitchen.
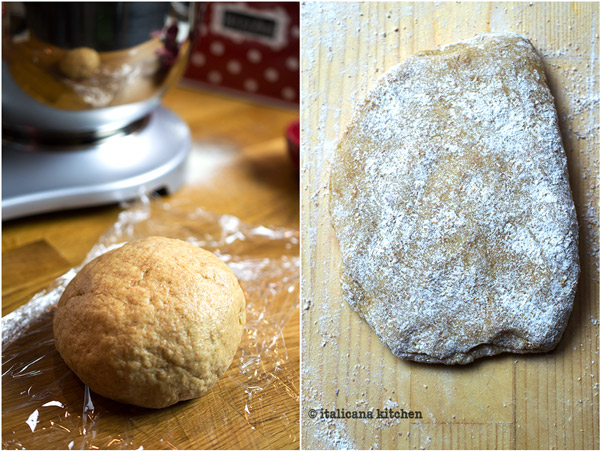
After you have mixed up the ingredients, it is important to divide the dough into two balls, wrap them in plastic wrap and store in the refrigerator for at least 1/2 hour. Then divide the dough into four equal parts, pat them into a rectangle shape and flour them well.
Flour the pasta roller accessory and run one piece of dough through it on setting 0 at speed 1 (the slowest.) Fold the dough over and pass it through again. Repeat another time. Continue to run the dough through the machine several times reducing the thickness from 0 to 5.
Repeat for all of the sheets of pasta, adding more flour each time to the pasta roller accessory.
Generously flour a large wooden board and place the pasta sheets on top. Generously flour both top and bottom of the pasta sheets. If you don’t flour them enough, the pasta will stick to itself when rolled and will be impossible to unroll.
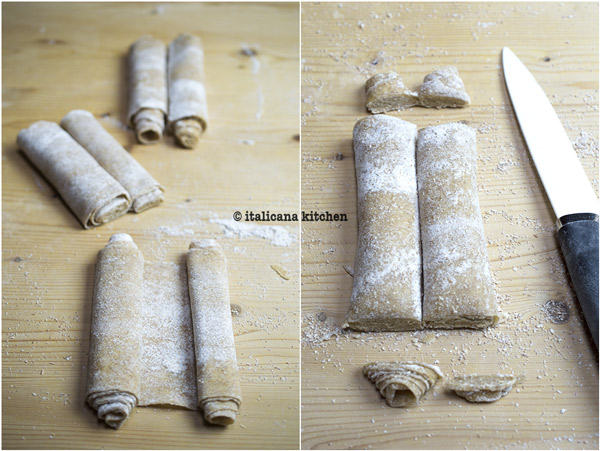
To easily unroll the tagliatelle ribbons, here is a little trick: instead of rolling the pasta sheet only to one side, roll both sides towards the middle, then even out the edges with a knife.
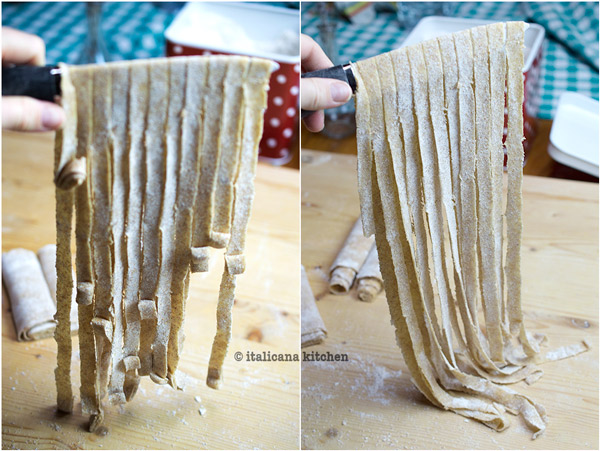
Slice the noodles so that they are 1/4 inch (10mm) and slide the knife under the pasta sheet.
Lift up with the sharp part of the knife pointing downwards so it doesn’t cut through the pasta sheet, and carefully unravel any pasta curls that didn’t automatically fall to the board.
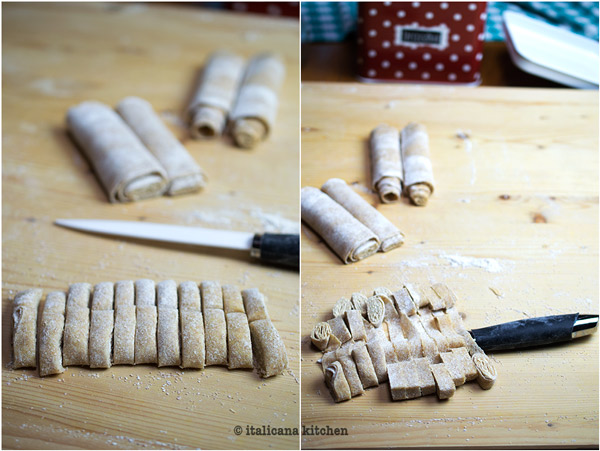
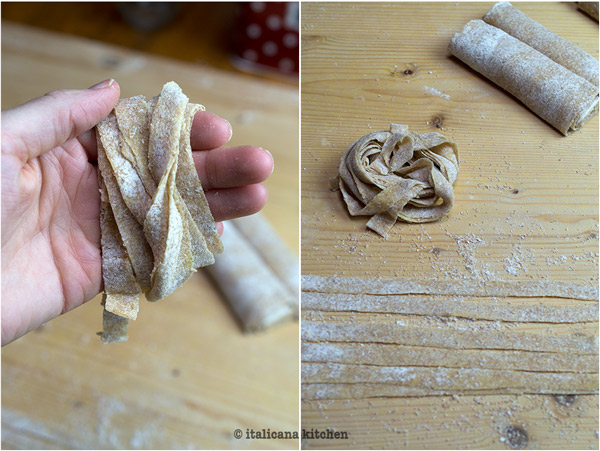
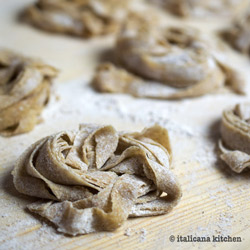
Lay out the pasta ribbons on the floured board. Take 3-4 ribbons in one hand and roll around your fingers as if you were rolling up a cord.
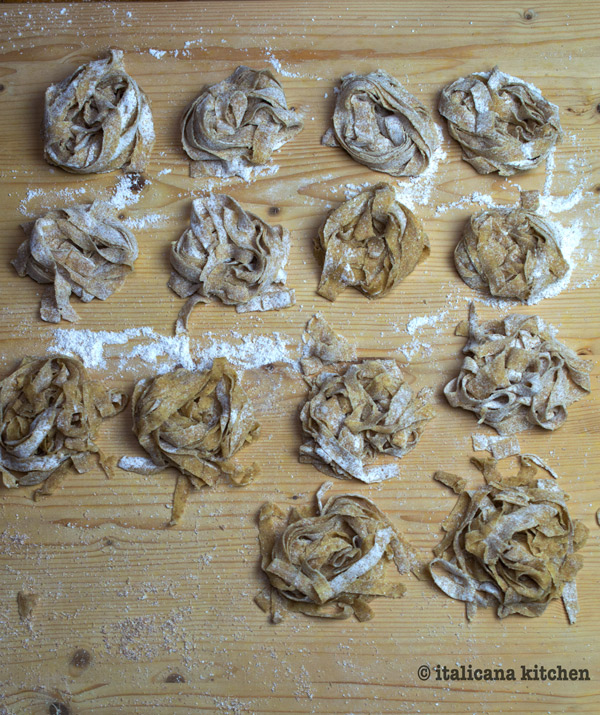
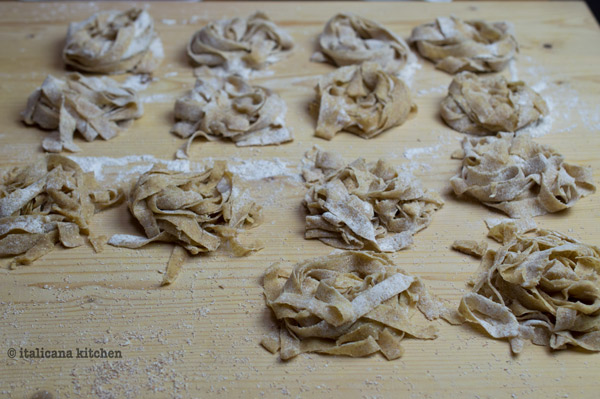
When all of the pasta has been loosely wrapped around your fingers, gently set it down on the floured board. These little clusters of pasta are called “nidi” in Italian, or “nests”, since they resemble bird nests. Repeat with the remaining dough.
It is usually recommended to allow fresh pasta to dry for a few hours before cooking; however, I couldn’t wait that long and tried cooking the pasta right after I made these and it turned out great.
The trick to a good Italian pasta is to generously salt the water after it is boiling; Mr. Italicano always notices if I forgot. This fresh tagliatelle only takes a few minutes to cook. I usually check after 2 minutes and every minute after until ready. The pasta should be “al dente” or slightly firm when bitten into.
The tagliatelle can be stored in the refrigerator for 1 day max, or you can freeze them. The best way to store them in the freezer is to put them on a cookie sheet so that they are not touching. Tuck them in the freezer until frozen, otherwise they will stick together, then you can place them in plastic bags, one on top of the other and take out the quantity you want as needed. Two little nests are 1 portion size.
Get a little taste of Italy without leaving your kitchen by making these handmade whole grain tagliatelle.
Serves: 4
Ingredients
1¾ cups (210g) whole grain flour
½ cup + 2 tablespoons (90g) durum wheat semolina
3 large eggs (2.2-2.4 ounces each)
2 pinches unrefined salt
1 tablespoon extra virgin olive oil
Instructions
Attach the dough hook to the stand mixer and add the flours, eggs, salt and extra virgin olive oil. Mix on speed 1 for five minutes. Stop the mixer and push against the dough with your finger. If it leaves an imprint (like a ripe peach) and doesn’t stick to your finger, it’s ready. If the dough, however, is sticky turn the stand mixer back on and gradually add a little more flour, stopping every so often to check the consistency until it no longer sticks to your finger.
If don’t have a stand mixer, follow the same procedure but knead by hand until the dough is homogenous, leaves an imprint when poked and isn’t sticky.
Divide the dough into two balls and wrap each one individually with some plastic wrap; place in the refrigerator for 30 minutes.
Attach the pasta roller accessory and sprinkle some flour on top. Divide each ball into two pieces (four pieces total), shape them into flat rectangles and flour generously on top and bottom. Pass one of the pieces through the machine on speed 1. Fold it back over on itself, and pass it through again. Repeat one more time before moving on to the next level of thickness. Pass the dough several times reducing the thickness from no. 0 to 5.
Generously flour a large wooden board and lay the pasta sheets on top as you roll them out.
If you are rolling out the dough with a rolling pin, it will be easier to divide the dough into two pieces and roll each one out on a generously floured wooden board. The dough should be rolled out thin enough that when you hold the dough up against a light you can see the light almost pass through.
Roll each side of the pasta sheet towards the center. Even off the ends with a knife but don’t throw away these scraps, you can stick them in the middle of the little pasta nests.
Slice the noodles so that they are ¼ inch (10mm) and slide the knife under the pasta sheet.
Lift up with the sharp part of the knife pointing down so it doesn’t cut through the pasta sheet, and carefully unravel any pasta curls that didn’t automatically fall to the board.
Lay out the pasta ribbons on a generously floured board. Take 3-4 ribbons in one hand and roll them around your fingers as if you were rolling up a cord.
When all of the pasta has been loosely wrapped around your fingers, gently set it down on the floured board. These little clusters of pasta are called “nidi” in Italian, or “nests”, since they resemble bird nests. Repeat with the remaining dough.
It is usually recommended to allow fresh pasta to dry for a few hours before cooking; however, I couldn’t wait that long and tried cooking the pasta right after I made these and it turned out great.
Bring a large pot of water to boil; add course salt then dump the tagliatelle inside. Cook for 2-3 minutes then check one to see if one is ready. The pasta should be “al dente” or slightly firm. If it is not ready, continue to cook for 1 minute and check again. Drain and serve with your sauce of choice and a big sprinkle of freshly grated Parmesan cheese.
Conservation
The tagliatelle can be stored in the refrigerator for 1 day max, or you can freeze them. The best way to store them in the freezer is to put them on a cookie sheet so that they are not touching. Tuck them in the freezer until frozen, otherwise they will stick together, then you can place them in plastic bags, one on top of the other and take out the quantity you want as needed. Two little nests are 1 portion size.


 Last week I talked about the
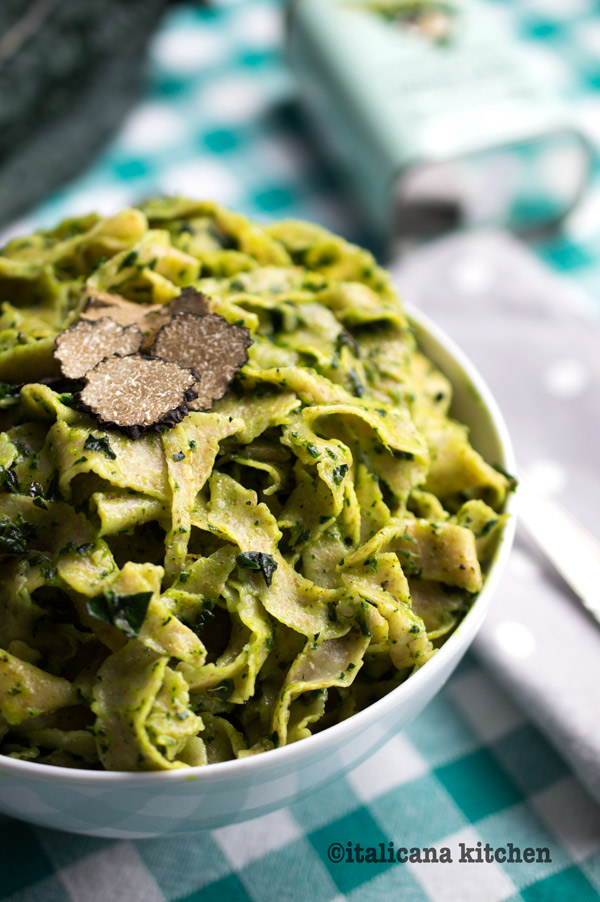


 After you have mixed up the ingredients, it is important to divide the dough into two balls, wrap them in plastic wrap and store in the refrigerator for at least 1/2 hour. Then divide the dough into four equal parts, pat them into a rectangle shape and flour them well.