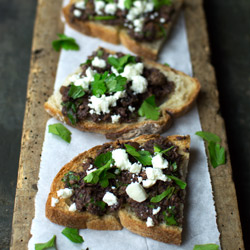
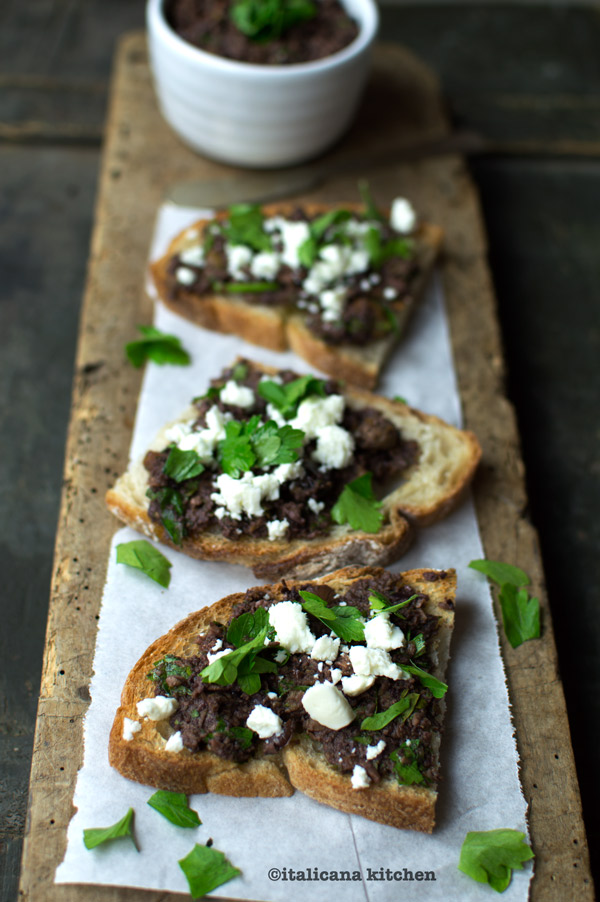
You might be wondering what that weird foreign word is in the title. It’s the variety of one of my favorite Italian olives and is pronounced taj-jas-kay. These small greenish-purplish-brownish olives are cultivated on the rocky mountain slopes ::pendenze of the Italian Riviera in Liguria.
Taggiasche olives have a meaty texture and a slightly tart salty flavor. They are perfect ground up in this pesto or just plopped into various salads or entrees, especially with white fish like rockfish :: loscorfano.
If there is one thing I beg of you, it’s to use a good rustic bread, not the store bought sliced kind. Mr. Italicano and I shot a video this weekend at our favorite bakery :: forno, Forno di Mario, located in Correggio. The video will be coming soon but in the meantime we took home a loaf of miracle bread made with natural yeast and antique grains. This bread was perfect for a light and crunchy bruschetta.
This appetizer :: antipasto is perfect for last minute guests as you can whip it together in just 5 minutes. It helps to have a jar of good quality taggiasche olives in the cupboard for occasions like this.
This appetizer is perfect for last minute guests as you can whip it together in just 5 minutes.
Serves: 10-12 bruschette
Ingredients
6 tablespoons of extra virgin olive oil
12 ounces (340g) taggiasche olives, drained
2 tablespoons lemon juice (about half a lemon)
1 clove garlic, minced
1 cup (10g) loosely packed Italian flat leaf parsley
1 loaf of rustic bread, sliced
Crumbled feta, as needed
Instructions
Put the oil, olives, lemon juice, garlic, capers and parsley in a food processor or blender and mix until slightly chunky. Add more extra virgin olive oil if needed to arrive at the desired consistency.
Serve with toasted bread, some crumbled feta and parsley.
3.2.2925
Here’s some other great recipe to try with taggiasche olives:
Whenever I travel to a new country, I make it a rule to eat only local food. I see it as a chance for me to learn, discover and explore a culture through its gastronomy :: gastronomia. After all, I never know if I will be back. I fear that I might miss out on some spectacular dish or some new flavor sensation that will push my tastebuds to a new level.
Years ago, when I was traveling with my friend Suzanne in South East Asia, we stuck to this rule. From what I recall, we only cheated a few times: Mexican food in Vietnam (it was just too irresistable); and, maybe a Starbuck’s coffee in an airport or two. Apart from those few occasions, we spent six months together traveling to over nine countries, eating like locals. We shopped at rowdy markets, ate street food ::il cibo venduto per strada every chance we could, participated in cooking classes and arranged home stays so we could stay and dine in some local’s homes and get a real authentic experience of the culture.
For me, food is not just a way to nourish :: nutrire my body, but a way for me to satisfy my curiosity and, more importantly, a way for me to remember. A lot of my memories of a country are associated with food. That is just how my brain works. After month or even years have passed after a trip, I usually can never remember the historical sites or famous works of art in museums, but I can remember the memorable food that I ate.
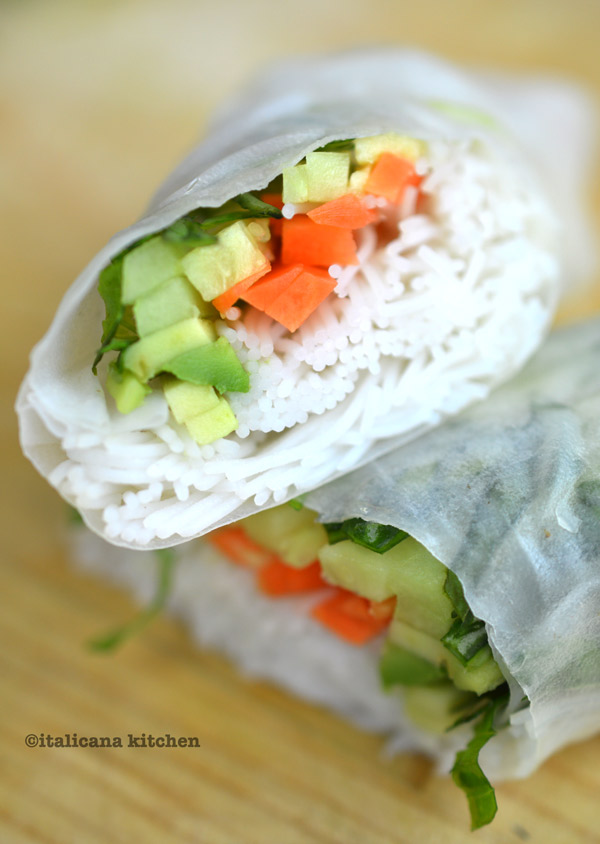
These spring rolls bring back great memories of Thailand. I am on Railay Island. It is dark out, but Suzanne, Brian (another friend who was traveling with us for a few weeks) and I use our head lamps to keep from tripping on the dirt and stone path leading to an open air restaurant tucked a hundred yards inland. We walk up the stairs and find a table by a railing on the expansive porch. We sit on dark wooden stools and look out towards the Andaman Sea where we can faintly make out the waves crashing on the beach. Wafts of mosquito spray, sweet flowers and thai spices fill the air. Oh, that sticky air that makes your face shiny and your clothes cling to you. We order our food and shortly afterwards, our appetizer ::antipasto arrives: fresh spring rolls. I take a bite.
Now I find myself back in my kitchen. I am alone…no friends, sea or humid air; but, for a fleeting moment I was there. With a bite of these spring rolls :: involtini primavera I had been transported back in time to a country thousands of miles away. I had been sitting with my dear friends and enjoying an incredible meal in a foreign place. I never knew when I would have gone back to Thailand, but today for a moment, I did.
These spring rolls are a light and easy-to-prepare appetizer; perfect for spring and summer.
Ingredients
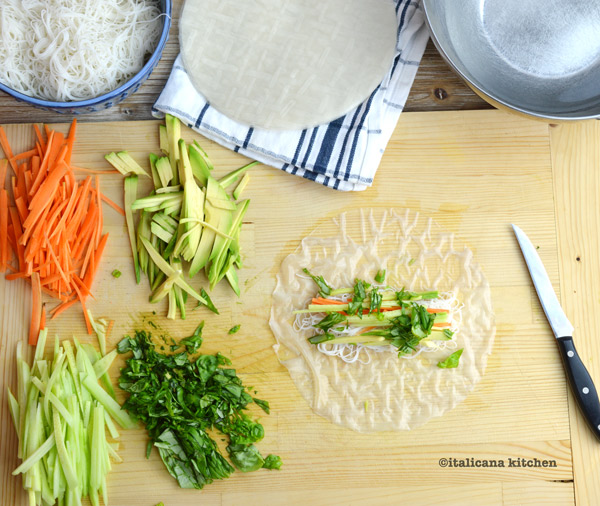
2 oz (100g) vermicelli noodles
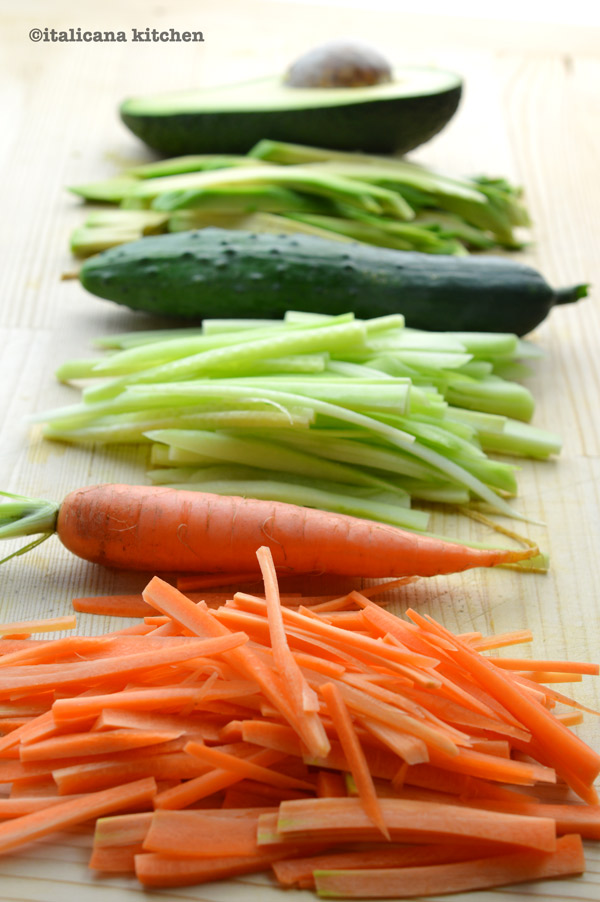
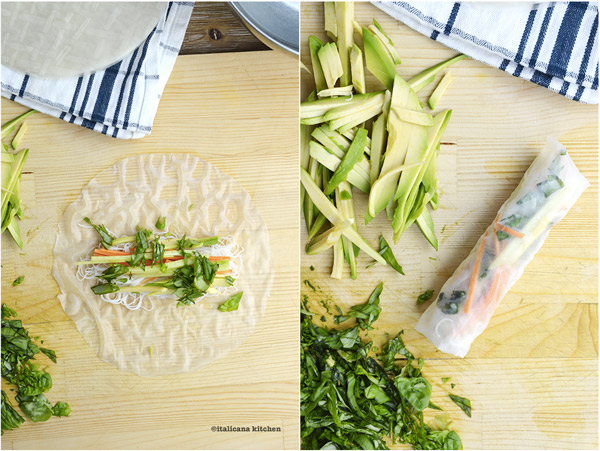
2 carrots, cut into julienne
1 cucumber, cut into julienne
Avocado, cut into julienne
Basil, roughly chopped
12 rice papers
1 bowl warm water
Instructions
Bring a medium pot of water to boil. Put the vermicelli noodles in a large bowl. Once the water is boiling, pour it onto the noodles and let them soak for 4-5 minutes. Drain and let cool.
Set up your work station with the noodles, carrots, cucumber, avocado, basil and warm water. You’ll also need a cutting board to roll and cut each spring roll.
Soak one rice paper at a time for about 10 seconds then place it on the cutting board. It should be pliable but not too wet it tears. Load the rice paper with a small amount of rice noodles, carrots, cucumber, avocado and basil. Fold the sides in and then roll tightly. Cut in half. Repeat with the remaining ingredients.
Serve with soy sauce, peanut sauce or chili sauce.
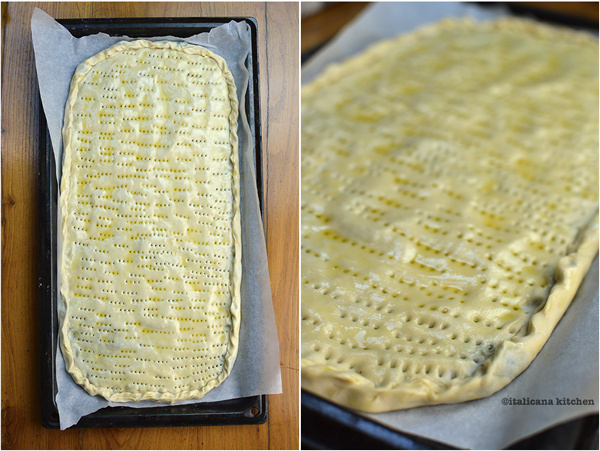
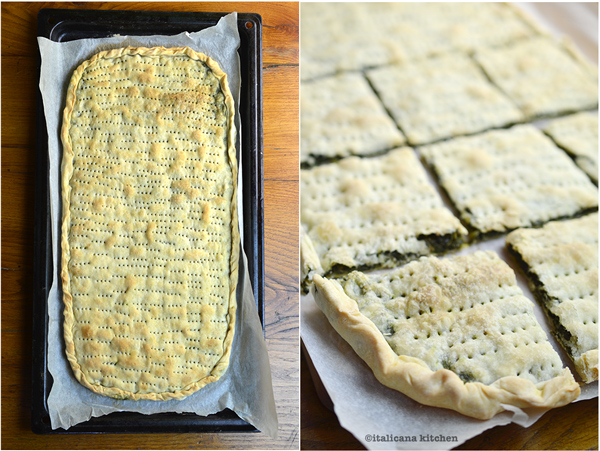
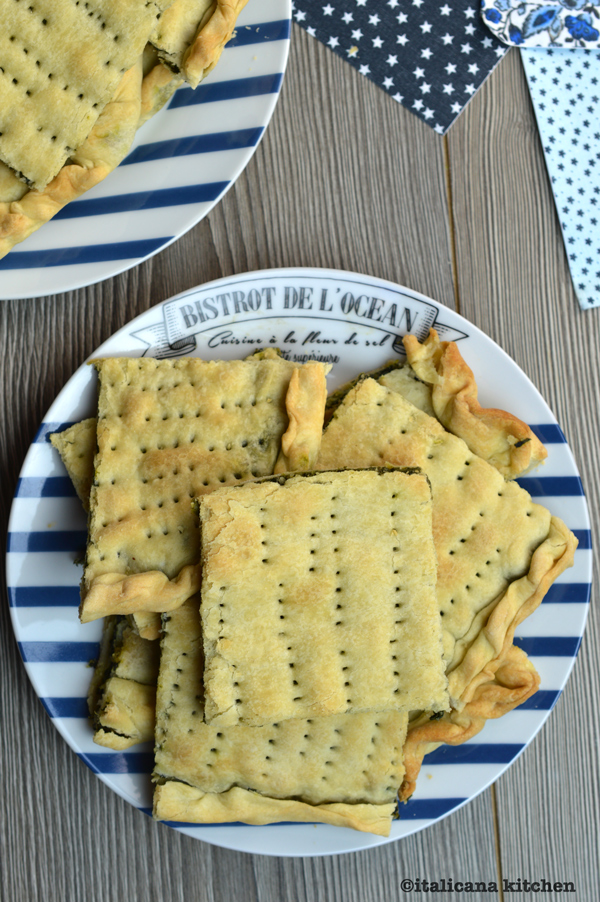
If you’ve ever traveled around Italy, you’ve probably discovered that every region, even each town, has special traditional dishes :: piatti.Erbazzone, a delicious spinach pie, is one of these unique dishes that originated from Reggio Emilia, a quaint town in the region of Emilia-Romagna. The easiest way to show you how to make this Italian delicacy is with a short video. Enjoy! 🙂
I still remember the first time I ate erbazzone. It was over six years ago and my second morning of living in Italy, my new home ::casa. I remember walking into the town’s center for a cappuccino and a brioche (or croissant, as Italians most commonly call them.) They were out of my favorite kind: whole wheat with honey, so, I instead opted for the inviting little square slice in the display cabinet. I had no idea what it was. I just pointed and the person behind the counter said a weird name: erbazzone.
It was love at first bite. Thin layers of crust surrounded cooked greens (Swiss chard and spinach, I came to find out). I had lived in Rome in university for three months and traveled quite a bit throughout Italy, but it was moments like these that always put me in awe. Italian gastronomy is so vast :: vasto. There is so much variety and diversity, it’s an endless flavor discovery.
I devoured the square and asked for another. I was eating my vegetables after all, wasn’t I? Well, come to find out this little seemingly vegetarian slice of goodness is most often loaded with lard, and often times pancetta, an Italian style of bacon. My dad would love it…for those on the other hand who want a healthier option, you can easily substitute with extra virgin olive oil and still get all the great taste :: sapore. Problem solved.
If you want to try an easy, but authentic, Italian breakfast or appetizer, make this erbazzone recipe!
Cuisine: Italian
Serves: 8-10
Ingredients
For the dough:
3 cups (400g) all-purpose flour
2 teaspoons (10g) salt
3 tablespoons (35g) extra virgin olive oil
1 cup (210g) lukewarm water
For the filling:
1 lb 10 ounces (800g) Swiss chard
1 lb 2 ounces (500g) spinach
1 bunch spring onions with stems (100g), finely chopped
1 tablespoon extra virgin olive oil
1 clove garlic, finely chopped
3.6 oz (100g) grated Parmigiano Reggiano (Parmesan)
1 handful of Italian flat-leafed parsley, finely chopped
Salt and pepper
Instructions
In a large bowl, add the flour and salt. Stir. Add the extra virgin olive oil and water and begin mixing with your hands. Add more water, a spoonful at a time, if needed until the mixture becomes homogenous and comes together in a ball. If you press the dough with your finger it should leave an imprint that soon disappears; if it sticks to your finger, add a bit more flour. Wrap the dough in plastic wrap and store in the refrigerator for ½ hour.
In the meantime, bring a large pot of water to boil and generously salt the water. Add the Swiss chard stems, cook for a few minute then add the leaves and cook for another minute or two until soft. Scoop the Swiss chard out and drain well. Cook the spinach until wilted. Drain thoroughly and press out the extra water with a wooden spoon against the holes of the strainer.
In a large skillet, add the extra virgin olive oil and cook the garlic for one minute over medium heat. Add the spring onions and cook until soft. Add the spinach and chard and cook until the water from the vegetables has evaporated. Remove from heat and transfer the vegetables into a bowl.
Preheat the oven to 400°F (204°C) (static mode). Line a 20 inch (52cm or larger) rectangular pan with parchment paper. Divide the dough in two and roll the sheets out thinly so they are the size of the pan. Roll the dough onto the rolling pin and carefully lay it in the pan.
When the vegetables have cooled, add the Parmigiano Reggiano, parsley, salt and pepper; mix well. Put the filling on top of the dough and spread it out evening, leaving a little bit of an edge. Put the second layer of dough on top and crimp the edges. Prick the top layer all over with a fork, making sure to go all the way down; otherwise, the dough will puff up when baked. Brush with extra virgin olive oil.
Cook for 30 minutes; let cool then cut into squares. Eat warm or cold for breakfast, lunch or as a snack or an appetizer.
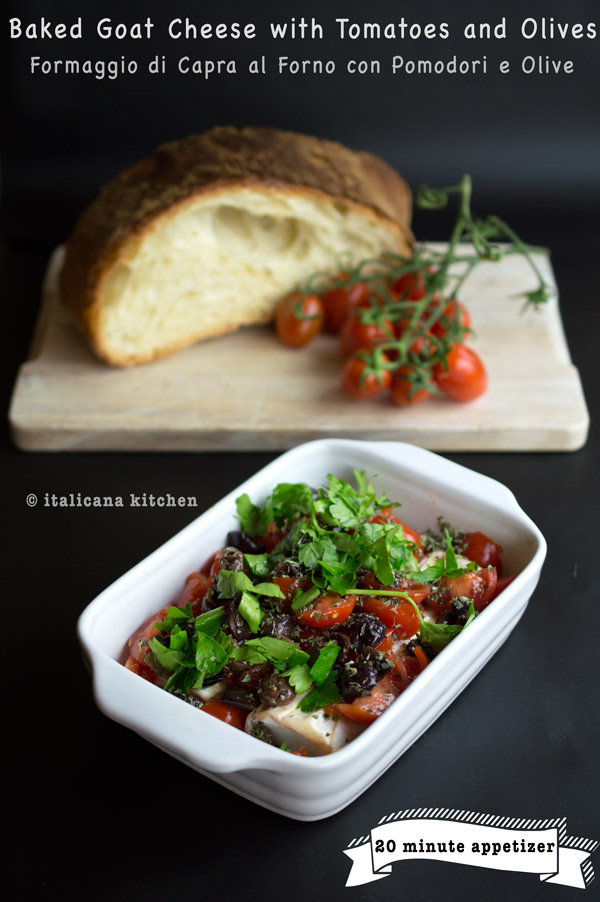
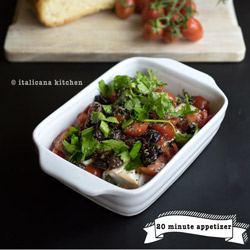
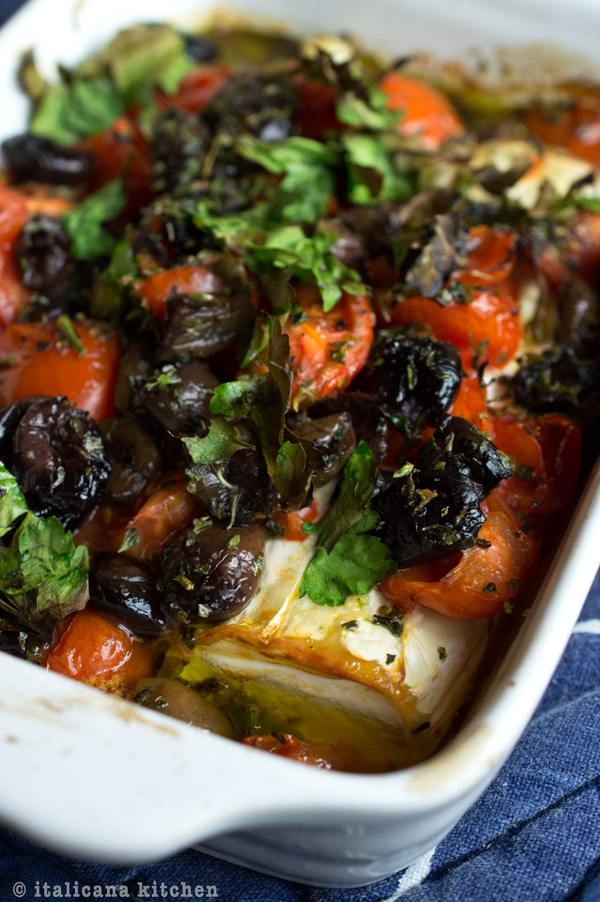
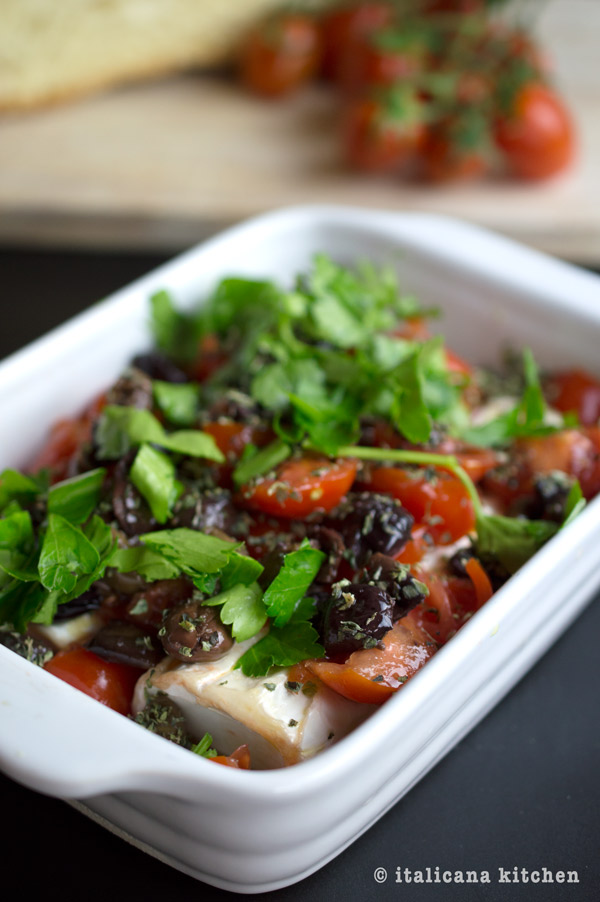
This baked goat cheese with tomato and olives is ridiculously easy to prepare, looks fancy and is absolutely delicious. This is the perfect appetizer for when unexpected guests stop by or when you don’t have a lot of time (or desire) to cook an elaborate appetizer, but want to avoid using processed foods.
When I said that this baked goat cheese was easy to prepare, I wasn’t joking. All you need is 5 minutes to throw the ingredients in a baking dish then let the oven work away for 15 minutes. The result is creamy goat cheese that you can slather onto toasted artisanal Italian bread topped with mouthwatering roasted tomatoes and flavorful taggiasche olives.
For those of you interested in learning a few cooking words in Italian so you can read the menu on your next trip to Italy, here is a quick recap of the words seen in the video:
goat cheese :: formaggio di capra
tomatoes :: pomodori
parsley :: prezzemolo
olives :: olive
oregano :: origano
sea salt :: sale marino
black pepper :: pepe nero
extra virgin olive oil :: olio extra vergine di oliva
This baked goat cheese with tomato and olives is easy to prepare and the perfect appetizer for when unexpected guests stop by or when you don’t have a lot of time (or desire) to cook a elaborate appetizer, but want to avoid using processed foods.
Serves: 4
Ingredients
1 goat cheese log (6 ounces/180g)
10 grape or datterini tomatoes, quartered
2 tablespoons parsley, finely chopped
¼ cup Taggiasche olives (or kalamata olives)
2 pinches of dried oregano
1 pinch of sea salt
A few cracks of black pepper
A good drizzle of extra virgin olive oil
Fresh artisanal Italian bread
Instructions
Preheat the oven to 400°F (200°C).
Cut the goat cheese in half and place it in a small baking dish. Top with tomatoes, parsley, olives, oregano, salt and pepper. Bake for 15 minutes.
In the meantime slice the bread and toast in the toaster or stick in the oven for a 1-2 minutes, flip the slices and bake for another minute or two.
Serve the baked goat cheese with the toasted bread. Buon appetito!
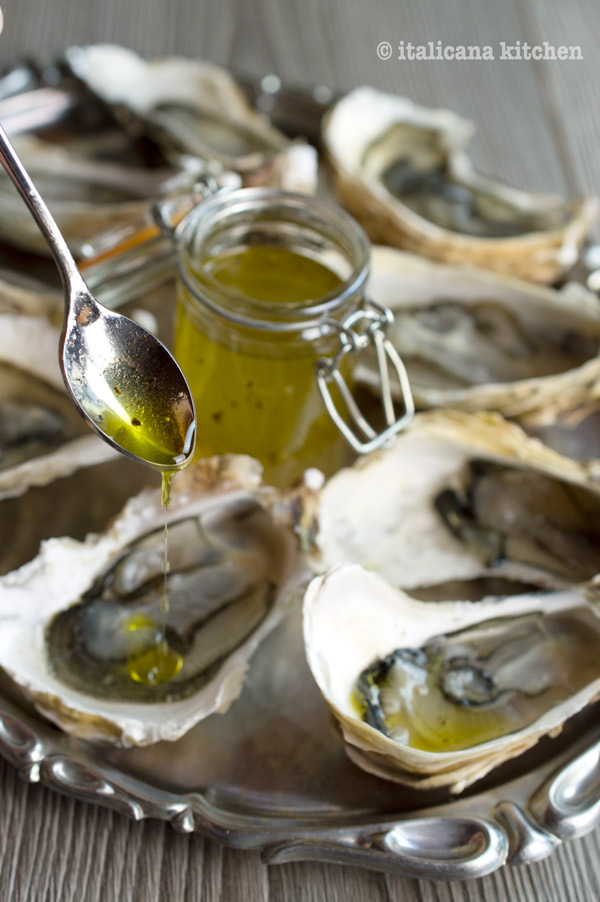
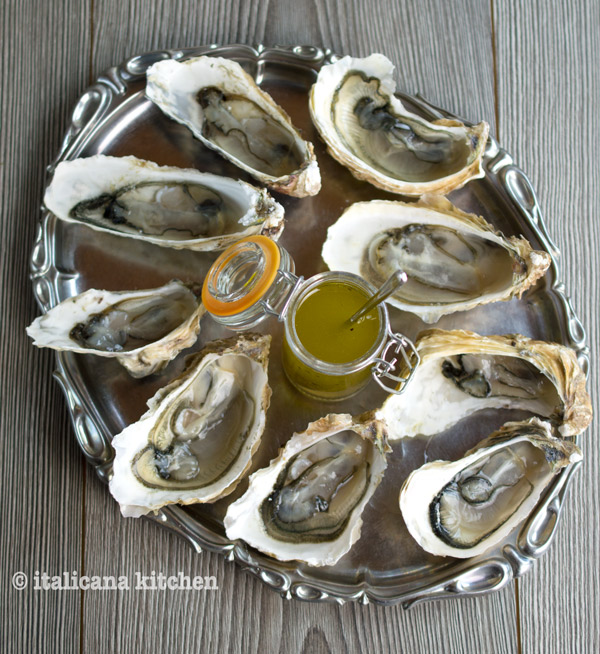
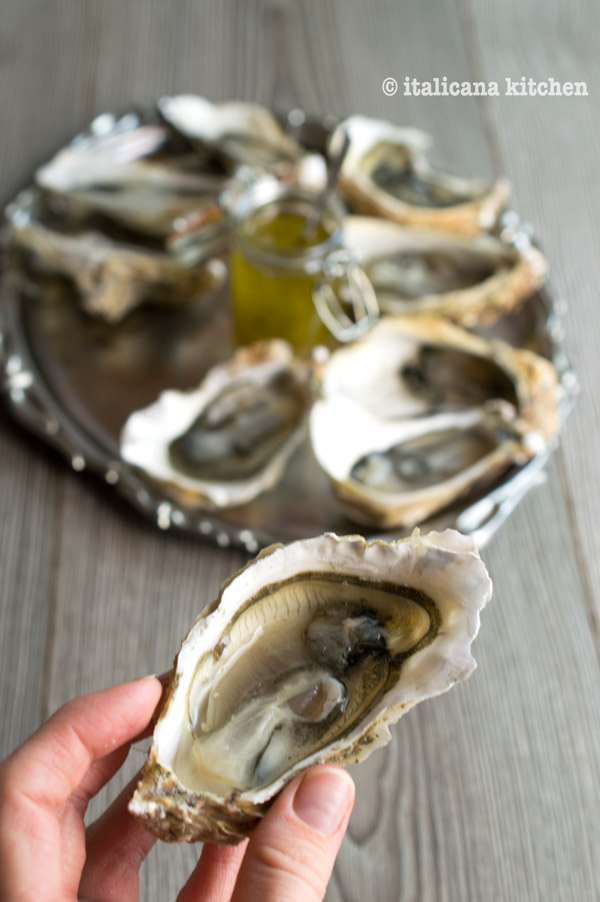
Living in Seattle, Washington, I had the advantage of finding delicious fresh raw oysters at Pikes Place Market or in the various seafood restaurants. I always ate them plain or with a squeeze of fresh lemon :: limone fresco. This time, I wanted to give them an Italian twist by serving them with a fresh vinaigrette made from good extra virgin olive oil from Liguria, a little fresh lemon I picked up in Lake Garda in the region of Trentino Alto-Adige, salt from Cervia near the Adriatic sea and black pepper.
Using this vinaigrette on seafood and vegetables is quite common in Italy. There is an appetizer called pinzimonio that is simply raw vegetables (usually fennel, carrots, radicchio, tomatoes and celery) served with the vinaigrette. In Sardinia, a common recipe is Crostacei alla Catalana :: Catalonia Crustaceans. (In the past, Sardinia was dominated by Catalonia.) It is a mix of shrimp, prawns, lobster and crab that are boiled then served with the vinaigrette and often times, pinzimonio. It is usually eaten as an appetizer or main course.
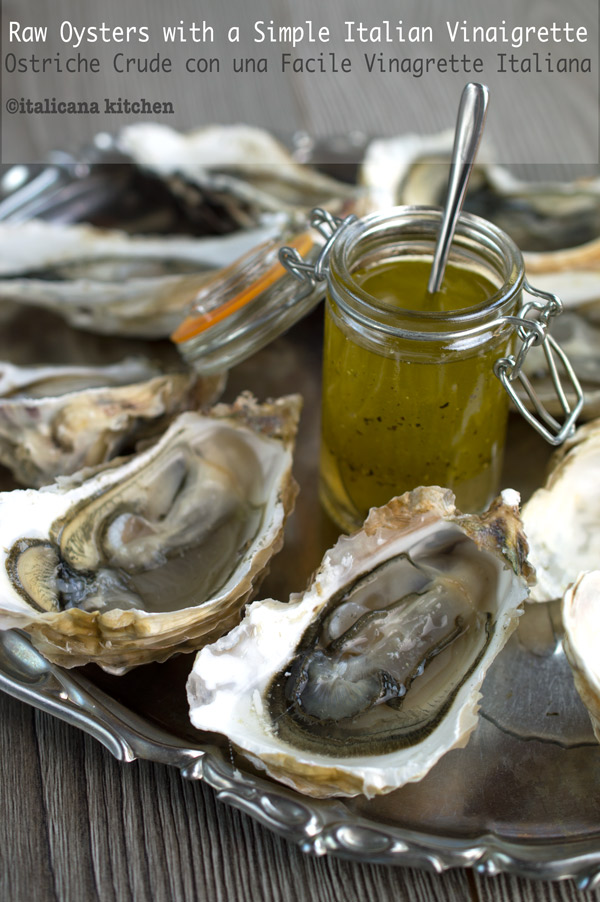
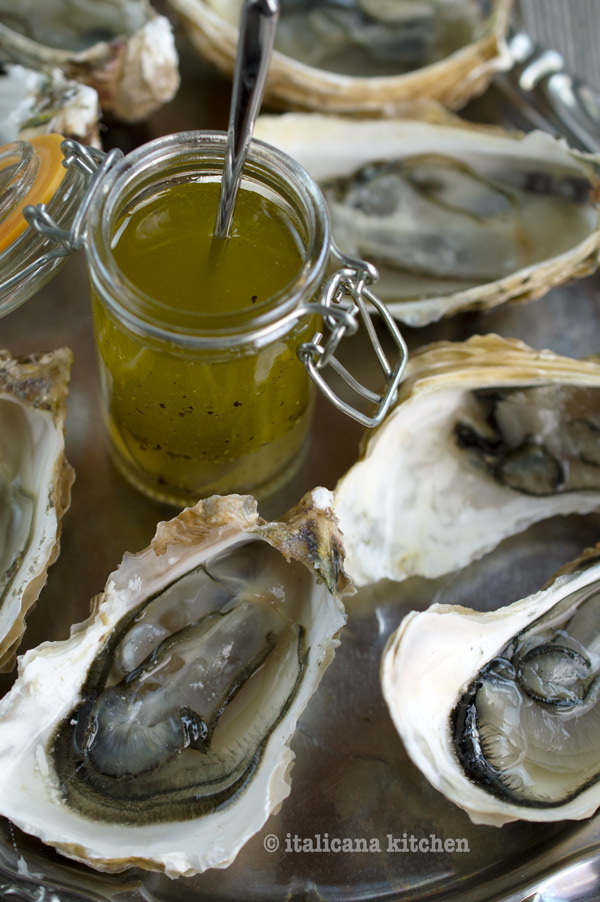
This simple Italian vinaigrette is a perfect alternative sauce for raw oysters :: ostriche crude. It is fresh with a subtle zing, a smooth finish and doesn’t cover the ocean taste of the raw oysters.
This simple Italian vinaigrette is a perfect alternative sauce for raw oysters.
Serves: 2
Ingredients
¼ cup extra virgin olive oil
1-2 pinches unrefined salt
1-2 cracks of freshly ground black pepper
1-2 squeezes of lemon
9 fresh oysters, cleaned and opened
Instructions
In a small bowl, mix together the extra virgin olive oil, unrefined salt, black pepper and lemon. Taste and adjust seasonings as needed. Serve alongside the oysters.
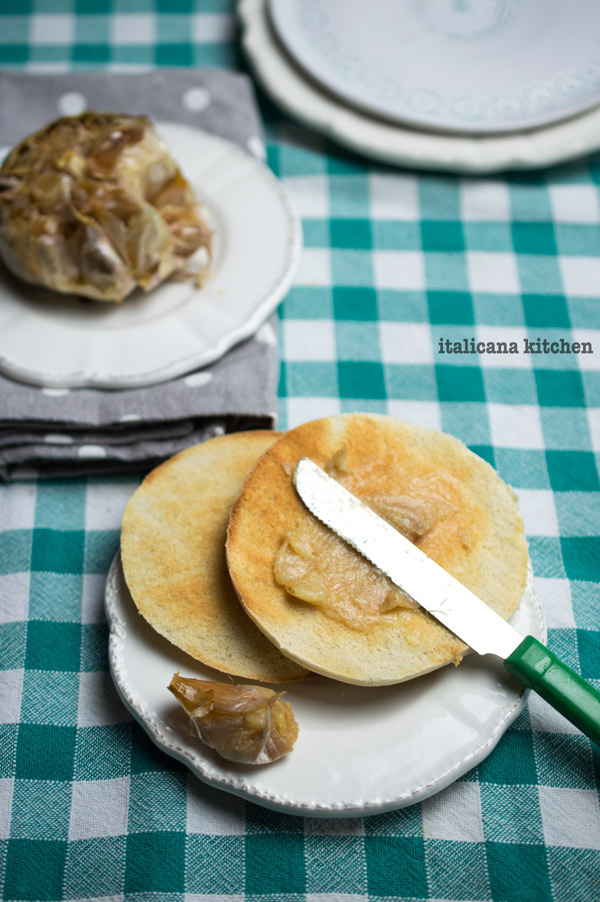
Whenever Mr. Italicano makes himself bruschetta he rubs the toasted bread with a garlic clove :: spicchio di aglio before adding a drizzle of extra virgin olive oil. He then eats it plain, sprinkled with a bit of sea salt or a few chopped tomatoes, olives or marinated artichokes. Although the toppings may change, one thing that always remains the same is the garlic—it’s a must.
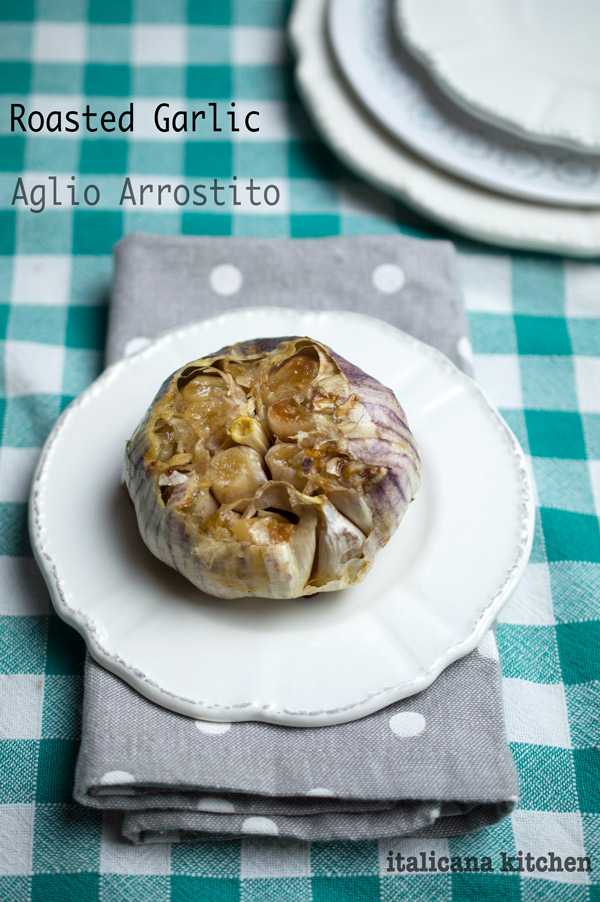
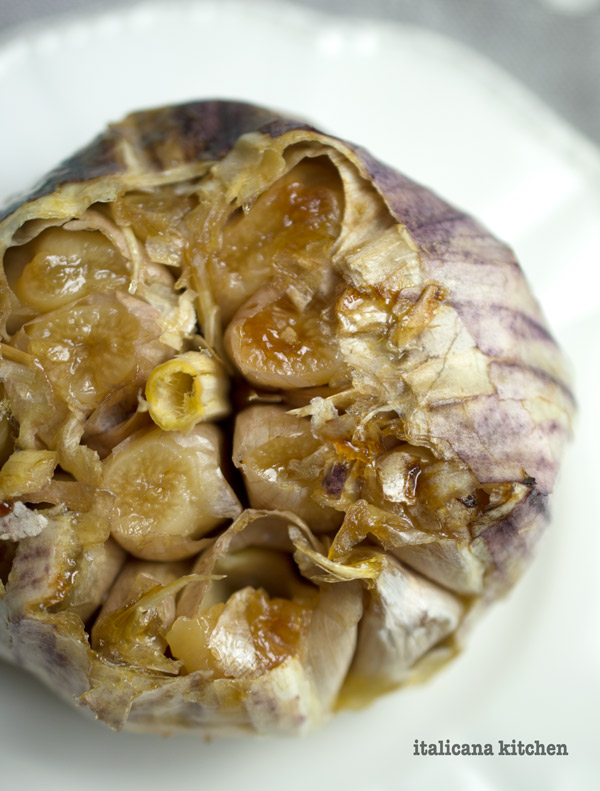
You would think that Italians, who are extreme garlic lovers, would be fully aware that by roasting the garlic first means that you don’t just have to rub :: strofinare the garlic on the bread to give it some aroma, but you can actually spread the garlic on top because it becomes soft and smooth like freshly churned butter. I thought roasted garlic was common everywhere, but to my surprise, Mr. Italicano had never even heard of roasted garlic, let alone tried it. Let’s just say, he was quite the happy camper to discover it.
Roasted garlic isn’t as potent as fresh garlic; it’s like a creamy, buttery, caramelized, melt-in-your-mouth spread with a hint of garlic that is so addicting you might find yourself eating half a garlic bulb :: testa d’aglio. Which you should actually bring it on! Garlic has a ton of health benefits like fighting the common cold that circulates in this season, just to name one.
My sister-in-law :: cognata Jordan taught me how to roast garlic this way when I was in college in Seattle and would go to her and my brother Cliff’s apartment occasionally on the weekends for a home cooked meal. They both are exceptional cooks and I always looked forward to dinners with them because I felt like I was in some high quality gourmet restaurant. It beat out the Top Ramen or box mac and cheese by a zillion to one.
When I smelled this garlic roasting in the oven :: forno this afternoon, it brought me back to these family memories that were over a decade ago. Oh, the power of smell—how I adore you and your ability to transport me back in time, if only for a sweet and fleeting moment.
What I love about roasting garlic is how quick it is to prepare—less than 1 minute—and how elegant it is to serve, making it a fuss free appetizer you can serve at dinner parties. You can spread it on hot toasted bread, pita chips and crackers or stir it into sauces, pestos and hummus for a richer flavor sensation. It’s also perfect as a quick snack because, once cooked, you can store it in the fridge for up to a week and have it ready to slather on a piece of bread right out of the toaster.
Roasted garlic is the perfect appetizer for the winter holidays; it's easy to make, tastes amazing and it's super healthy.
Serves: 6-8
Ingredients
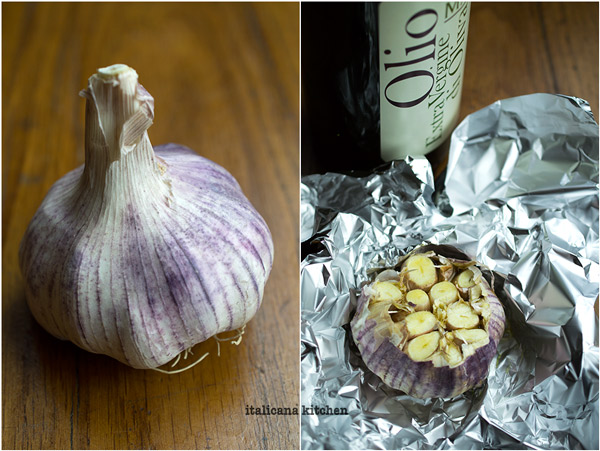
1 garlic bulb
Extra virgin olive oil
Instructions
Preheat the oven to 400°F (200°C).
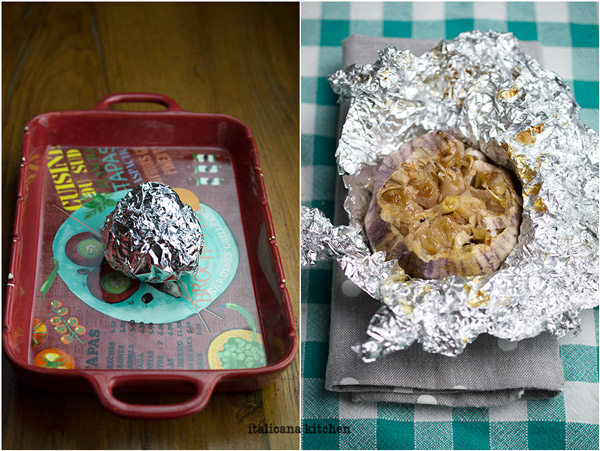
Peel off the outer layers of the garlic bulb then cut off ¼ inch from the top. Drizzle some extra virgin olive oil and rub it onto the cloves with your fingers. Wrap in aluminum foil, place in a casserole dish or on a baking sheet and bake for 40-55 minutes, or until the garlic clove when squeezed out of the clove comes out soft and creamy like freshly churned butter. Spread onto bread, pita chips, crackers or stir it into sauces, pestos and hummus. Store the roasted garlic in an airtight container in the refrigerator.
 You might be wondering what that weird foreign word is in the title. It’s the variety of one of my favorite Italian olives and is pronounced taj-jas-kay. These small greenish-purplish-brownish olives are cultivated on the rocky mountain slopes :: pendenze of the Italian Riviera in Liguria.
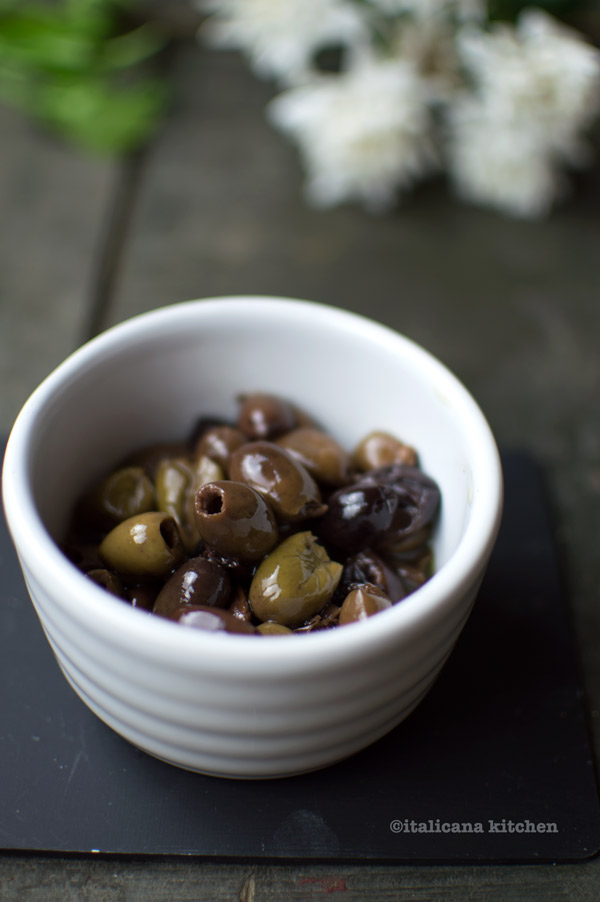 Taggiasche olives have a meaty texture and a slightly tart salty flavor. They are perfect ground up in this pesto or just plopped into various salads or entrees, especially with white fish like rockfish :: lo scorfano.
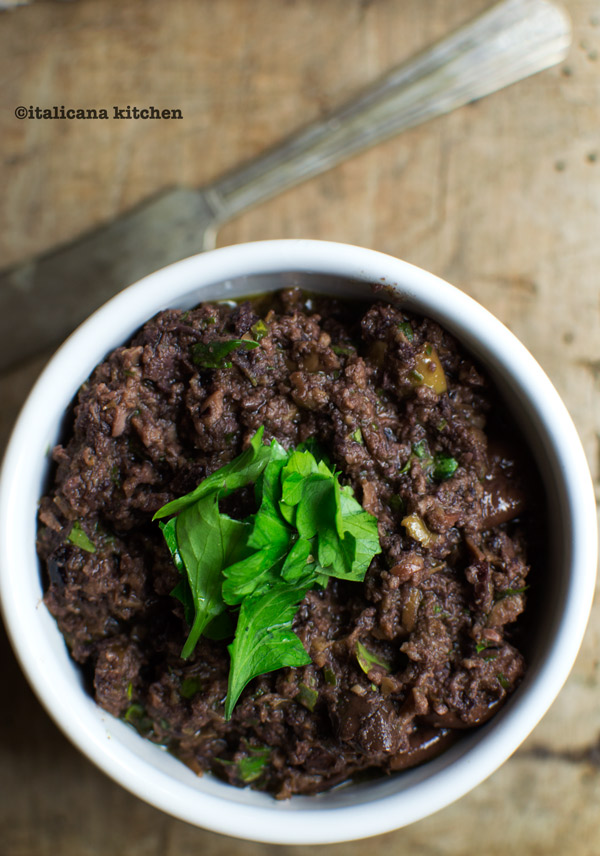 If there is one thing I beg of you, it’s to use a good rustic bread, not the store bought sliced kind. Mr. Italicano and I shot a video this weekend at our favorite bakery :: forno, Forno di Mario, located in Correggio. The video will be coming soon but in the meantime we took home a loaf of miracle bread made with natural yeast and antique grains. This bread was perfect for a light and crunchy bruschetta.
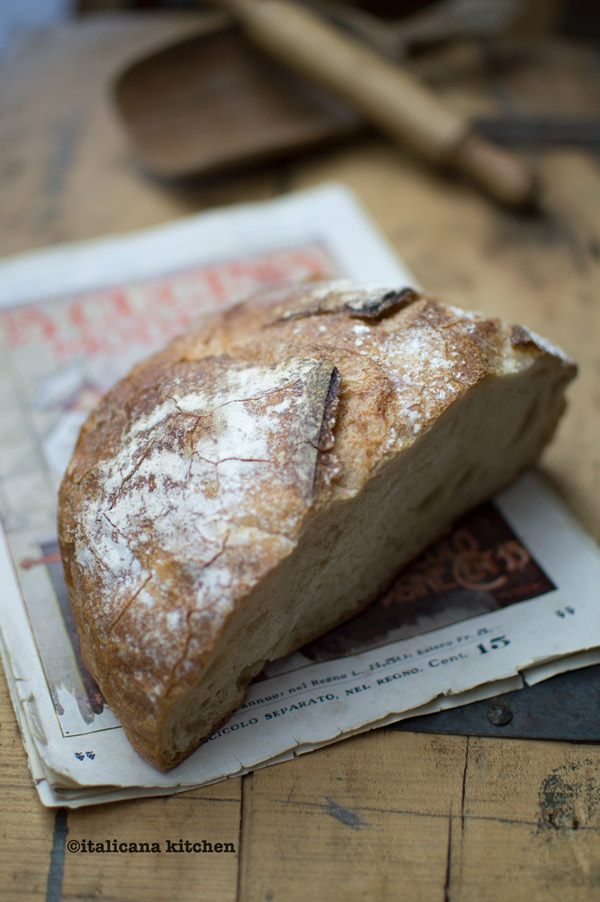
 This appetizer :: antipasto is perfect for last minute guests as you can whip it together in just 5 minutes. It helps to have a jar of good quality taggiasche olives in the cupboard for occasions like this.


